
|
|
|

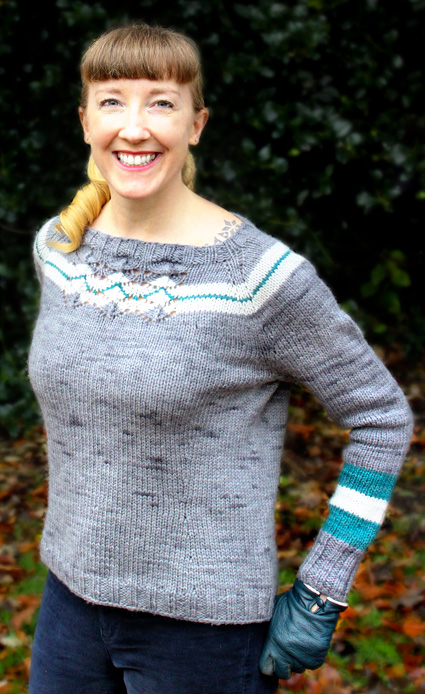
Elkko is the result of a generous gift of yarn coming together with a favorite stitch pattern and too much television viewing. After an embarrassing number of hours watching Nordic crime dramas, I decided I too had to have a thick, woolly sweater with a colorwork yoke to wear during weekend trips to the countryside. The only problem was I didn't really want to make a fair isle yoke in a heavy yarn, as I live in a relatively mild climate. So when I was given a sweater quantity of gorgeous aran-weight BFL, I started swatching up different stitches until I found this combination – stripes with lace – creating both interesting colorwork and a lighter sweater to wear year-round. A top down raglan pullover, Elkko features short rows, compound raglan increases and waist shaping to make this easy-to-wear sweater a great fit.
|
||
|
|
||
|
SIZE |
|
|
FINISHED MEASUREMENTS |
|
MATERIALS Notions |
|
GAUGE |
|
PATTERN NOTES |
|
Raglan Inc Rnd: K1, M1R, [work to 1 st before next raglan marker, M1L, k1, sm, k1, M1R] three times, work to 1 st before last raglan marker, M1L, k1. 8 sts inc'd Sleeve Inc Rnd: Work to first raglan marker, sm, k1, M1R, work to 1 st before next raglan marker, M1L, k1, sm, work to next raglan marker, sm, k1, M1R, work to 1 st before next raglan marker, M1L, k1. 4 sts inc'd. The lace pattern on the yoke begins 4 rnds after the rib trim finishes, while the raglan shaping continues. As the raglan shaping is different for every size, the yoke lace instruction is given first and the shaping follows, but they are worked at the same time.
The stitch markers are used for multiple instructions. Slip stitch markers when you come to them if they aren't specifically mentioned. |
|
DIRECTIONS Yoke Note: Work the increases as described below for 4 rnds, then begin the lace pattern at the front and back while continuing to work the increases as described below. Begin the short rows after the lace pattern is finished. Increases: Sizes XS-3X: All Sizes: Work Lace (beginning after 4th inc rnd): Continue to work through the increases for 4 more rnds in St st. Then begin short rows on the next increase row, working the plain rows on the WS. Continue working the increases as appropriate. XS Size Only: The shaping will finish before the short rows and lace panel are finished. Continue working the short rows and lace without shaping. Short Rows Continue yoke until all the increases are completed.
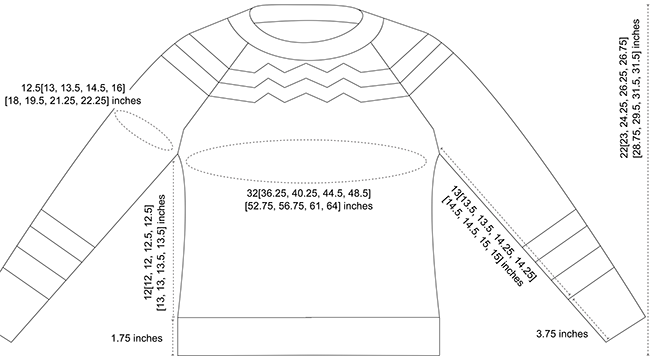
Separate Sleeves from Body: Body Waist shaping Inc rnd: Work to first front lace marker, sm, M1R, work to 2 sts before second front lace marker, M1L, work to back lace marker, sm, M1R, work to 2 sts before second back lace marker, M1L, knit to end of rnd. 4 sts inc'd. Continue to knit in the round until the body is 12[12, 12, 12.5, 12.5, 13, 13, 13.5, 13.5] inches long, measured from underarm to hem, or 1.75 inches shorter than your desired length. Work 10 rnds of k2, p2 rib. BO in pattern. Pick up the first set of sleeve sts, and pick up and k6[6, 8, 8, 10, 10, 12, 12, 14] sts from the body underarm, placing a stitch marker at the centre of these picked up sts. 48[50, 52, 56, 62, 70, 76, 82, 86] sts. Note: After working 44[46, 46, 50, 50, 52, 52, 55, 55] rnds (approximately 8[8.25, 8.25, 9, 9, 9.5, 9.5, 10, 10] inches), work next 10 rnds in CC2, next 8 rnds in CC 1 and last 8 rnds before rib cuff in CC2. All sizes: Sizes excluding XS and 3X: Work until under-sleeve measures 13[13.5, 13.5, 14.25, 14.25, 14.5, 14.5, 15, 15] inches or 3.75 inches shorter than desired sleeve length. Cuff |
 |
|
FINISHING |
| ABOUT THE DESIGNER |
|
Renée Callahan is an expat Seattleite relocated to East London and knitting full-time. After studying fashion design at Central Saint Martins and setting up a knitwear studio, she now spends as much time as possible working on handknit designs. She loves learning new (and old!) techniques and spreading the knitterly love with classes and workshops. |
|
Pattern & images © 2015 Renée Callahan. Contact Renée |