Enveloped, a free knitting pattern from Knitty.com.
INTRODUCTION
Enveloped
 by Amy Gunderson

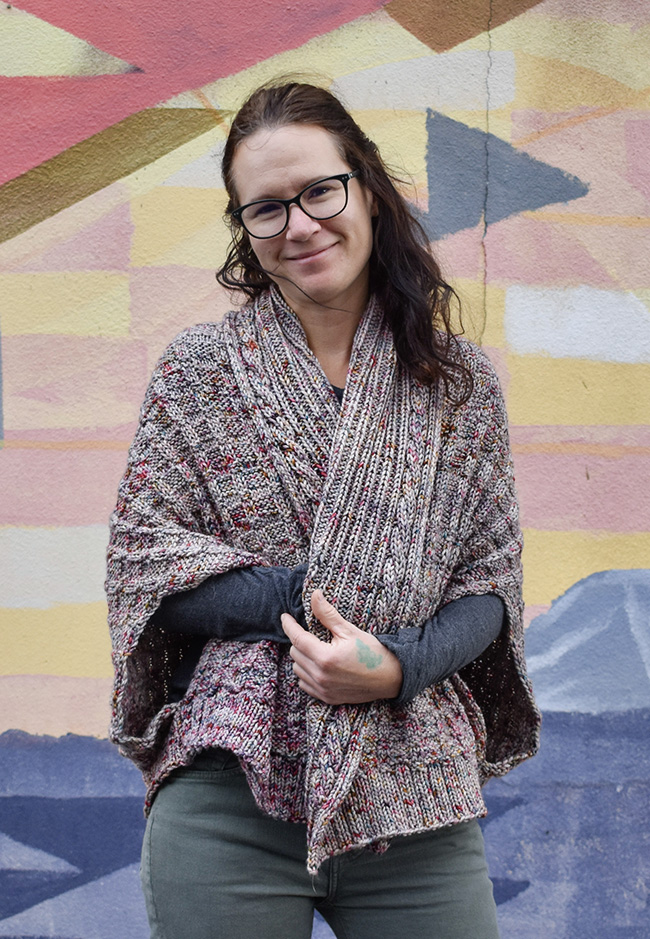
This cocoon-like cardigan is easy to throw on over most anything you might be wearing – pjs included! It's intended to be quite oversized and blanket-like, perfect for snuggling into but also looking like you just stepped off a sweater show runway.
It's knit sideways in one piece, with the lower edging added along the side of the back after the main piece is done. The collar features a reversible cable with ribbing, so it looks great no matter how it's folded. Two small seams finish off this sweater whose construction is simpler than you think.
Most of the photos show the collar worn as intended – up and around the back neck. But turn this baby upside-down if you like for a different look and a longer cardigan (see pic below)!
 model: Amy Gunderson
photos: Alex Henley
SIZE
XS[S, M, L, 1X, 2X, 3X, 4X, 5X]
Shown in size S. Model pictured has a 34”/86.5 cm bust
FINISHED MEASUREMENTS
Back Width: 30[31.25, 32.25, 32.25, 33.5, 34.75, 35.75, 37, 38] inches/ 76.5[79.25, 82.25, 82.25, 85.25, 88, 91, 94, 97] cm
Total circumference: 67.75[69, 70, 73.25, 74.5, 75.75, 80, 81.25, 82.25] inches/ 172[175.5, 178, 186, 189, 192.5, 203, 206.5, 209] cm
MATERIALS
Yarn
![]() Madelinetosh TML Triple Twist [100% superwash merino; 130 yds/119 m per 3.5 oz/100 g skein]; color: Leaf Fall, 8[9, 10, 10, 11, 11, 12, 12, 13] skeins
Madelinetosh TML Triple Twist [100% superwash merino; 130 yds/119 m per 3.5 oz/100 g skein]; color: Leaf Fall, 8[9, 10, 10, 11, 11, 12, 12, 13] skeins
Yarn Characteristics
![]() Triple Twist is a three-ply, aran-weight yarn. It is bouncy, springy, and has wonderful stitch definition. Choose a plied yarn in 100% wool or acrylic (or a blend of the two) that will give some stitch definition, if substituting.
Triple Twist is a three-ply, aran-weight yarn. It is bouncy, springy, and has wonderful stitch definition. Choose a plied yarn in 100% wool or acrylic (or a blend of the two) that will give some stitch definition, if substituting.
Recommended needle size
[always use a needle size that gives you the gauge listed below - every knitter's gauge is unique]
![]() US #10/6mm circular needles, 40 inches/100 cm long
US #10/6mm circular needles, 40 inches/100 cm long
Notions
![]() stitch markers
stitch markers
![]() yarn needle
yarn needle
GAUGE
15 sts/21 rows = 4 inches/10 cm in Texture Patt
PATTERN NOTES
[Knitty's list of standard abbreviations and techniques can be found here.]
Choose a size based on your usual ready-to-wear top size. This garment is intended to be worn very oversized.
K2, P1 Ribbing (multiple of 3 sts + 1, worked flat)
Row 1 [RS]: P1, *k2, p1; rep from * to end.
Row 2 [WS]: K1, *p2, k1; rep from * to end.
Repeat Rows 1-2 for patt.
CHARTS
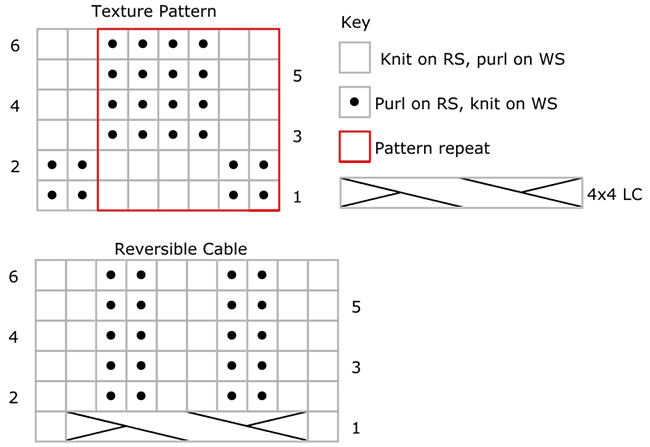
Texture Pattern (Multiple of 6 sts + 2)
Row 1 [RS]: *P2, k4; rep from * to last 2 sts, p2.
Row 2 [WS]: K2, *p4, k2; rep from * to end.
Row 3: *K2, p4; rep from * to last 2 sts, k2.
Row 4: P2, *k4, p2; rep from * to end.
Rows 5-6: Rep Rows 3-4.
Rep Rows 1-6 for patt.
Reversible Cable (Panel of 10 sts)
Row 1 [RS]: K1, 4x4 LC, k1.
Row 2 [WS]: [P2, k2] 2 times, p2.
Row 3: [K2, p2] 2 times, k2.
Row 4: [P2, k2] 2 times, p2.
Rows 5-6: Rep Rows 3-4.
Rep Rows 1-6 for pattern.
4x4 LC: Sl next 4 sts to cn and hold in front, k1, p2, k1 from left needle, k1, p2, k1 from cn.
DIRECTIONS
Right Front Hem
Cast on 71[71, 71, 77, 77, 77, 83, 83, 83] sts.
Work in K2, P1 Ribbing for 3”, ending with a RS row.
Inc row [WS]: Work in K2, P1 Ribbing over 58[58, 58, 64, 64, 64, 70, 70, 70] sts, pm, work in rib over 4 sts, pm, [m1p, p1, m1, k1] 2 times, m1p, p1, pm, work in rib over rem 4 sts. 5 sts inc'd, 76[76, 76, 82, 82, 82, 88, 88, 88] sts
Main Right Front
Note: Read ahead: Texture Pattern and Collar Increases are worked at the same time.
Row 1 [RS]: Work in K2, P1 Ribbing to m, Reversible Cable to m, K2, P1 Ribbing to m, work in Texture Pattern to last 2 sts, k2.
Row 2 [WS]: P2, work in Texture Pattern to m, work in K2, P1 to m, Reversible Cable to m, K2, P1 Ribbing to end.
Cont as est'd through Row 6 of Texture Pattern, then repeat Rows 1-6 of Texture Pattern 8[8, 9, 9, 9, 9, 10, 10, 10] more times.
AT THE SAME TIME, after 3[3, 4, 4, 4, 4, 5, 5, 5] total repeats of Texture Pattern are worked, begin Collar Increases.
Collar Increases
Inc row [RS]: Work in pattern as est'd to 1 st before third m, m1p, work in patt to end. 1 st inc'd.
Note: Maintain inc'd sts in rib patt.
Rep Inc row every RS row 17 more times. 31 Collar sts, 94[94, 94, 100, 100, 100, 106, 106, 106] total sts.
Cast on for Back:
Next row [RS]: Work in patt to end, cast on 36[36, 42, 42, 42, 42, 48, 48, 48] sts. 130[130, 136, 142, 142, 142, 154, 154, 154] total sts.
Next row [WS]: Work Row 2 of Texture Pattern to m, work as est'd to end.
Continue as est'd through Row 6 of patt. Rep Rows 1-6 25[26, 27, 27, 28, 29, 30, 31, 32] more times, then rep Row 1 once more.
Next row [WS]: Bind off 36[36, 42, 42, 42, 42, 48, 48, 48] sts, work in patt to end. 94[94, 94, 100, 100, 100, 106, 106, 106] sts rem.
Collar Decreases
Dec row [RS]: Work in patt to 2 sts before third m, ssk, work in patt to end. 1 st dec'd.
Rep Dec row every RS row 17 more times. 76[76, 76, 82, 82, 82, 88, 88, 88] sts rem.
Work even in patt for 18[18, 24, 24, 24, 24, 30, 30, 30] more rows.
Next row [WS]: Removing markers as you go, work in patt to cable sts, [p2tog, k2tog] 2 times, p2tog, work in patt to end. 71[71, 71, 77, 77, 77, 83, 83, 83] sts rem.
Work in K2, P1 Ribbing for 3 inches/7.5 cm, ending with a WS row.
Bind off all sts.
Back Edging
With RS facing, pick up and knit 114[117, 120, 120, 126, 129, 135, 138, 144] sts at the rate of approximately 7 sts for every 10 rows.
Row 1 [WS]: P1, work in K2, P1 Ribbing to end of row.
Row 2 [RS]: K1, work in K2, P1 Ribbing to end of row.
Cont as est'd until edging measures 3 inches/7.5 cm, ending with WS row.
Bind off all sts.
FINISHING
Weave in ends. Block piece to finished measurement. Sew sides of Back Edging to ribbing at lower edge of Fronts.
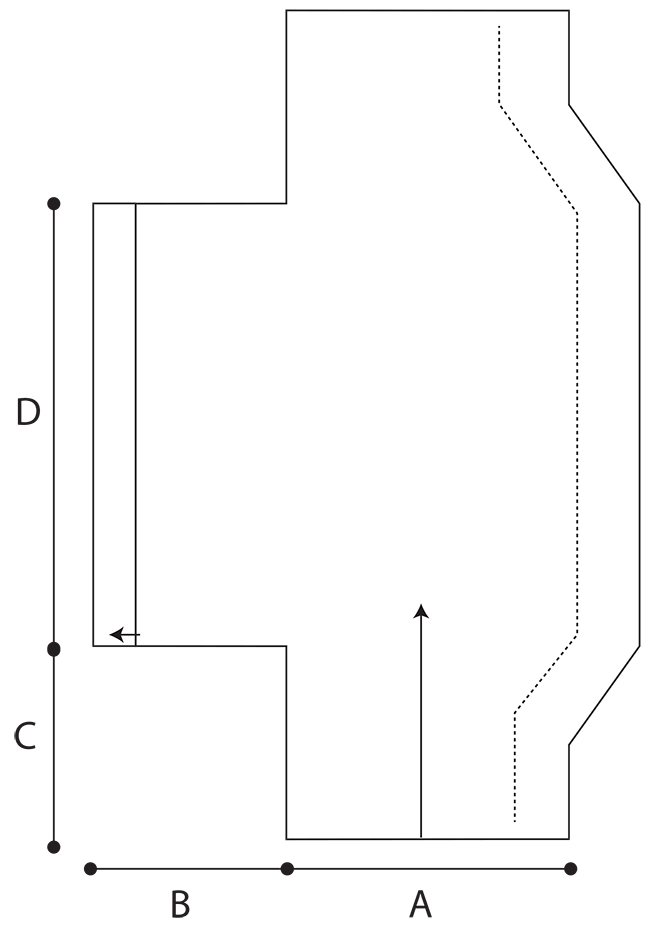
A – Front Width: 19[19, 19, 20.5, 20.5, 20.5, 22.25, 22.25, 22.25] inches/ 48.5[48.5, 48.5, 52, 52, 52, 56.5, 56.5, 56.5] cm
B – Lower Back Length: 12.5[12.5, 14.25, 14.25, 14.25, 14.25, 15.75, 15.75, 15.75] inches/ 32[32, 36, 36, 36, 36, 40, 40, 40] cm
C – Armhole: 13.25[13.25, 14.5, 14.5, 14.5, 14.5, 15.5, 15.5, 15.5] inches/ 33.5[33.5, 37, 37, 37, 37, 39.5, 39.5, 39.5] cm
D – Back Width: 30[31.25, 32.5, 32.5, 33.5, 34.75, 35.75, 37, 38] inches/76.25, 79.5, 82.5, 85, 88.5, 91, 94, 96.5] cm
ABOUT THE DESIGNER
 Amy Gunderson lives in Reno, Nevada, where she works as the yarn director for Jimmy Beans Wool. She also does a variety of knit and crochet freelance design but isn't known for any particular technique because she loves them all. Amy's favorite people are her two dogs, Suzy and Charli, and feels super lucky to be able to take them to work with her.
Find her on Ravelry.
Pattern & images © 2021 Amy Gunderson