B-side, a free knitting pattern from Knitty.com.
INTRODUCTION
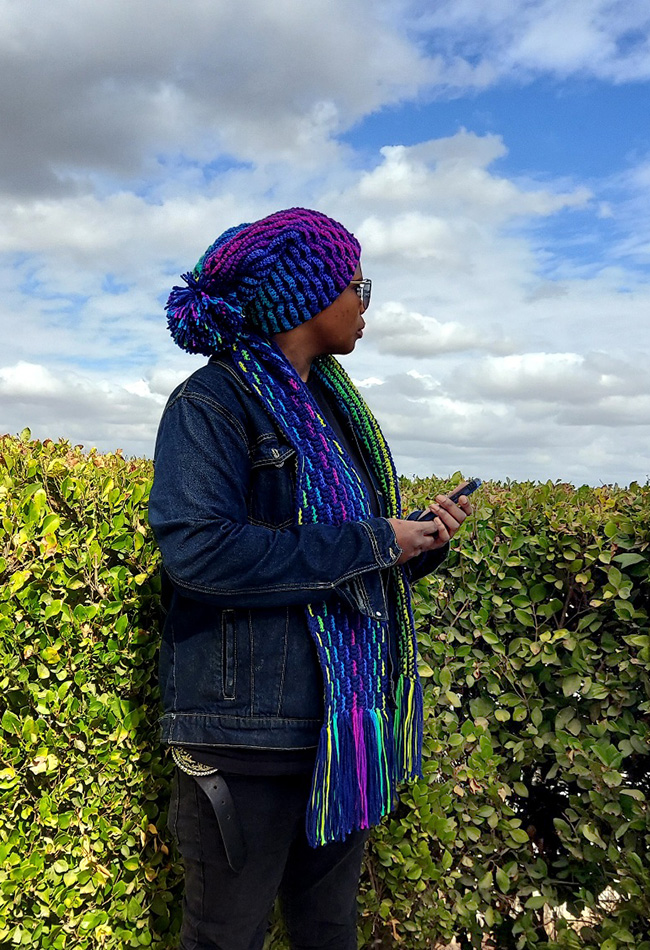
B-side
 by Risë Burgie

I've always been a "B-side" person ever since I was a little girl with a collection of 45 RPM records, Over the years, I came to realize many of the B-sides of those 45s, just like the wrong sides of knit and crochet stitch patterns, weren’t to be overlooked. I was pleasantly surprised to find this to be so when working up the swatch for this complementary Scarf and Hat set. On one side flickering colors of Meteor Showers and the other side soft undulating chromatic waves of Fire Rainbows.
Using an Overlay Mosaic Crochet technique with a simple 6-stitch/4-row repeat, the pieces worked up in no time in this easy-to-memorize pattern; Every other row is worked in Single Crochet Through the Back Loop only. This side-to-side quick-to-crochet combo set is absolutely perfect for gift giving with minimal finishing only two seams in the hat. The anticipation of colors changing as the pattern develops makes for hard to put down projects.
 model: Ashley Burgie
photos: Risë Burgie
SIZE
Scarf: One
Hat: S[M, L]
FINISHED MEASUREMENTS
Hat Circumference: 20[22, 24] inches/ 51[56, 61] cm
Hat Length: 12[13, 15] inches/ 31[33, 38] cm
Choose a size with 1-2 inches/2.5-5 cm positive ease for a slouchy-fitting hat; 1-2 inches/2.5-5 cm negative ease for a more snug-fitting hat.
Scarf width: 7.5 inches/19 cm.
Scarf length: 72 inches/183 cm, including fringe
MATERIALS
Yarn
![]() [MC] Red Heart Super Saver Jumbo [100% Acrylic; 744yds/681m per 14oz/396g skein]; Soft Navy, 1 Skein
[MC] Red Heart Super Saver Jumbo [100% Acrylic; 744yds/681m per 14oz/396g skein]; Soft Navy, 1 Skein
![]() [CC] Red Heart Super Saver Jumbo Stripe [100% Acrylic; 482yds/440m]; Parrot Stripe, 1 Skein
[CC] Red Heart Super Saver Jumbo Stripe [100% Acrylic; 482yds/440m]; Parrot Stripe, 1 Skein
Yarn Characteristics
![]() The samples shown use a #4 medium worsted-weight 4-ply 100% acrylic yarn in both solid and long-striping gradient yarns. When worked in this overlaid crochet technique, a multidimensional, textured pattern is created providing extra warmth and a dense, squishy fabric great for cold weather outings. Highly contrasting MC and CC yarns are recommended.
The samples shown use a #4 medium worsted-weight 4-ply 100% acrylic yarn in both solid and long-striping gradient yarns. When worked in this overlaid crochet technique, a multidimensional, textured pattern is created providing extra warmth and a dense, squishy fabric great for cold weather outings. Highly contrasting MC and CC yarns are recommended.
Hat and scarf together use almost all of the CC yardage, and about three quarters of the MC yardage.
Recommended needle size
[always use a needle size that gives you the gauge listed below - every knitter's gauge is unique]
![]() US H-8/5mm crochet hook
US H-8/5mm crochet hook
Notions
![]() handheld steamer or steam iron
handheld steamer or steam iron
![]() .08 gauge clear elastic beading cord
.08 gauge clear elastic beading cord
![]() balloons (for blocking)
balloons (for blocking)
![]() large pompom maker or piece of cardboard
large pompom maker or piece of cardboard
![]() yarn needle
yarn needle
GAUGE
Scarf gauge: 12 stitches/14 rows = 4 inches/10cm in pattern stitch
Hat gauge: 14 stitches/13 rows = 4 inches/10cm in pattern stitch
Both gauges are taken after steam blocking: hat is steamed gently to shape, but not stretched. Scarf was pinned out and stretched lengthways.
PATTERN NOTES
[Knitty's list of standard abbreviations and techniques can be found here.]
Hat and scarf use an Overlay Mosaic crochet technique creating a beautifully textured and multidimensional fabric working with only one color per row. All rows are worked from right to left. If desired, you may cut short lengths of color in the Parrot Stripe colorway to align colors at beginning of the rows in the hat and save them for fringe or pompom.
Crochet Abbreviations
BLSc: single crochet through the back loop only
Ch: chain
EOR: end of row
ES: edge st
FLDc: double crochet through front loop only into same color Sc stitch two rows below.
Sc: single crochet
StSc – Standing single crochet stitch: Place a slip knot on empty hook, and insert hook through the center (splitting the "v" just beneath the two loops when making the standard single crochet) of the first stitch in the previous row, wrap yarn around hook, pull through st; 2-loops remain. Wrap yarn around hook and pull through both loops on hook. The stsc is slightly wider than the sc and will need to be adjusted by pulling the loop up before ending the stitch. It should be the same height as all of the rest of the stiches across the row to maintain gauge at edges of work. At the ends of the rows, you’ll use this same method to work into the final stitch, using the current loop on the hook.
Pattern Stitch
Pattern is a multiple of 6 stitches plus 5, worked over 4 rows.
Each row is worked from the same side, alternating yarns. At the end of every row, fasten off after working the last stitch. To start the next, do not turn, return to the beginning, join the next color using the StSc as instructed.
When making the scarf, leave an 8-9 inch/20-24 cm tail when joining and cutting the yarn.
When making the hat, leave a 3-4 inch/8-10 cm tail when joining and cutting the yarn, and crochet over the ends to lessen the finishing required. Make certain to work the crocheted overstitches a bit tighter to maintain gauge and prevent flaring out on either side of work.
DIRECTIONS - Scarf
With MC, make a Foundation Ch of 174 sts, turn work.
Set-up Row 1: [MC] Sc in 2nd Ch from hook and into each ch across row. 173 sts. Cut yarn, leaving an 8-9 inch/20-23 cm tail. Do not turn.
Set-up Row 2: [CC] StCh in first stitch, Blsc into each st across row until 1-st remains, work sc through center of last st on previous row as for StCh st. Fasten off, cut yarn as before; do not turn.
Row 1: [MC] Stsc, [Blsc in next 3 sts, Fldc in next 3 sts] to last 4 sts, work 3-blsc,
work 1 sc through center of last st on previous row as for StCh. Fasten off, cut yarn as before; do not turn.
Row 2: [CC] Stsc, Blsc across row to last st, work 1 sc through center of last st on previous row as for StCh. Fasten off, cut yarn as before; do not turn.
Row 3: [MC] Stsc, [Fldc in next 3 sts, Blsc in next 3 sts] to last 4 sts, work 3 Fldc,
work 1 sc through center of last st on previous row as for StCh. Fasten off, cut yarn as before; do not turn.
Row 4: Work as for Row 2.
Repeat Rows 1-4 for pattern until scarf measures approximately 7 inches/18 cm, and work Rows 1-2 once more. Fasten off, cut yarn as before.
FINISHING
Lightly steam block swatch first to test. Let dry. Pin short ends of scarf to 62 inches/155cm across with Striped B-side facing to help eliminate the natural curl on sides and ends of scarf. If using steam iron, do not allow the iron to touch the piece. Only use steam of the iron or handheld steamer held approximately 2-3 inches/5-8 cm above the work while steaming. Tap the edges gently while still damp if curl is present.
Sample has additional fringe. For each row-end tail, cut 3 additional lengths of the same yarn; each should be 18-19 inches/45-48 cm long. Then attach the additional strands to the scarf edge, alongside the existing tail, with a crochet hook: Fold the three lengths in half, put the crochet hook through the edge of the scarf, grab the folded end of the strands, and pull through the edge of the scarf; then grab the long ends of the strands and pull them through that loop. Snug them up tightly to secure the knots. Trim.
DIRECTIONS - Hat
With MC, make a Foundation Ch of 42[48, 54] sts, turn work.
Set-up Row 1: [MC] Sc in 2nd Ch from hook and into each ch across row. 41[47, 53] sts. Cut yarn, leaving a 3-4 inch/8-10 cm tail. Do not turn.
Set-up Row 2: [CC] StCh in first stitch, Blsc into each st across row until 1 st remains, work sc through center of last st on previous row as for StCh st. Fasten off, cut yarn as before; do not turn.
Work Rows 1-4 as for scarf, leaving a 3-4 inch/8-10 cm tail at row start and end, until hat measures 20[22, 24] inches/ 51[56, 61] cm, ending with Row 2 of pattern.
FINISHING
Cut an 18 inch/45 cm piece of yarn, and split the plies, to reduce the bulk of the seam, and seam the short edges.
Thread 18-inch piece of yarn though tapestry needle, lay work flat and gather stitches on one end by using a running stitch between the edge sts and the last pattern st of each row about every few stitches from side to side. Pull to cinch and weave in ends.
Steam block as for scarf; place hat over balloon blown to desired hat size. When dry, cut ends of yarn. Thread clear elastic into tapestry needle and weave through bottom edge of hat using a running stitch through every few Stsc sts. Adjust for comfort, and then knot several times using double overhand or square knots. Cut thread, leaving 4-5 inch/10-12 cm tails and weave them through the edge.
Make and attach pompom to top of hat.
ABOUT THE DESIGNER
 Risë Burgie is a maker, designer, fiber and textile artist, and bead weaver. Her designs have appeared in PLY, Spin-Off, and Knit N Style Magazines, and Vogue Knitting the Ultimate Sock Book: History*Technique*Design. She has worked at LYSs and had her work juried in county and state fairs as well as major fiber related events over the past 30+ years.
Risë currently resides in California's Central Valley where she enjoys her much less non-Jr. Corporate lifestyle of yesteryear and instead plays the flute, sings, and tends her indoor scrap garden. Find her on Ravelry.
Pattern & images © 2022 Risë Burgie