Hyggelig, a free knitting pattern from Knitty.com.
INTRODUCTION
Hyggelig
 by Hannah Maltby

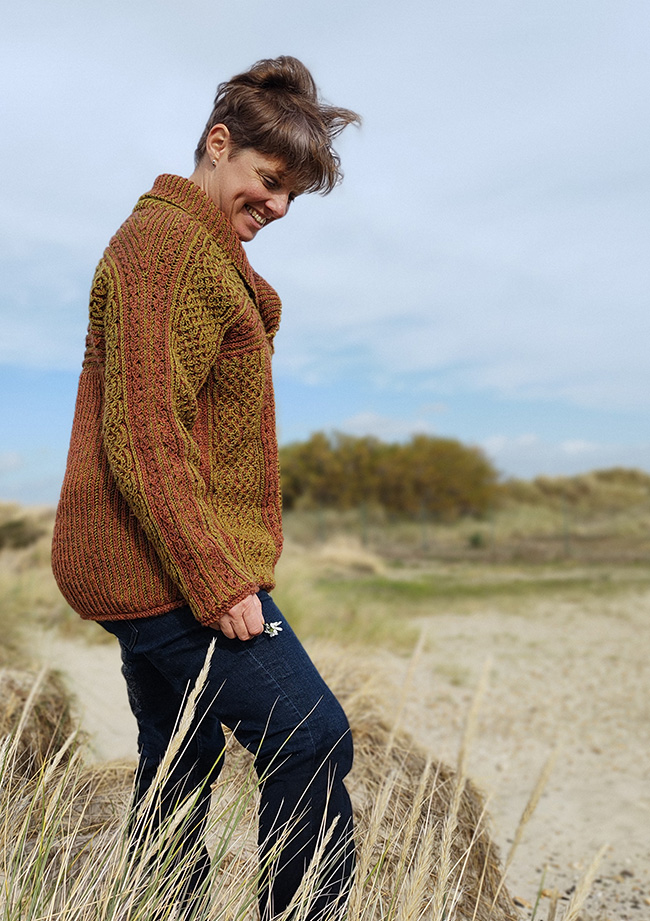
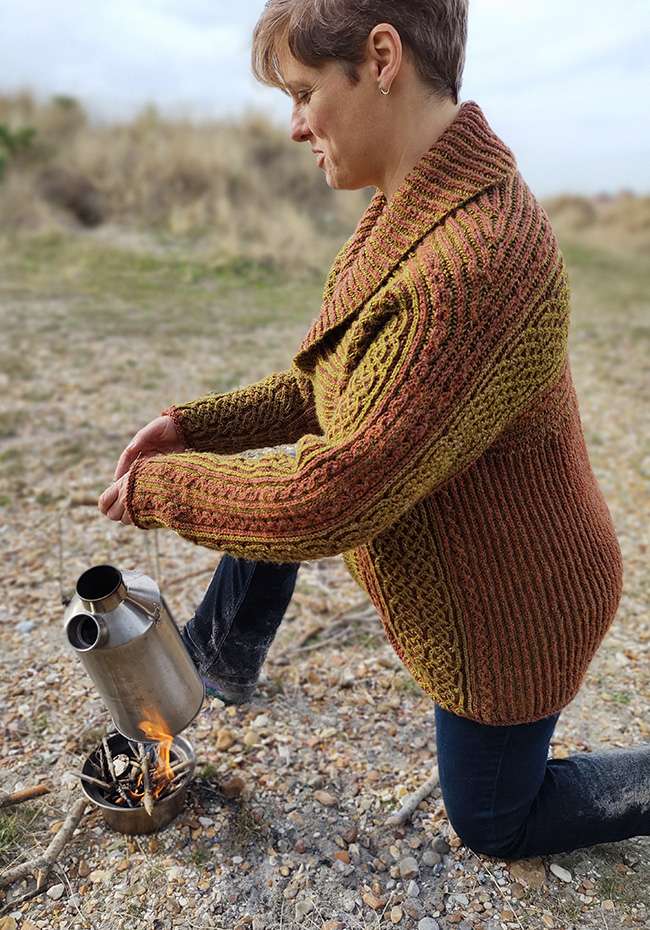
Last winter, I spent a lot of time wearing a sweater that I had handknit – supposedly – for my husband. There was something really comforting about a slightly over-sized and marvellously warm sweater. So this year, I decided to make one just for me. I knew I wanted it warm and squishy for the ultimate in winter self-care, and really, there was only one choice. For me, brioche knitting hits all of the above and repays the investment of time needed to work it in full. It truly is hyggelig – meaning cozy, comfortable, snug. I love the look of brioche cables, and I have much, much, respect for those crafters who have the patience to work them, but I quickly discovered that the technique was not for me. The good news is that there is always more than one way to approach knitting, and a similar effect can be made with careful use of increasing and decreasing.
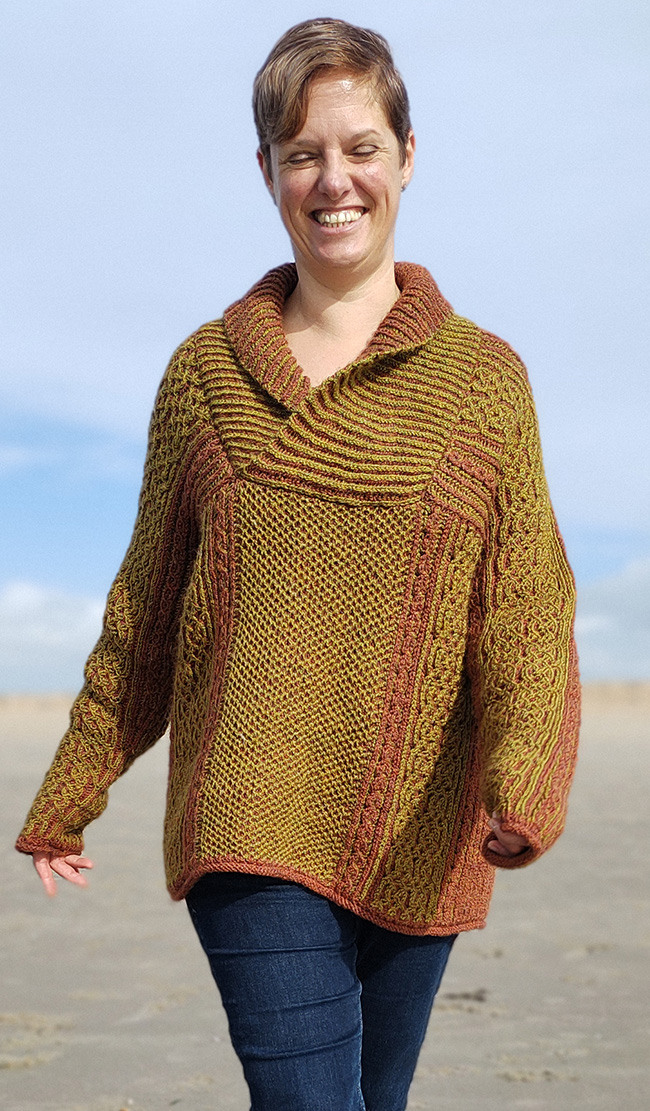
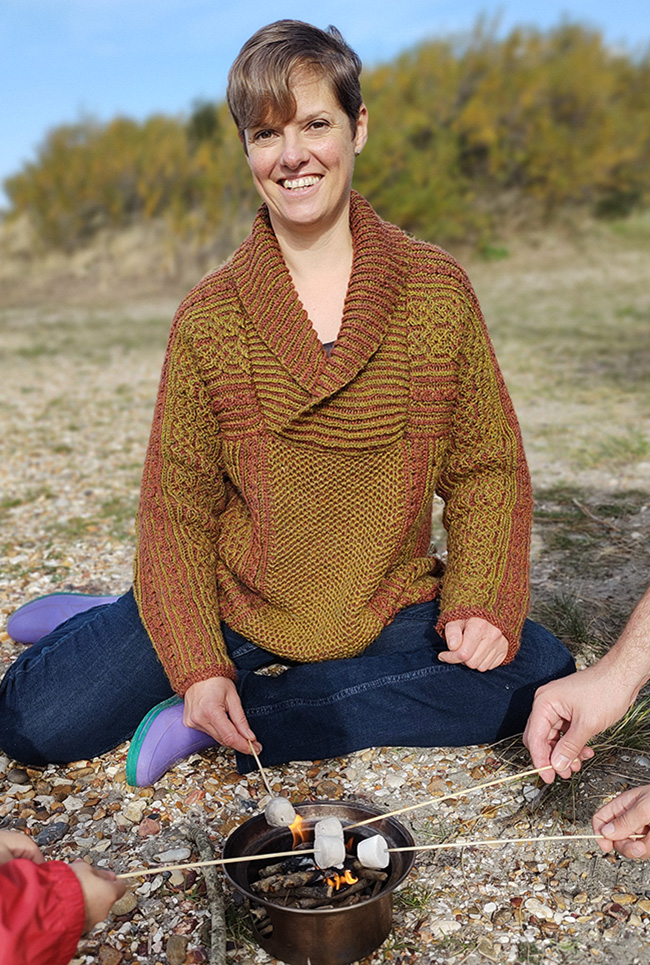
This jumper is a celebration of all things brioche, featuring two color brioche, syncopated brioche, brioche mock cables and brioche honeycomb stitch. This sweater uses an 8-row pattern to capture the essence of intricate celtic knots. The knotwork pattern really pops as the main part of the jumper is worked with the dark color prominent – that's the syncopated part. The mock cables are created with brioche star stitches, a stitch that combines an increase with either a left or right decrease, giving the impression of crossing cables. The left version of the star stitch is easier to work than the right, so you could simplify the pattern by only using the left star stitch. The end result would be very similar.
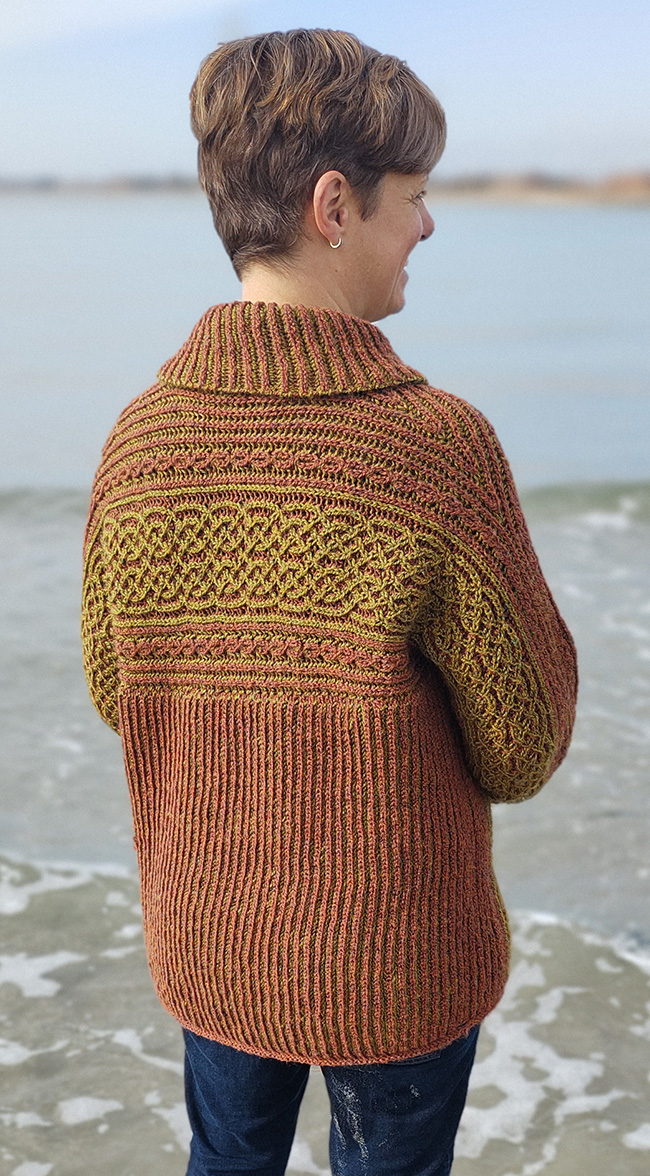
The sweater pattern grew from the idea of having an unbroken celtic knot winding its way from cuff to cuff, across the yoke at the back of the sweater. In order to achieve this, the sweater is knit from cuff to cuff. The first sleeve is worked in the round to the shoulder, before splitting and working flat for the body. The neck is shaped by binding off and then casting on stitches before the work is rejoined in the round for the second sleeve. Stitches for the body are picked up and the body is also worked in the round, with a brioche honeycomb panel down the front. Finally, the collar is worked flat and seamed onto the sweater. This construction means that the brioche is worked both in the round and flat. Each brioche row is worked with two passes, once in the light color, then a second pass in the dark color. To work this flat, you will need to work with a circular or double-pointed needles.
 model: Rebecca Sowden
photos: Hannah Maltby
SIZE
Women's XS[S, M, L, 1X, 2X, 3X, 4X, 5X]
shown in size M with 6 inches/15 cm of positive ease
FINISHED MEASUREMENTS
Chest circumference at underarm: 35.5[39.5, 43.5, 47.25, 51.25, 55, 59, 63, 67] inches/ 90[100, 110, 120, 130, 140, 150, 160, 170] cm
Length: 23.25[23.5, 24, 24.5, 24.75, 25.5, 26, 26.5, 26.75] inches / 59[60, 61, 62, 63, 65, 66, 67, 68] cm
MATERIALS
Yarn
Stylecraft Highland Heathers DK [100% acrylic; 297 yd/272 m per 100g skein];
![]() [L - light] Gorse; 3[3, 4, 4, 4, 5, 5, 5, 6] skeins
[L - light] Gorse; 3[3, 4, 4, 4, 5, 5, 5, 6] skeins
![]() [D - dark] Marmalade; 3[4, 4, 4, 5, 5, 5, 6, 6] skeins
[D - dark] Marmalade; 3[4, 4, 4, 5, 5, 5, 6, 6] skeins
Yarn Characteristics
![]() The sample shown uses a DK-weight 2-ply acrylic yarn. The yarn is spun to have a heathered color and rustic feel.
The sample shown uses a DK-weight 2-ply acrylic yarn. The yarn is spun to have a heathered color and rustic feel.
Recommended needle size
[always use a needle size that gives you the gauge listed below - every knitter's gauge is unique]
![]() US #6/4mm circular needle, 24-inch / 60cm or longer, for body
US #6/4mm circular needle, 24-inch / 60cm or longer, for body
![]() US #6/4mm circular needle, 16-inch / 40cm for working flat (optional, but it does make it easier)
US #6/4mm circular needle, 16-inch / 40cm for working flat (optional, but it does make it easier)
![]() US #6/4mm in your preferred needle(s) for working a small circumference in the round
US #6/4mm in your preferred needle(s) for working a small circumference in the round
Notions
![]() 5 stitch markers
5 stitch markers
![]() scrap yarn (optional)
scrap yarn (optional)
![]() yarn needle
yarn needle
GAUGE
20 sts/20 rounds = 4 inches/10 cm in brioche stitch
Note: gauge is always taken after blocking.
PATTERN NOTES
[Knitty's list of standard abbreviations and techniques can be found here.]
Brioche stitch: this refers to a stitch with its yarn over wrap. Always work these together unless otherwise stated.
brk: Brioche knit. Knit the stitch that was slipped in the previous row together with its yarn over.
brp: Brioche purl. Purl the stitch that was slipped in the previous row together with its yarn over.
sl1yo: Slip 1 yarn over. Bring yarn to the front, slip the next stitch purlwise, then bring the yarn to the back over the needle and the slipped stitch. The slipped stitch and yarn over are counted as 1 brioche stitch.
brk2tog: Brioche right leaning decrease. Slip the brioche stitch knitwise to RH needle, k1, pass the slipped brioche stitch over, transfer knitted stitch back to LH needle, pass the next brioche stitch over the knit stitch, transfer knit stitch back to RH needle.
brssk: Brioche left leaning decrease. Slip the brioche stitch knitwise to working needle, knit the next 2 stitches together, pass the slipped brioche stitch over.
brkyobrk: Brioche knit 1 to 3 stitch increase. Work brioche knit, yarn over, brioche knit all into the same stitch.
brpyobrp: Brioche purl 1 to 3 st increase. Work brioche purl, yarn over, brioche purl all into the same stitch
brsL: Brioche star st left. Slip the brioche stitch knitwise to RH needle, knit the next 2 stitches together, yarn over, knit the two stitches together again, pass the slipped brioche stitch over the three new stitches.
brsR: Brioche star stitch right. Slip the brioche stitch knitwise to RH needle, knit 1, yarn over, knit 1, all into next stitch, pass the slipped brioche stitch over these three stitches, transfer the 3 stitches back to LH needle, pass the next brioche stitch over the 3 stitches, transfer 3 stitches back to RH needle.
brhc: Brioche honeycomb stitch. Separate the yarn over wrap from the brioche stitch moving it back up the LH needle, knit the brioche stitch without its yarn over wrap, then slip the yarn over wrap purlwise to the RH needle.
sm: slip marker.
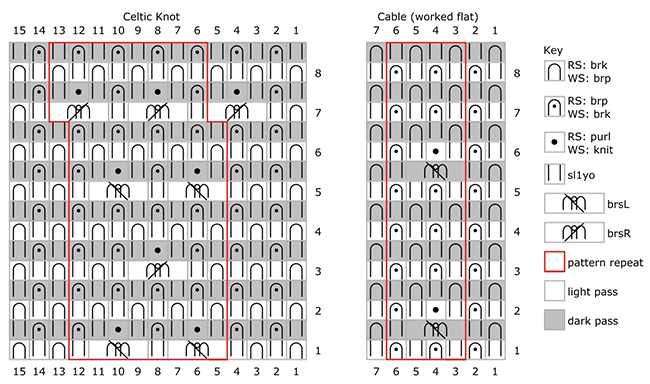
CHARTS
Charts are worked both in the round and flat. When worked flat, each even number is a WS row, and should be read from left to right. Square brackets indicate the repeated sections. The pattern instructions tell you how often to work the repeat.
Cable chart Multiple of 4 sts + 3
In the round
Rnd 1 L: Sl1yo, brp, [(sl1yo, brp) twice], sl1yo.
Rnd 1 D: Brk, sl1yo, [brsL, sl1yo], brk.
Rnd 2 L: Sl1yo, brp, [sl1yo, p1, sl1yo, brp], sl1yo.
Rnd 2 D: Brk, sl1yo, [(brk, sl1yo) twice], brk.
Rnd 3 L: Sl1yo, brp, [(sl1yo, brp) twice], sl1yo.
Rnd 3 D: Brk, sl1yo, [(brk, sl1yo) twice], brk.
Rnd 4 L: Rep Rnd 3.
Rnd 4 D: Rep Rnd 3.
Rnds 5-8: Rep Rnds 1-4.
Worked flat
Row 1 L [RS]: Sl1yo, brp, [(sl1yo, brp) twice], sl1yo.
Row 1 D: Brk, sl1yo, [brsL, sl1yo], brk.
Row 2 L [WS]: Sl1yo, [brk, sl1yo, k1, sl1yo], brk, sl1yo.
Row 2 D: Brp, [(sl1yo, brp) twice], sl1yo, brp.
Row 3 L: Sl1yo, brp, [(sl1yo, brp) twice], sl1yo.
Row 3 D: Brk, sl1yo, [(brk, sl1yo) twice], brk.
Row 4 L: Sl1yo, [(brk, sl1yo) twice], brk, sl1yo.
Row 4 D: Brp [(sl1yo, brp) twice], sl1yo, brp.
Row 5-8: Rep Rows 1-4.
Celtic knot chart Multiple of 8 sts + 7
In the round
Rnd 1 L: (Brk, sl1yo) twice, [(brsL, sl1yo) twice], brk, sl1yo, brk.
Rnd 1 D: (Sl1yo, brp) twice, [(sl1yo, p1, sl1yo, brp) twice], sl1yo, brp, sl1yo.
Rnd 2 L: (Brk, sl1yo) twice [(brk, sl1yo) 4 times], brk, sl1yo, brk.
Rnd 2 D: (Sl1yo, brp) twice, [(sl1yo, brp) 4 times], sl1yo, brp, sl1yo.
Rnd 3 L: (Brk, sl1yo) twice, [brk, sl1yo, brsR, sl1yo, brk, sl1yo], brk, sl1yo, brk.
Rnd 3 D: (Sl1yo, brp) twice, [sl1yo, brp, sl1yo, p1, (sl1yo, brp) twice], sl1yo, brp, sl1yo.
Rnd 4: Rep Rnd 2.
Rnd 5: Rep Rnd 1.
Rnd 6: Rep Rnd 2.
Rnd 7 L: Brk, sl1yo, brsR, [(sl1yo, brsR) twice], sl1yo, brk.
Rnd 7 D: Sl1yo, brp, sl1yo, p1, sl1yo, [(brp, sl1yo, p1, sl1yo) twice], brp, sl1yo.
Rnd 8 L: (Brk, sl1yo) twice, brk, [(sl1yo, brk) 4 times], sl1yo, brk.
Rnd 8 D: (Sl1yo, brp) twice, sl1yo, [(brp, sl1yo) 4 times], brp, sl1yo.
Worked flat
Row 1 L [RS]: (Brk, sl1yo) twice, [(brsL, sl1yo) twice], brk, sl1yo, brk.
Row 1 D: (Sl1yo, brp) twice, [(sl1yo, p1, sl1yo, brp) twice], sl1yo, brp, sl1yo.
Row 2 L [WS]: Brp, sl1yo, brp, [(sl1yo, brp) 4 times], (sl1yo, brp) twice.
Row 2 D: Sl1yo, brk, sl1yo, [(brk, sl1yo) 4 times], (brk, sl1yo) twice.
Row 3 L: (Brk, sl1yo) twice, [brk, sl1yo, brsR, sl1yo, brk, sl1yo], brk, sl1yo, brk.
Row 3 D: (Sl1yo, brp) twice, [sl1yo, brp, sl1yo, p1, (sl1yo, brp) twice], sl1yo, brp, sl1yo.
Row 4: Rep Row 2.
Row 5: Rep Row 1.
Row 6: Rep Row 2.
Row 7 L: Brk, sl1yo, brsR, [(sl1yo, brsR) twice], sl1yo, brk.
Row 7 D: Sl1yo, brp, sl1yo, p1, sl1yo, [(brp, sl1yo, p1, sl1yo) twice], brp, sl1yo.
Row 8 L: Brp, sl1yo, [(brp, sl1yo) 4 times], (brp, sl1yo) twice, brp.
Row 8 D: Sl1yo, brk, [(sl1yo, brk) 4 times], (sl1yo, brk) twice, sl1yo.
DIRECTIONS
YOKE
Work right sleeve:
Using D, CO 46[46, 46, 46, 46, 54, 54, 54, 54] sts. Join to work in the round, being careful not to twist. Place BOR marker.
Knit 5 rnds.
Rnds 6-7: (K1, p1) to end.
Join L and begin brioche:
Set-up rnd L: (K1, sl1yo) 8 times, (p1, sl1yo) 7[7, 7, 7, 7, 11, 11, 11, 11] times, (k1, sl1yo) 8 times.
Set-up rnd D: (Sl1yo, brp) 7 times, (sl1yo, brk) 8[8, 8, 8, 8, 12, 12, 12, 12] times, (sl1yo, brp) 7 times, sl1yo, brk.
Note: even though you have an even number of stitches on the needle, there is one stitch which forms the center of the stitch pattern. This will be referred to as the center stitch and is marked in bold throughout the instructions when possible.
Rnd 1 L: Work Celtic Knot chart, working the repeat section once; work Cable chart, working the repeat section 1[1, 1, 1, 1, 2, 2, 2, 2] times; brp; work Cable chart, working the repeat section 1[1, 1, 1, 1, 2, 2, 2, 2] times; work Celtic Knot chart working the repeat section once; sl1yo.
Rnd 1 D: Work Celtic Knot chart working the repeat section once, work Cable chart working the repeat section 1[1, 1, 1, 1, 2, 2, 2, 2] times, sl1yo, work Cable chart working the repeat section 1[1, 1, 1, 1, 2, 2, 2, 2] times, work Celtic Knot chart working the repeat section once; brk.
Rnd 1 establishes the pattern. Work another 7 rnds in patt.
Note: As you increase stitches on the sleeve, you will incorporate these new stitches into the Celtic Knot chart, working the repeat 2[2, 2, 2, 2, 2, 2, 2, 3] times. When you are working with partial charts, if you do not have enough sts to complete the brioche star stitch, work these as brk instead.
Inc rnd A L: Brkyobrk, work as est to last 2 sts, brkyobrk, sl1yo. 4 sts inc'd.
Inc rnd A D: Sl1yo, work in patt to last 2 sts, sl1yo, brk.
Patt rnd A L: Brk, sl1yo, work as est to last 3 sts, sl1yo, brk, sl1yo.
Patt rnd A D: Sl1yo, work as est to last 2 sts, sl1yo, brk.
Repeat Patt rnd A another 8[6, 6, 4, 4, 4, 2, 2, 2] times.
Repeat the above 10[8, 8, 6, 6, 6, 4, 4, 4] rnds another 3[3, 3, 3, 3, 3, 1, 3, 7] times.
Size 3X only:
Work Inc rnd A, then work Patt rnd A 5 times.
Repeat the above 6 rnds once more.
62[62, 62, 62, 62, 70, 70, 70, 86] sleeve sts.
All sizes:
Inc rnd B L: Rep Inc rnd A.
Inc rnd B D: Sl1yo, brk (last st of cable chart), work in patt to last 3 sts, brk (first st of cable chart), sl1yo, brk.
Patt rnd B L: Brp, sl1yo, work as est to last 3 sts, sl1yo, brp, sl1yo.
Patt rnd B D: Sl1yo, work as est to last 2 sts, sl1yo, brk.
Work Patt rnd B another 8[8, 6, 4, 4, 4, 4, 2, 4] times.
Note: For this section of increases, as you increase sts on the sleeve, you will now incorporate these new sts into a new Cable chart, working the repeat 1[1, 1, 1, 1, 2, 2, 2, 2] times. When you are working with partial charts, if you do not have enough sts to complete the brioche star stitch, work these as brk instead.
Inc rnd C L: Brpyobrp, work as est to last 2 sts, brpyobrp, sl1yo. 4 sts inc'd.
Inc rnd C D: Sl1yo, work in patt to last 2 sts, sl1yo, brk.
Patt rnd C L: Brp, sl1yo, work as est to last 3 sts, sl1yo, brp, sl1yo.
Patt rnd C D: Sl1yo, work as est to last 2 sts, sl1yo, brk.
Repeat Patt rnd C another 8[8, 6, 6, 4, 4, 4, 4, 4] times.
Repeat the above 10[10, 8, 8, 6, 6, 6, 6, 6] rnds another 1[2, 2, 2, 2, 3, 4, 4, 4] times.
For sizes XS and 2X:
Work Inc rnd C, followed by Patt rnd C 11[-, -, -, -, 7, -, -, -] times.
For all sizes:
You will have 78[78, 78, 78, 78, 94, 94, 94, 110] sts on needle and will have added enough stitches to work the whole Cable chart. From now on, stitches will be added in plain brioche stitch. Add markers to mark the edges of the chart stitches.
For all sizes except XS:
Work Inc rnd C, then Patt rnd C -[9, 7, 7, 5, 7, 5, 5, 5] times.
Repeat the above -[10, 8, 8, 6, 8, 6, 6, 6] rnds another -[0, 0, 2, 0, 1, 2, 3, 0] times.
For sizes M and 1X:
Work Inc rnd C, then Patt rnd C -[-, 9, -, 7, -, -, -, -] times.
Repeat the above -[-, 10, -, 8, -, -, -, -] rnds another -[-, 0, -, 2, -, -, -, -] times.
For all sizes:
You will have 78[82, 86, 90, 94, 102, 106, 110, 114] sts and the sleeve should measure 18.25[18.25, 18.25, 17.5, 17.5, 17.5, 16.75, 16.75, 16.75] inches / 46.5[46.5, 46.5, 44.5, 44.5, 42.5, 42.5, 42.5, ] cm from the cast on edge.
If you want to lengthen the sleeve do so here, but make sure you work an even number of rounds.
Split for upper body:
For the next sections, the piece will be worked flat.
Row 1 L [RS]: P1, (sl1yo, brp) to marker, sm, work as est to marker, sm, (brp, sl1yo) to last 2 sts, brp, p1. Do not turn, slide sts to other end of needle.
Row 1 D: K1 (brk, sl1yo) to marker, sm, work as est to marker, sm, (sl1yo, brk) to last 2 sts, sl1yo, k1. Turn.
Row 2 L [WS]: K1, (sl1yo, brk) to marker, sm, work as est to marker, sm, (brk, sl1yo) to last 2 sts, brk, k1. Do not turn, slide sts to other end of needle.
Row 2 D: P1 (brp, sl1yo) to marker, sm, work as est to marker, sm, (sl1yo, brp) to last 2 sts, sl1yo, p1. Turn.
Repeat Rows 1-2 another 0[2, 4, 6, 6, 8, 10, 11, 13] times.
Shape shoulder:
Note: Stitches will be added each side of the centre stitch and worked in plain brioche. For the first rows after the increase, these new stitches will be marked in bold in the instructions. Once the pattern is established for these new stitches, only the original center stitch will be referred to and marked in bold. Note that the additional center stitches will not be present on the first increase rows.
Inc row L [RS]: P1, work as est to center stitch, brpyobrp, work as est to last st, p1. Do not turn, slide sts to other end of needle. 2 sts inc'd.
Inc row D: K1, work as est to the 3 center sts, sl1yo, k1, sl1yo, work as est to last st, k1. Turn.
Inc row L [WS]: K1, work as est to 3 center sts, brk, sl1yo, brk, work as est to last stitch, k1. Do not turn, slide sts to other end of needle.
Inc row D: P1, work as est to center st, brpyobrp, work as est to last stitch, p1. Turn. 2 sts inc'd.
Row 3 L: P1, work as est to 3 center sts, sl1yo, p1, sl1yo, work as est to last st, p1. Do not turn, slide sts to other end of needle.
Row 3 D: K1, work as est to 3 center sts, brk, sl1yo, brk, work as est to last st, k1. Turn
Row 4 L: K1, work as est to center st, brp, work as est to last st, k1. Do not turn, slide sts to other end of needle.
Row 4 D: P1 work as est to center stitch, sl1yo, work as est to last st p1. Turn.
Repeat Rows 3-4 another 1[1, 1, 1, 2, 2, 2, 2, 2] times. Work the center st on Row 3 as a brp.
Repeat the above 6[6, 6, 6, 8, 8, 8, 8, 8] rows another 1[1, 0, 0, 3, 3, 2, 1, 0] times.
For sizes XS[S, M, L, 3X, 4X, 5X] only:
Work Inc row [RS] then Inc row [WS], work Rows 3-4 3[3, 3, 3, -, -, 4, 4, 4] times.
Repeat the above 8[8, 8, 8, -, -, 10, 10, 10] rows another 1[1, 2, 2, -, -, 0, 1, 2] times.
For all sizes:
You will have 94[98, 102, 106, 110, 118, 122, 126, 130] sts.
Shape neck:
Stitches will be bound off to shape the neck. In preparation for this, on the next row all sl1yo sts will be worked as sl1wyib instead on the first half of the row.
Row 1 L [RS]: P1, (sl1wyib, brp) 3[4, 5, 6, 7, 7, 8, 9, 6] times, (sl1wyib, brk) 12[12, 12, 12, 12, 12, 12, 12, 16] times, (sl1wyib, brp) 7[7, 7, 7, 7, 9, 9, 9, 9] times, sl1wyib, brp, then work as est to end.
Row 1 D: BO 46[48, 50, 52, 54, 58, 60, 62, 64] sts, the center st will be on the working needle, work as est to end.
48[50, 52, 54, 56, , 60, 62, 64] sts on needle.
Row 2 L [WS]: K1, work as est to last st, k1.
Row 2 D: P1, work as est to last st, p1.
Row 3 L: P1, work as est to last st, p1. Do not turn, slide sts to other end of needle.
Row 3 D: K1, work as est to last st, k1. Turn
Row 4: Rep Row 2.
Repeat Rows 3-4 another 13[13, 13, 13, 17, 17, 17, 17, 17] times.
Next row L [RS]: Rep Row 3 L.
Next row D: Cable CO 46[48, 50, 52, 54, 58, 60, 62, 64] sts. 94[98, 102, 106, 110, 118, 122, 126, 130] sts on LH needle. K1, (k1, sl1yo) 4[5, 6, 7, 8, 8, 9, 10, 7] times, (p1, sl1yo) 11[11, 11, 11, 11, 11, 11, 11, 15] times, (k1, sl1yo) 8[8, 8, 8, 8, 10, 10, 10, 10] times, work as est to end.
Note: Charts will be re-introduced on the next row. Begin each new chart starting on the same row as the other charts you are already working.
Next row L [WS]: Work as est to center stitch, brk, (sl1yo, brk) 4 times, work Cable chart working the repeat 1[1, 1, 1, 1, 2, 2, 2, 2] times, work Celtic Knot chart working the repeat 2[2, 2, 2, 2, 2, 2, 2, 3] times, work Cable chart working the repeat 1[1, 1, 1, 1, 2, 2, 2, 2] times, (sl1yo, brk) to last st, k1.
Next row D: Work as est to center st, sl1yo, (brp, sl1yo) 4 times, work Cable chart working the repeat 1[1, 1, 1, 1, 2, 2, 2, 2] times, work Celtic Knot chart working the repeat 2[2, 2, 2, 2, 2, 2, 2, 3] times, work Cable chart working the repeat 1[1, 1, 1, 1, 2, 2, 2, 2] times, (brp, sl1yo) to last st, p1.
Shape shoulder:
Work another 6[6, 6, 6, 6, 6, 8, 8, 8] rows in est patt.
Dec row L [RS]: Work as est to center st, brp, work as est to end. Do not turn, slide sts to other end of needle.
Dec row D: Work as est to 1 st before center st, brssk, work as est to end. Turn. 2 sts dec'd.
Dec Row L [WS]: Work as est to 1 st before center stitch, brssk, work as est to end. Do not turn, slide sts to other end of needle. 2 sts dec'd.
Dec row D: Work as est to center st, sl1yo, work as est to end. Turn.
Repeat the above 8[8, 8, 8, 8, 8, 10, 10, 10] rows another 1[1, 2, 2, 3, 3, 0, 1, 2] times.
For sizes XS, S, M, L, 3X, 4X, 5X:
Work 4[4, 4, 4, -, -, 6, 6, 6] rows in est patt, followed by the Dec Row [RS] then Dec Row [WS].
Repeat the above 6[6, 6, 6, -, -, 8, 8, 8] rows another 1[1, 0, 0, -, -, 2, 1, 0] times.
For all sizes:
You will have 78[82, 86, 90, 94, 102, 106, 110, 114] sts.
Work 2[6, 10, 14, 14, 18, 22, 24, 28] rows in est patt.
Work left sleeve:
Join in the round for sleeve. Place BOR Marker.
If you wish to lengthen the sleeve, do so here, working an even number of rounds.
As you decrease for the sleeve, maintain the continuity of the charted patterns for as long as possible. If you do not have enough stitches to work the brioche star stitch, work these as brk instead. All decreases are worked the same, regardless of whether the chart calls for a purl or knit stitch. Consequently, the charts are not referred to in these instructions. You may find that the repeats do not neatly match with the number of stitches required to work each chart, but things should work out when you reach the end of the shaping and are ready for the cuff.
Work 11[9, 9, 7, 7, 7, 5, 5, 5] rnds in est patt.
Dec rnd A L: Brssk, work as est to last 4 sts, brk2tog, sl1yo. 4 sts dec.
Dec rnd A D: Work as est.
Repeat the above 12[10, 10, 8, 8, 8, 6, 6, 6] rnds another 0[4, 0, 5, 2, 2, 10, 8, 6] times. 74[62, 82, 66, 82, 90, 62, 74, 86] sts.
Work 9[7, 7, 5, 5, 5, 3, 3, 3] rnds in est patt, followed by Dec rnd A.
Repeat the above 10[8, 8, 6, 6, 6, 4, 4, 4] rnds another 6[3, 8, 4, 8, 8, 1, 4, 7] times. 46[46, 46, 46, 46, 54, 54, 54, 54] sts.
Work 8 rnds in est patt.
The next rnd prepares for the transition from brioche to rib st.
Next rnd L: Work as est, but work all brioche star stitches as brk, sl1yo, brk.
Next rnd D: Work as est, but substitute sl1wyib for every sl1yo.
Break off L, cont with D.
Remove any remaining markers (except for BOR marker) as you reach them in the next rnd.
Rnds 1-2: (K1, p1) to end.
Knit 5 rnds.
BO.
BODY
Starting at the wearer's right front underarm with RS facing and using D, pick up and knit 29[34, 39, 44, 45, 50, 55, 60, 65] sts for right front, CO 32[32, 32, 32, 40, 40, 40, 40, 40] for front neck, pick up and knit 29[34, 39, 44, 45, 50, 55, 60, 65] sts for left front and 90[100, 110, 120, 130, 140, 150, 160, 170] sts for back. 180[200, 220, 240, 260, 280, 300, 320, 340] sts.
Join to work in the round being careful not to twist stitches. Slip 1[0, 1, 0, 1, 0, 1, 0, 1] st from RH to LH needle. Place BOR marker.
Set-up rnd L: (P1, sl1yo) 0[2, 1, 3, 4, 2, 5, 3, 6] times, p1, pm, (sl1yo, p1) 3[3, 3, 3, 3, 5, 5, 5, 5] times, (sl1yo, k1) 8[8, 12, 12, 12, 12, 12, 16, 16] times, (sl1yo, p1) 3[3, 3, 3, 3, 5, 5, 5, 5] times, sl1yo, pm, p1, (p1, sl1yo) 15[15, 15, 15, 19, 19, 19, 19, 19] times, p1, pm, (sl1yo, p1) 3[3, 3, 3, 3, 5, 5, 5, 5] times, (sl1yo, k1) 8[8, 12, 12, 12, 12, 12, 16, 16] times, (sl1yo, p1) to end.
Set-up rnd D: (Sl1yo, brk) to 1 st before marker, sl1yo, sm, (brk, sl1yo) 4[4, 4, 4, 6, 6, 6, 6, 6] times, (brp, sl1yo) 7[7, 11, 11, 11, 11, 11, 15, 15] times, (brk, sl1yo) 3[3, 3, 3, 3, 5, 5, 5, 5] times, brk, sm, k1, (sl1yo, brk) to 1 st before marker, k1, sm, (brk, sl1yo) 4[4, 4, 4, 6, 6, 6, 6, 6] times, (brp, sl1yo) 7[7, 11, 11, 11, 11, 11, 15, 15] times, (brk, sl1yo) to end.
Note: begin working Cable and Celtic Knot charts with Rnd 1.
Rnd 1 L: (Brp, sl1yo) to 1 st before marker, brp, sm, work Cable chart working repeat 1[1, 1, 1, 1, 2, 2, 2, 2] times, work Celtic Knot chart working repeat 1[1, 2, 2, 2, 2, 2, 3, 3] times, work Cable chart working repeat 1[1, 1, 1, 1, 2, 2, 2, 2] times, sm, p1, (brp, sl1yo) to 1 st before marker, p1, sm, work Cable chart working repeat 1[1, 1, 1, 1, 2, 2, 2, 2] times, work Celtic Knot chart working repeat 1[1, 2, 2, 2, 2, 2, 3, 3] times, work Cable chart working repeat 1[1, 1, 1, 1, 2, 2, 2, 2] times, pm, (brp, sl1yo) to end.
Rnd 1 D: (Sl1yo, brk) to 1 st before marker, sl1yo, sm, work as est to marker sm, k1, (k1, brhc) to 1 st before marker, k1, sm, work as est to marker, sm, (sl1yo, brk) to end.
Rnd 2 L: (Brp, sl1yo) to 1 st before marker, brp, sm, work as est to marker, sm, p1, (sl1yo, brp) to 1 st before marker, p1, sm, work as est to marker, sm, (brp, sl1yo) to end.
Rnd 2 D: (Sl1yo, brk) to 1 st before marker, sl1yo, sm, work as est to marker, sm, k1, (brhc, k1) to 1 st before marker, k1, sm, work as est to marker, sm, (sl1yo, brk) to end.
Repeat Rnds 1-2 until work measures 14 inches/35.5 cm from cast-on neck edge, or 0.5 inch/1.5 cm shorter than desired length, ending after Rnd 2.
Note: The next rnd prepares for the transition from brioche to rib st.
Next rnd L: (Brp, sl1yo) to 1 st before marker, brp, sm, (sl1yo, brp) 3[3, 3, 3, 3, 5, 5, 5, 5] times, (sl1yo, brk) 8[8, 12, 12, 12, 12, 12, 16, 16] times, (sl1yo, brp) 3[3, 3, 3, 3, 5, 5, 5, 5] times, sl1yo, sm, p1, (brp, sl1yo) 15[15, 15, 15, 19, 19, 19, 19, 19] times, p1, sm, (sl1yo, brp) 3[3, 3, 3, 3, 5, 5, 5, 5] times, (sl1yo, brk) 8[8, 12, 12, 12, 12, 12, 16, 16] times, (sl1yo, brp) to end.
Next rnd D: (Sl1wyib, brk) to 1 st before marker, sl1wyib, sm, (brk, sl1wyib) 4[4, 4, 4, 6, 6, 6, 6, 6] times, (brp, sl1wyib) 7[7, 11, 11, 11, 11, 11, 15, 15] times, (brk, sl1wyib) 3[3, 3, 3, 3, 5, 5, 5, 5] times, brk, sm, k1, (sl1wyib, brk) to 1 st before marker, k1, sm, (brk, sl1wyib) 4[4, 4, 4, 6, 6, 6, 6, 6] times, (brp, sl1wyib) 7[7, 11, 11, 11, 11, 11, 15, 15] times, (brk, sl1wyib) to end, sm as you come to it.
Break off L, cont with D.
Remove any remaining markers (except for BOR marker) as you reach them in the next rnd.
Rnds 1-2: (P1, k1) to end.
Knit 5 rnds.
BO.
COLLAR
Note: The cast-on edge of the collar will be visible on the finished sweater. The instructions are given for a tubular cast-on as this creates a neat and stretchy edge. If you have a favourite cast-on for brioche, feel free to substitute it here, just remember that the edge needs to be able to stretch.
If substituting a cast-on, CO 124[128, 134, 140, 152, 158, 162, 168, 172] sts and skip to Row 3.
If using a tubular cast on, the tubular cast on will have a selvedge stitch on each end for seaming later.
With scrap yarn, provisionally CO 63[65, 68, 71, 77, 80, 82, 85, 87] sts.
With D, Set-up row: P1, (yo, p1) to last st, p1. 124[128, 134, 140, 152, 158, 162, 168, 172] sts.
Row 1 [WS]: K1, (k1, sl1wyif) to last st, k1.
Row 2 [RS]: P1, (k1, sl1wyib) to last st, k1.
Begin brioche:
Row 3 L: P1, (p1, sl1yo) to last st, p1. Do not turn, slide sts to other end of needle.
Row 3 D: K1, (sl1yo, brk) to last st, , k1. Turn.
Row 4 L: K1, (brk, sl1yo) to last st, , k1. Do not turn, slide sts to other end of needle.
Row 4 D: P1, (sl1yo, brp) to last st, , p1. Turn.
Row 5 L: P1, (brp, sl1yo) to last st, p1. Do not turn, slide sts to other end of needle.
Row 5 D: K1, (sl1yo, brk) to last st, k1. Turn.
Repeat Rows 4-5 until work measures 6.25[6.25, 6.25, 6.25, 8, 8, 8, 8, 8] inches/ 16[16, 16, 16, 20, 20, 20, 20, 20] cm. BO.
FINISHING
Decide whether you like the dark or light side of the collar to show. I chose to have the dark on the outside, once the collar was folded over. When seaming, make sure that this color is on the INSIDE. Match the centre of the BO edge of the collar to the centre of the back of the neck, seam into place around the neck edge, leaving the front edge of the neck free. Place one set of collar row edges over the other. Traditionally, this would be left over right for a female, or right over left for a male. Seam the row edges to the cast-on stitches at the top of the body at the front. Weave in ends and block to desired dimensions.
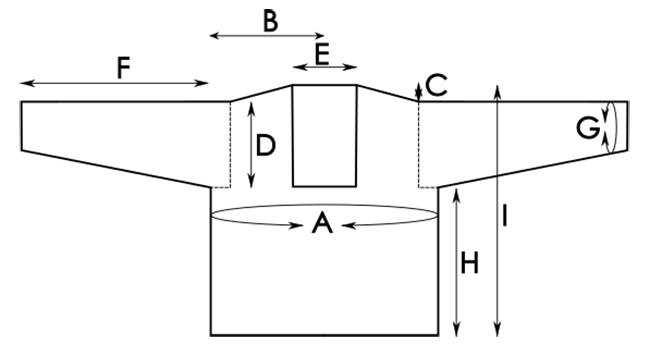
A – Chest circumference at underarm: 35.5[39.25, 43.25, 47.25, 51.25, 55, 59, 63, 67] inches / 90[100, 110, 120, 130, 140, 150, 160, 170] cm
B – Centre back to underarm: 9[9.75, 11, 11.75, 13, 13.75, 15, 15.75, 17] inches / 23[25, 28, 30, 33, 35, 38, 40, 43] cm
C – Shoulder drop: 1.5 inches/4 cm
D – Armhole depth: 7.75[8, 8.5, 8.75, 9.25, 10, 10.5, 10.75, 11.25] inches / 19.5[20.5, 21.5, 22.5, 23.5, 25.5, 26.5, 27.5, 28.5] cm
E – Back neck width: 6.25[6.25, 6.25, 6.25, 7.75, 7.75, 7.75, 7.75, 7.75] inches / 16[16, 16, 16, 20, 20, 20, 20, 20] cm
F – Sleeve length: 18.25[18.25, 18.25, 17.5, 17.5, 17.5, 16.75, 16.75, 16.75] inches / 46.5[46.5, 46.5, 44.5, 44.5, 42.5, 42.5, 42.5, ] cm
G – Cuff circumference: 9[9, 9, 9, 9, 10.75, 10.75, 10.75, 10.75] inches / 23[23, 23, 23, 23, 27, 27, 27, 27] cm
H – Lower body length: 14.5 inches/37 cm
I – Total length: 23.25[23.5, 24, 24.5, 24.75, 25.5, 26, 26.5, 26.75] inches / 59[60, 61, 62, 63, 65, 66, 67, 68] cm
ABOUT THE DESIGNER
 Hannah publishes patterns under the name Brambles and Bindweed. She is drawn to the puzzle of translating intricate patterns into knitted fabric. She draws inspiration from celtic knotwork and quilting designs. She has many ideas, but never enough time to knit them all.
You can find her on Ravelry and her website.
Pattern & images © 2022 Hannah, Brambles and Bindweed