Legwarmer Slouch Leg Sock, a free knitting pattern from Knitty.com.
INTRODUCTION
Slouch-warmer
 by Kate Atherley

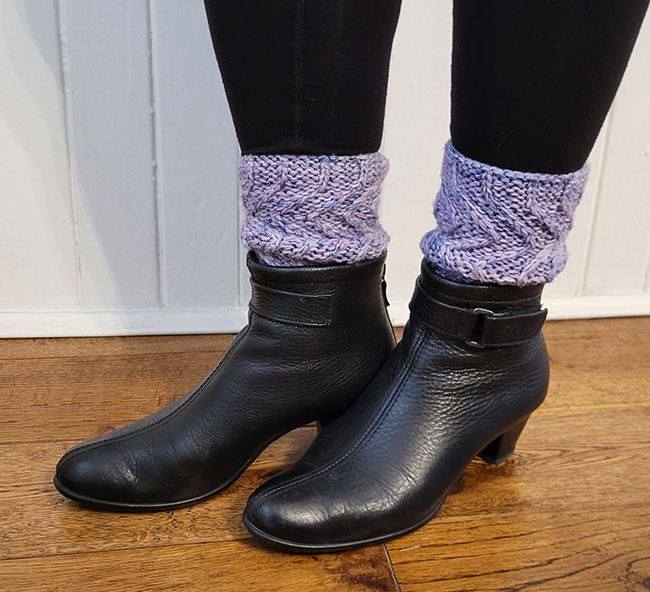
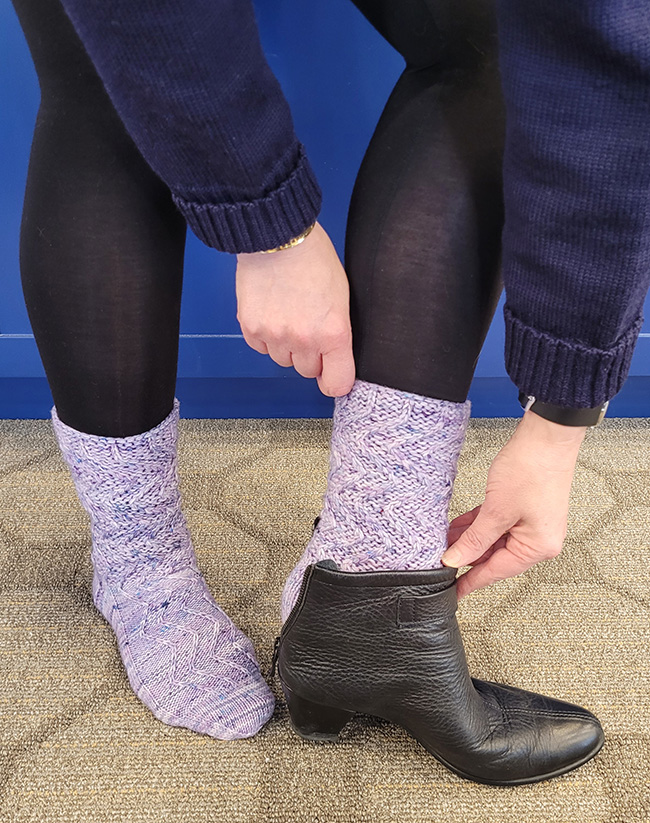
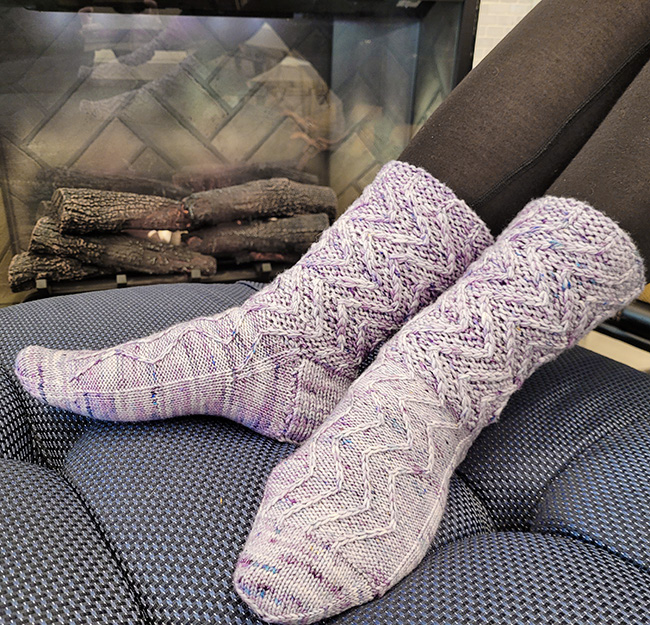
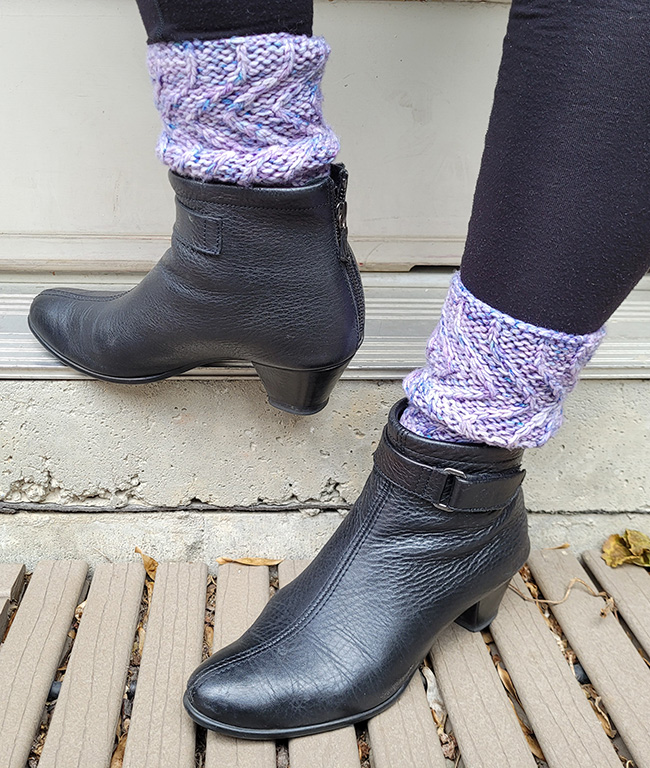
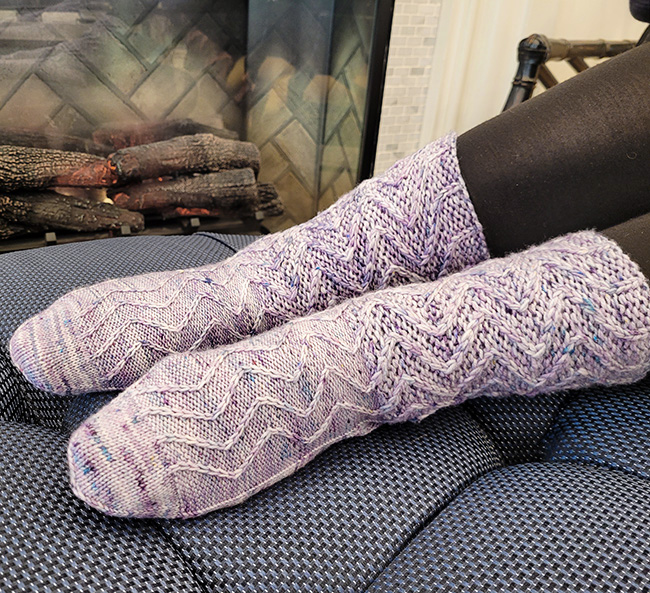
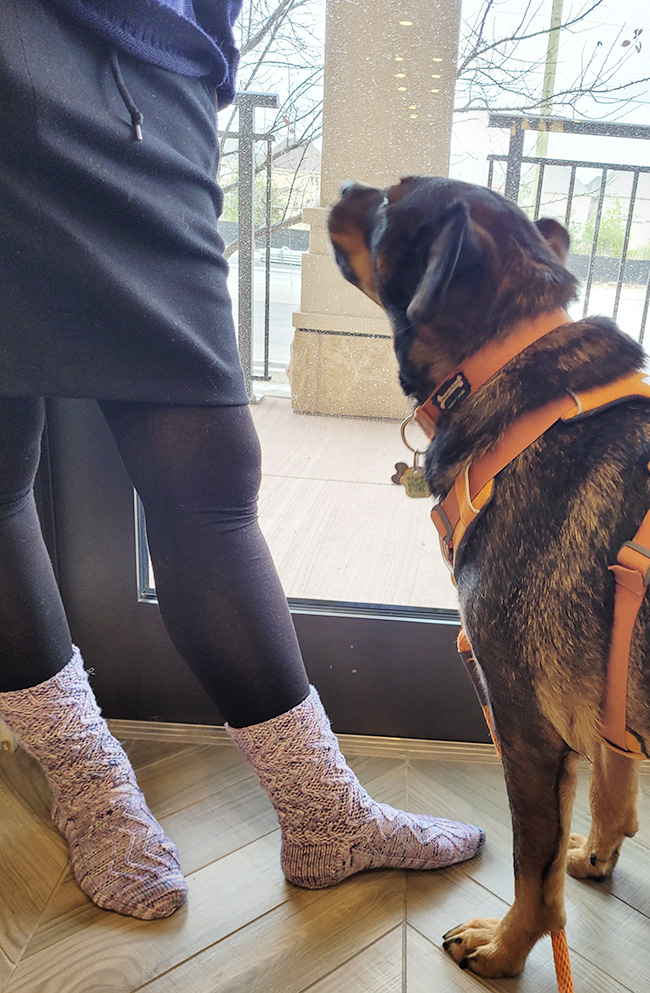
A sock with ambition, perhaps? A kicky leg-warmer above the ankle, a comfy and long-lasting sock below.
The leg is worked double-stranded in a garter-based pattern stitch, the heel flap and turn are worked with double-stranded yarn for extra reinforcement and comfort, and the foot is finished with your standard sock needles and one strand of yarn so that they fit into all of your regular shoes. The sock leg is substantial, so the slouch will only happen if you want it to. See pictures below for what it looks like unslouched.
To create the slouchy leg without having to adjust the pattern, I've indulged in a strategy that some might feel is cheating: you start the sock on a larger needle, then change to progressively smaller needles as you work the down the leg. This means that the pattern requires what seems like a truly horrifying number of needle sizes, but knitters who have an interchangeable set and work on magic loop will likely be fine! You can also fudge the leg a bit, too: if you are missing one of the sizes, just work with the ones you have. There are only two needles that are crucial: those for the heel and those for the leg.
Also, note that the foot instructions require a little bit of attention. To accommodate the change to a single strand of yarn, plus the fact that there's a left and a right foot and to allow you to work any length leg you want, the instructions for the transition from the leg to the foot patterning require you to read your knitting and decide on the increase positions yourself. Consider it as a guided "increase evenly across". Details are provided, but you will have work this section carefully. Extra attention is also required in the transition of the cable pattern into the instep, with cables "disappearing" into the sides.
 photos: Norm Wilner; photog assistant, Winnie
SIZE
XXS[XS, S, M, L, XL, 2X, 3X, 4X, 5X]
FINISHED MEASUREMENTS
Foot circumference: 6[6.5, 7, 7.5, 8, 8.5, 9, 9.5, 10, 10.5] inches/ 15[16.5, 18, 19, 20.5, 21.5, 23, 24, 25.5, 26.5 cm]
Foot length: adjustable to fit
Leg length: cuff measures approximately 8 inches/20 cm from top of heel, adjustable to preference
Leg circumference at top: 7.25[7.25, 8, 8.75, 9.5, 9.5, 10.25, 11, 11.75, 12.25] inches / 18.5[18.5, 20.5, 22, 24, 24, 26, 28, 30, 31] cm
Choose a size with approximately 1 inch/2.5 cm negative ease in the foot circumference.
MATERIALS
Yarn
![]() Miss Babs Putnam [75% superwash merino wool, 25% nylon; 400yds per 110 g skein]; color: Happy Anniversary; 1[2, 2, 2, 2, 2, 2, 2, 2, 2] skeins
Miss Babs Putnam [75% superwash merino wool, 25% nylon; 400yds per 110 g skein]; color: Happy Anniversary; 1[2, 2, 2, 2, 2, 2, 2, 2, 2] skeins
Editor's note: This beautiful colorway (also shown below) was dyed especially by Miss Babs to celebrate our 20th Anniversary! You can get it directly from Miss Babs right here.

Yarn Characteristics
![]() Putnam is a classic fingering weight merino and nylon mix, multiple plies, nice and firm with a good twist. The colorway is a semi-solid blend of icy purples and blues, with contrasty speckles. This is a perfectly lively-but-not-too-lively colorway, making for a fun fabric in garter, reverse garter, stockinette and cables. Err on the side of a less-busy colorway, as you don’t want the patterning to disappear. A semi solid or gradient would also work very well.
Putnam is a classic fingering weight merino and nylon mix, multiple plies, nice and firm with a good twist. The colorway is a semi-solid blend of icy purples and blues, with contrasty speckles. This is a perfectly lively-but-not-too-lively colorway, making for a fun fabric in garter, reverse garter, stockinette and cables. Err on the side of a less-busy colorway, as you don’t want the patterning to disappear. A semi solid or gradient would also work very well.
Recommended needle size
[always use a needle size that gives you the gauge listed below - every knitter's gauge is unique]
For the foot:
![]() US #1.5/2.5mm needles for short circumference in the round
US #1.5/2.5mm needles for short circumference in the round
![]() US #3/3.25mm needles for short circumference in the round
US #3/3.25mm needles for short circumference in the round
For the leg (see Pattern Notes):
![]() US #7/4.5mm needles for short circumference in the round
US #7/4.5mm needles for short circumference in the round
![]() US #6/4mm needles for short circumference in the round
US #6/4mm needles for short circumference in the round
![]() US #5/3.75mm needles for short circumference in the round
US #5/3.75mm needles for short circumference in the round
![]() US #4/3.5mm needles for short circumference in the round
US #4/3.5mm needles for short circumference in the round
Notions
![]() cable needle (optional but helpful)
cable needle (optional but helpful)
GAUGE
24 sts/36 rounds = 4 inches in stockinette stitch using US #3/3.25mm needles and two strands of yarn held together
22 sts/24 ridges (48 rounds) = 4 inches in leg pattern using US #7/4.5mm needles and two strands of yarn held together
32 sts/48 rounds = 4 inches in stockinette stitch using US #1.5/2.5mm needles
PATTERN NOTES
[Knitty's list of standard abbreviations and techniques can be found here.]
Charts
Notes on Leg Charts:
For and Sock 2 Chart row 18, the first stitch is highlighted in orange. Slip this stitch purlwise to the end of the round, moving marker if necessary. This moves the start of the round left by 1 stitch.
For Sock 1 Chart row 18 and Sock 2 row 6, the last stitch is highlighted in green. Slip this stitch to the start of the round, moving marker if necessary. This moves the start of the round right 1 stitch. You will work the cable cross on the first two stitches of the next round, one of which is the stitch you just moved.
1/1 LC – with a cable needle: Slip the first stitch to a cable needle and hold in front of the work; k1, then k1 from cable needle.
1/1 LC – without a cable needle: Skipping the first stitch on the left needle, knit into the back of the second stitch; leave that in place and knit the first stitch, and then slip both off the needle together.
1/1 LPC: This one is more easily worked with a cable needle: slip the first stitch to a cable needle and hold in front of the work; p1, then k1 from cable needle.
1/1 RC – with a cable needle: Slip the first stitch to a cable needle and hold in back of the work; k1, then k1 from cable needle.
1/1 RC – without a cable needle: Skipping the first stitch on the left needle, knit into the second stitch; leave that in place and knit the first stitch, and then slip both off the needle together.
1/1 RPC – with a cable needle: Slip the first stitch to a cable needle and hold in back of the work; k1, then p1 from cable needle.
1/1 RPC –without a cable needle: Skipping the first stitch on the left needle, knit into the second stitch; leave that in place and purl the first stitch, and then slip both off the needle together.
Foot Pattern Chart
Note: This chart shows the movement of the cable, and the core repeat. The stitch counts shown on the chart may not match the count on your foot, and you may not start working the chart on row 1. What's important is keeping the cable cross pattern in place.
On The Leg
As shown, the leg is approximately 8 inches/20cm long and is worked in four 2-inch/5 cm sections, each with a different needle size. You start with the largest, then change to the next smaller size needle at the end of each section. If you don't have all four needle sizes, just work with as many of them as you have and divide the leg up as required. For example, if you have three of the needle sizes, change about every 2.5-3 inches/6.5-8 cm. If you wish to adjust the leg length, you can do that; just adjust how far you're working with each needle size accordingly.
CHARTS
Sock 1 Leg
Round 2: (P2, sl 1, p1) around.
Round 3: (K1, 1/1 RC, k1) around.
Round 4: (P1, sl 1, p2) around.
Round 5: (1/1 RC, k2) around.
Round 6: Sl 1 and move this stitch to the end of the round, (p3, sl 1) to end.
Rounds 7-11: Repeat Rounds 1-5.
Round 12: (Sl 1, p3) around.
Round 13: (1/1 LC, k2) around.
Round 14: (P1, sl 1, p2) around.
Round 15: (K1, 1/1 LC, k1) around.
Round 16: (P2, sl 1, p1) around.
Round 17: (K2, 1/1 LC) around.
Round 18: (P3, sl 1) to last 4 sts, p3, move next stitch to the start of the round.
Rounds 19-23: Repeat Rounds 13-17.
Round 24: (P3, sl 1) around
Sock 2 Leg
Round 2: (P1, sl 1, p2) around.
Round 3: (K1, 1/1 LC, k1) around.
Round 4: (P2, sl 1, p1) around.
Round 5: (K2, 1/1 LC) around
Round 6: (P3, sl 1) to last 4 sts, p3, move next stitch to the start of the round.
Rounds 7-11: Repeat Rounds 1-5.
Round 12: (P3, sl 1) around.
Round 13: (K2, 1/1 RC) around.
Round 14: (P2, sl 1, p1) around.
Round 15: (K1, 1/1 RC, k1) around.
Round 16: (P1, sl 1, p2) around.
Round 17: (1/1 RC, k2) around.
Round 18: Sl 1 and move this stitch to the end of the round, (p3, sl 1) to end.
Rounds 19-23: Repeat Rounds 13-17.
Round 24: (Sl 1, p3) around.
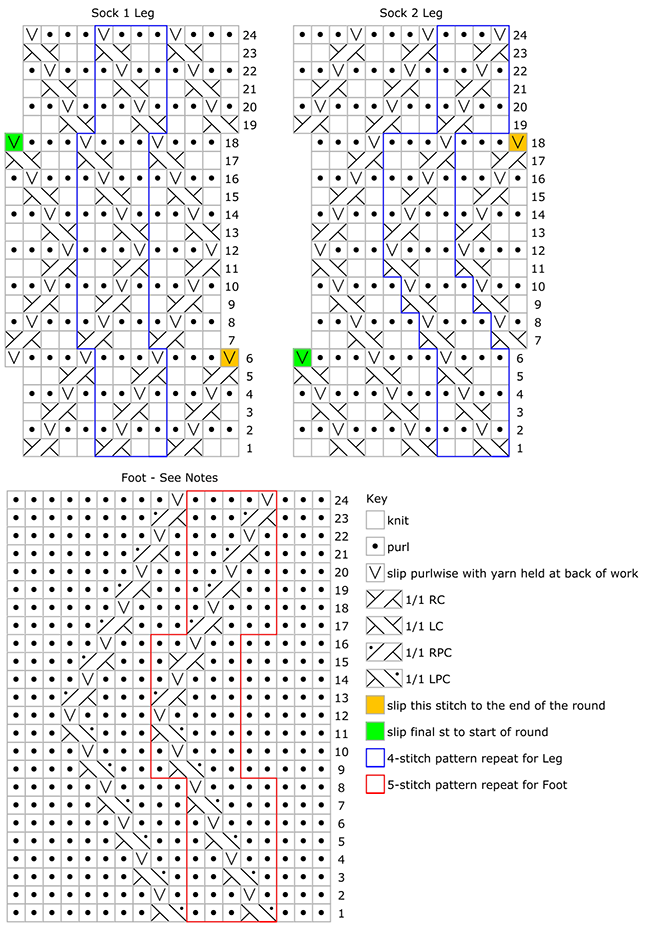
See Pattern Notes above for information about the Foot Pattern Chart and how to handle it.
DIRECTIONS
Leg
Using largest needles, the long-tail method, and two strands of yarn, CO 40[40, 44, 48, 52, 52, 56, 60, 64, 68] sts. Do not join.
Knit 1 row.
Distribute sts across needles as you prefer and join for working in the round. Note or mark start of round.
Sock 1 Only
Cuff round 1: (P3, sl1p) around
Cuff round 2: Knit.
Sock 2 only
Cuff round 1: (Sl1p, p3) around.
Cuff round 2: Knit.
Both Socks
Repeat Cuff rounds 1-2 3 more times, and work Cuff round 1 once more.
Next round: Work Round 1 of appropriate Leg Chart around.
Work in Leg Chart as set for approximately 2 inches/5 cm, paying attention to notes on the shift in the start of the round.
See Pattern Notes for suggestions if you wish to adjust the leg length or if you don't have all four needle sizes.
Change to needles one size smaller and work another 2 inches/5 cm.
Change to next smaller needles and work another 2 inches/5 cm.
Change to next smaller needles and work another 2 inches/5 cm (work measures approx. 8 inches/20 cm from end of cuff), ending on designated row as follows:
For Sizes 1, 2, 4, 7, and 9 ONLY: End after any odd-numbered row of the chart EXCEPT 5 or 17.
For Sizes 3, 5, 6, 8 and 10 ONLY: End after any odd-numbered row of the chart, EXCEPT 5, 7, 13 or 17.
Heel Flap
Change to US #3/3.25mm needles.
Heel will be worked across the next 20[20, 22, 24, 26, 26, 28, 30, 32, 34] sts, starting at this point. Rem sts can be slipped to a holder or grouped together on needle, as you prefer.
Note: No reinforcement pattern is used here – the double stranded yarn used with small needles provides sufficient density.
Heel flap row 1 [RS]: K 20[20, 22, 24, 26, 26, 28, 30, 32, 34] , turn.
Heel flap row 2 [WS]: Sl1p, p 19[19, 21, 23, 25, 25, 27, 29, 31, 33] .
Heel flap row 3: Sl1p, k 19[19, 21, 23, 25, 25, 27, 29, 31, 33] .
Heel flap row 4: Sl1p, k 19[19, 21, 23, 25, 25, 27, 29, 31, 33] .
Repeat Heel flap rows 3-4 8[8, 9, 10, 11, 11, 12, 13, 14, 15] times more.
Heel Turn
Row 1 [RS]: Sl1p, k 12[12, 14, 15, 16, 16, 18, 19, 20, 22] , ssk, turn.
Row 2 [WS]: Sl1p, p 6[6, 8, 8, 8, 8, 10, 10, 10, 12] , p2tog, turn.
Row 3: Sl1p, k 6[6, 8, 8, 8, 8, 10, 10, 10, 12] , ssk, turn.
Row 4: Sl1p, p 6[6, 8, 8, 8, 8, 10, 10, 10, 12] , p2tog, turn.
Repeat Rows 3-4 4[4, 4, 5, 6, 6, 6, 7, 8, 8] times more; all heel sts have been worked and 8[8, 10, 10, 10, 10, 12, 12, 12, 14] sts rem.
Final heel row [RS]: Sl1p, k 7[7, 9, 9, 9, 9, 11, 11, 11, 13] . Do not turn.
Gusset
Re-establish round: With RS facing, using slipped sts at sides of heel flap as a guide, pick up and knit 12[12, 13, 14, 15, 15, 16, 17, 18, 19] sts along the first side of the heel flap; work across instep in pattern as set, working 20[20, 22, 24, 26, 26, 28, 30, 32, 34] sts as per the next round from the Leg chart (this will be an even round); pick up and knit another 12[12, 13, 14, 15, 15, 16, 17, 18, 19] sts along the second side of the heel flap, and k 4[4, 5, 5, 5, 5, 6, 6, 6, 7] to midpoint of heel. 52[52, 58, 62, 66, 66, 72, 76, 80, 86] sts. This is the new start of the round. Rearrange sts as you prefer.
Cut one of the two strands and change to US #1.5/2.5 mm needles. The remainder of the sock will be completed with a single strand.
IMPORTANT – Read before you proceed:
In the following round, you will increase to the stitch count required for working single-stranded. You will work increases in the heel sts, the picked-up gusset sts, and the instep (sts worked in cable pattern).
Next round, increase to stitch count required for foot:
Across heel sts: K 3[3, 4, 4, 4, 4, 5, 5, 5, 6] , m1, k1.
Gusset increases: K tbl 3[2, 2, 3, 4, 3, 2, 3, 3, 4] , (m1, k tbl 6[4, 4, 4, 4, 3, 4, 4, 4, 4] ) 1[2, 2, 2, 2, 3, 3, 3, 3, 3] times, m1, k tbl 3[2, 3, 3, 3, 3, 2, 2, 3, 3] . 2[3, 3, 3, 3, 4, 4, 5, 4, 4] sts increased; 14[15, 16, 17, 18, 19, 20, 21, 22, 23] gusset sts after all increases completed.
Instep increases: For the instep, you need to continue in the established cable pattern while increasing 4[6, 6, 6, 6, 8, 8, 8, 8, 8] sts evenly across. Use m1 increase in the reverse stockinette stitch gaps between the cable crosses, so that you're separating the cable crosses by one more stitch, turning the 4-stitch repeat into a 5-stitch repeat; as required, work the remaining increases at the end(s) of the instep. 24[26, 28, 30, 32, 34, 36, 38, 40, 42] sts for instep after increases are completed.
Repeat Gusset increases over next set of gusset sts.
Work across remaining heel sts to end of round: K 3[3, 4, 4, 4, 4, 5, 5, 5, 6] , m1, k1.
62[66, 72, 76, 80, 84, 90, 94, 98, 104] sts once all increases have been completed.
Notes on foot patterning: You will be working the cable pattern as set on the leg across the instep but on a background of reverse St st, working 6 rows of 1/1 LPCs (12 rows total including plain rows) followed by 6 rows of 1/1 RPCs (12 rows total including plain rows); see Foot Chart for reference. For the starting point of the next row, count the number of 1/1 RPCs or LPCs worked and begin on the next row of the chart (for example, if you had worked three 1/1 LPC rows prior to heel/gusset, begin on Foot Chart Round 7 in order to complete three more 1/1 LPC rows.
Work gusset decreases as set by Shape gusset; AT THE SAME TIME, make changes to cable pattern on instep as follows:
When 0 sts rem between gusset/sole sts and leftmost 1/1 LPC and a 1/1 LPC is required for pattern: work to position of previous 1/1 LPC, work 1/1 LPC over 1 st from instep and 1 st from gusset/sole. This completes the cable; it will no longer be worked. Continue to work gusset/sole in St st and background of instep in reverse St st. There is now 1 less cable worked on instep.
When 0 sts rem between gusset/sole sts and rightmost 1/1 RPC and a 1/1 RPC is required for pattern: work to 1 st before position of previous 1/1 RPC, work 1/1 RPC. This completes the cable; it will no longer be worked. Continue to work gusset/sole in St st and background of instep in reverse St st. There is now 1 less cable worked on instep.
Shape gusset:
Decrease round: K to 3 sts before instep, k2tog, k1; work across instep in Foot pattern (see chart and notes); k1, ssk, k to end of round. 2 sts decreased.
Next round: K to instep; work across instep in pattern as set; k to end of round.
Repeat last 2 rounds 6[6, 7, 7, 7, 7, 8, 8, 8, 9] more times. 48[52, 56, 60, 64, 68, 72, 76, 80, 84] sts.
Work even in pattern as set until foot measures 1.75[1.75, 1.75, 2, 2, 2, 2.25, 2.25, 2.25, 2.5] inches / 4.5[4.5, 4.5, 5, 5, 5, 5.5, 5.5, 5.5, 6.5] cm shorter than desired foot length, ending on any round of Foot pattern.
Toe
Knit 1 round.
Note: The following instructions refer to instep stitches; if required, before you proceed, arrange your stitches or place markers so that you can identify the breaks between the instep and the sole stitches.
Decrease round: K to 3 sts before instep, k2tog, k1; k1, ssk, k to last 3 sts of instep, k2tog, k1; k1, ssk, k to end of round. 4 sts decreased.
Work 3 rounds even in St st.
Work Decrease round.
Work 2 rounds even in St st.
Rep last 3 rounds once more. 36[40, 44, 48, 52, 56, 60, 64, 68, 72] sts.
Work Decrease round.
Work 1 round even in St st.
Rep last 2 rounds twice more. 24[28, 32, 36, 40, 44, 48, 52, 56, 60] sts.
Work the Decrease round only 4[5, 6, 7, 8, 9, 10, 11, 12, 13] times. 8 sts rem.
Cut yarn and pull through rem sts to close.
FINISHING
Wash socks, and then weave in ends. Do not stretch or use blockers.
ABOUT THE DESIGNER
 Kate Atherley is Knitty's Managing Technical Editor and a knitting author and teacher. She’s also the co-founder and publisher of Digits & Threads, an independent, member-supported online magazine about Canadian fibre- and textile arts, crafts and industry. The combination of her university degree in mathematics, professional experience in software development and usability, and training in garment and fashion design give her a unique perspective.
You can see more of her work at kateatherley.com, and on Ravelry.
Pattern & images © 2022 Kate Atherley.