The Oddment Shawl, a free knitting pattern from Knitty.com.
INTRODUCTION
Oddment
by Taylor Rutledge

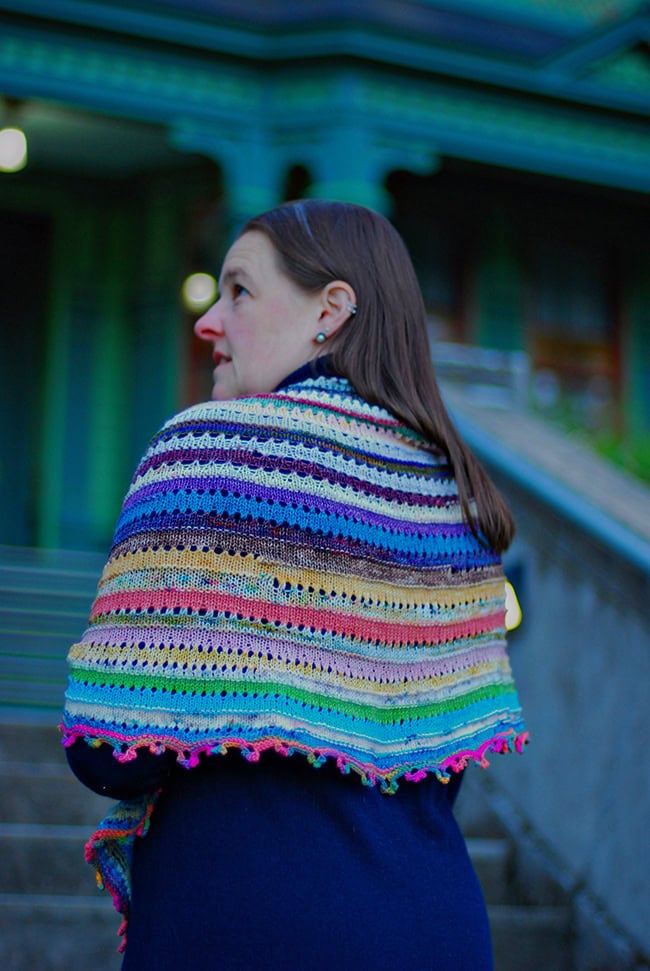
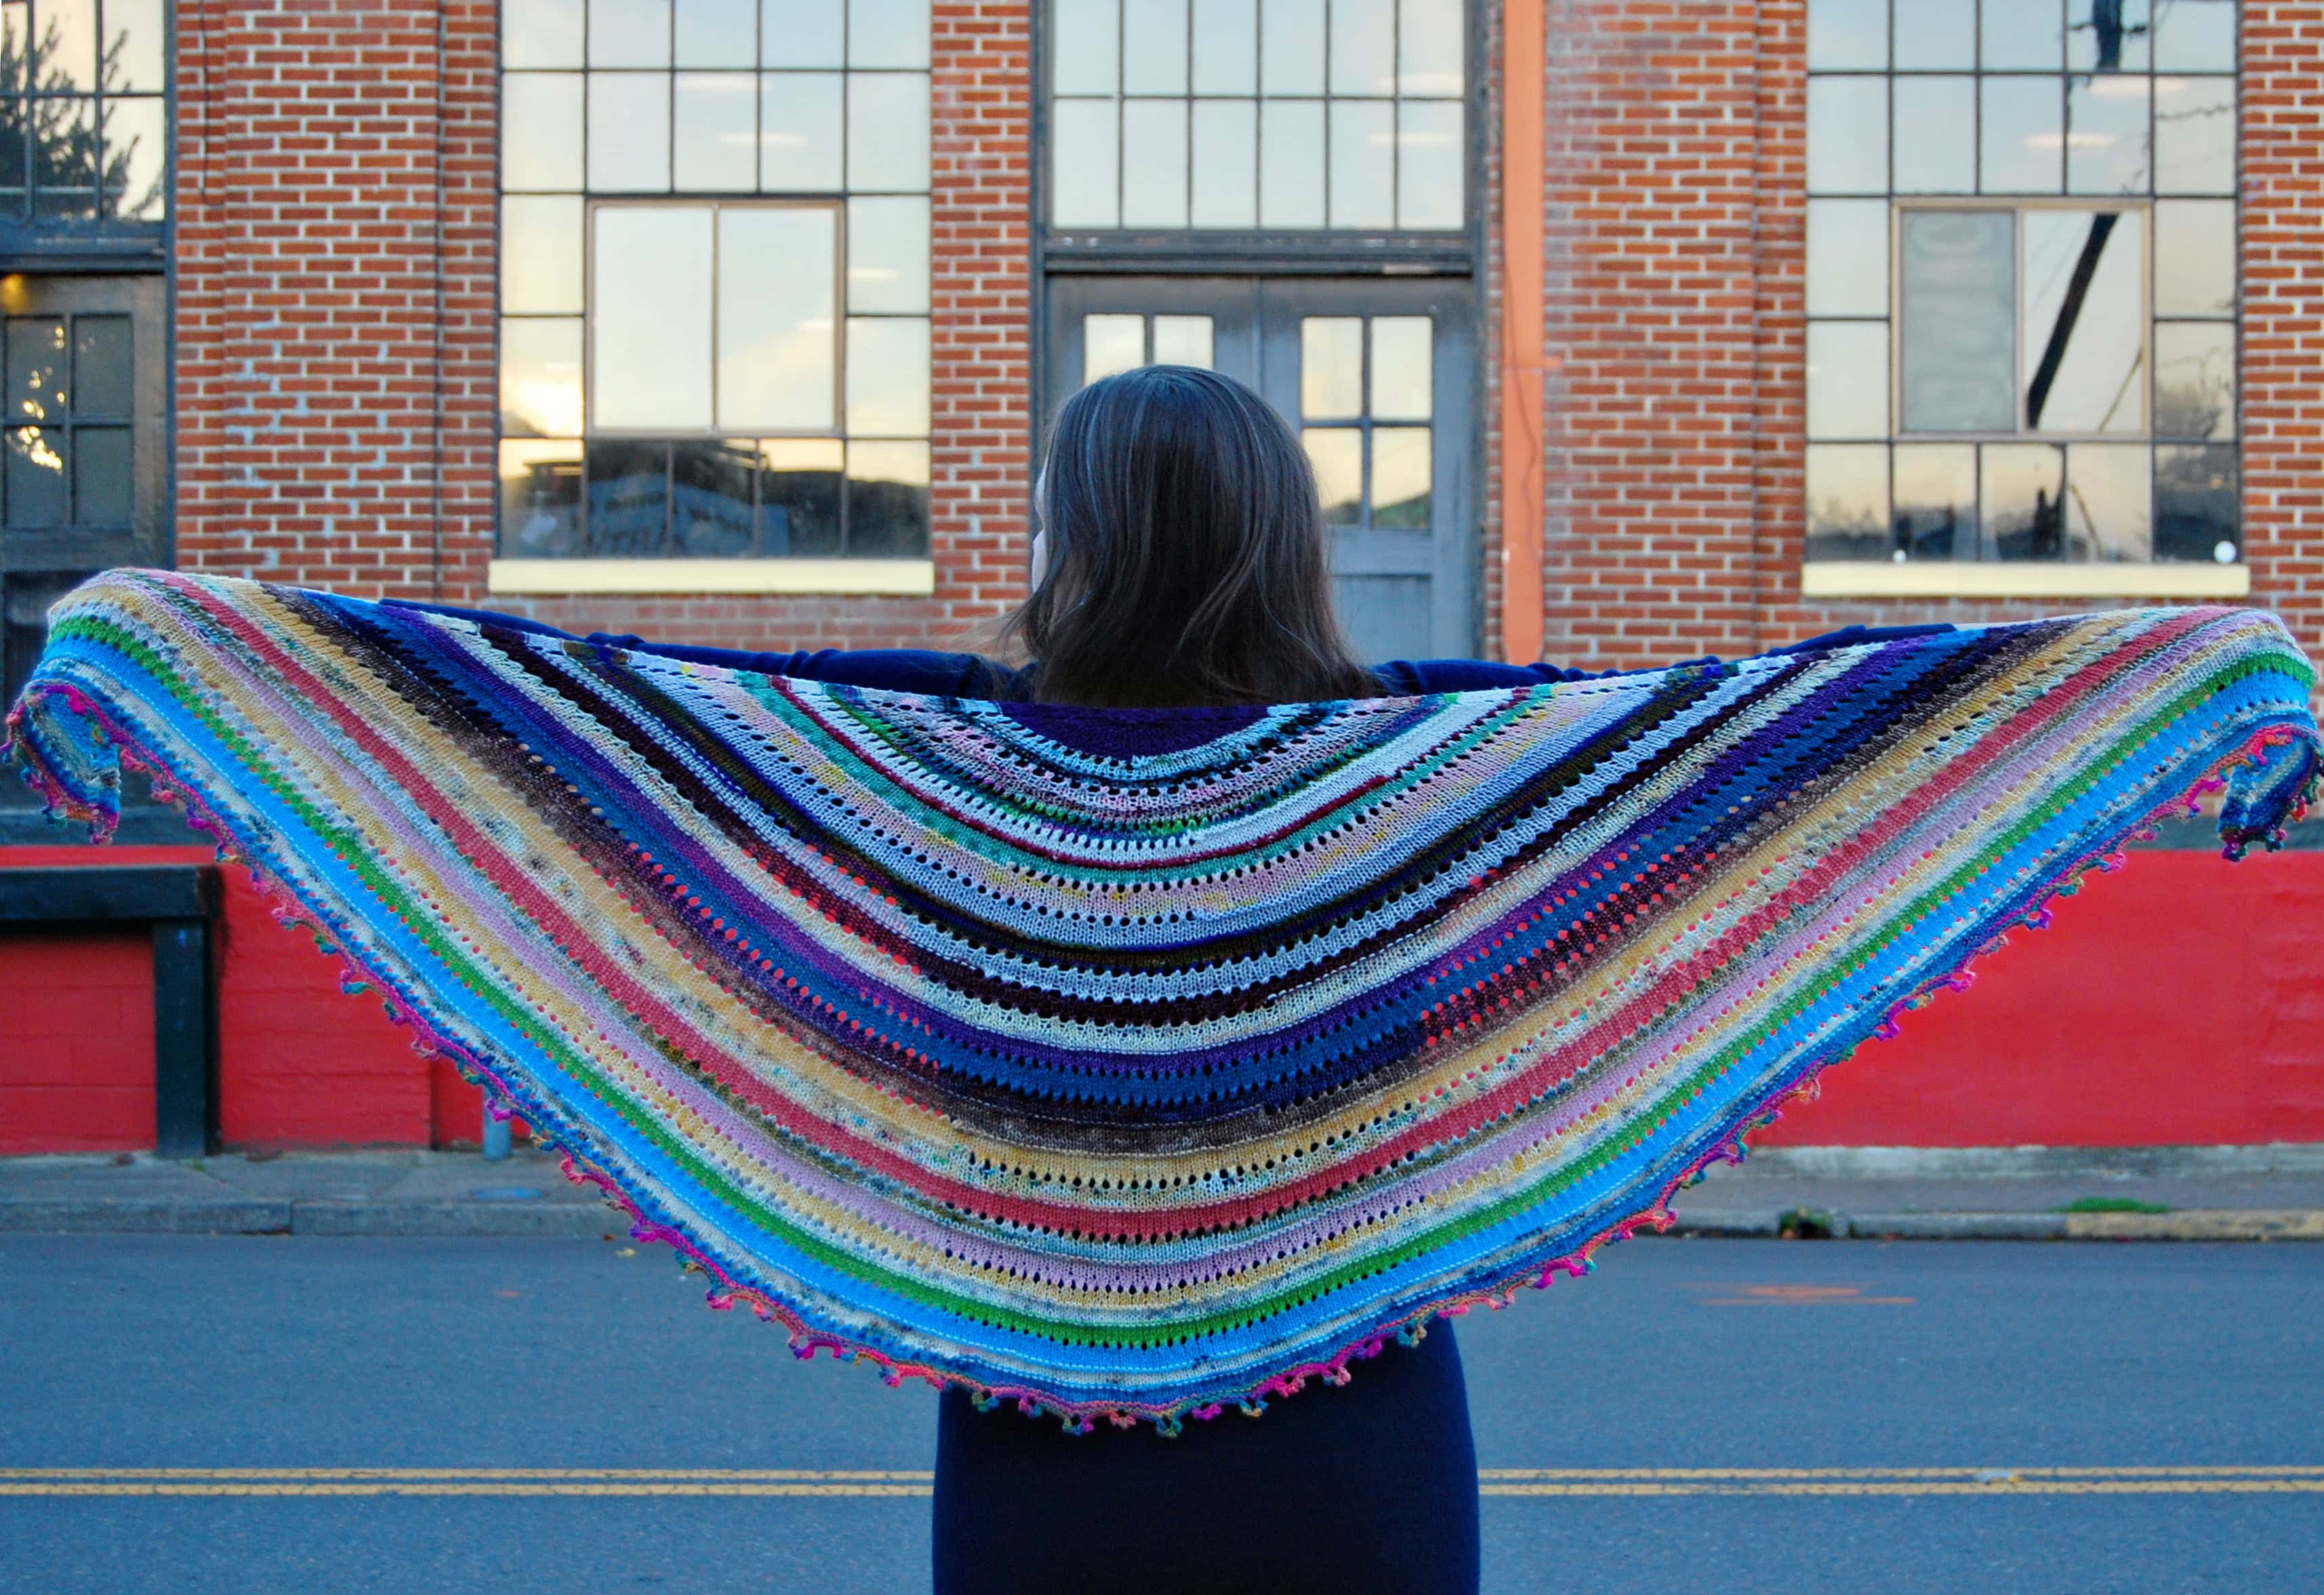
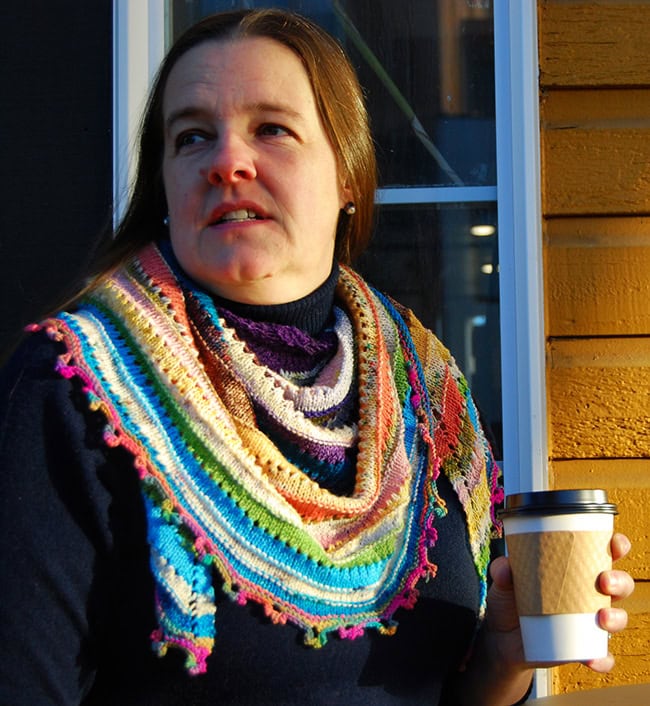
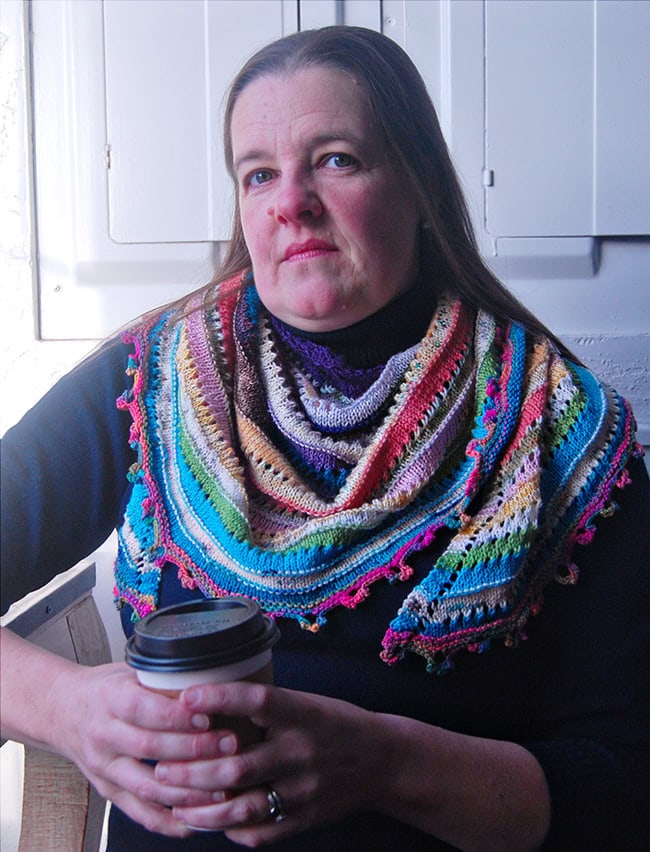
As much as knitters collect finished projects, we also collect odds and ends; the small balls of leftover yarn, none alone enough to make something but each too much to cast aside. In Oddment, these small odds and ends are combined with garter and eyelet texture to make a truly one–of-a-kind explosion of color and memory. Knit from the top down with few ends to weave in, a simple pattern, and an adventure of changing colors, this shawl is a knit you can return to again and again each time you need to use up those small oddments of leftover yarn.
 model: Taylor Rutledge
photos: Samuel Rutledge
SIZE
One
(Adjustable)
FINISHED MEASUREMENTS
At gauge given and with yardage listed, sample measures 63 inches/160 cm width and 21 inches/53 cm deep at deepest point.
MATERIALS
Yarn
![]() 200 grams (800-900 yards/730-820 meters) of scrap fingering and sock weight yarn from 1 to 25 grams each. Model shows approximately 30 different yarns.
200 grams (800-900 yards/730-820 meters) of scrap fingering and sock weight yarn from 1 to 25 grams each. Model shows approximately 30 different yarns.
Yarn Characteristics
![]() The sample shown is knit from .75g-20g ball ends in fingering weight. Wool and wool-blend sock yarns are recommended. This design works best with solid, tonal, specked, or random variegated yarns. Fixed-striping yarns don’t work well with the changing stitch count.
The sample shown is knit from .75g-20g ball ends in fingering weight. Wool and wool-blend sock yarns are recommended. This design works best with solid, tonal, specked, or random variegated yarns. Fixed-striping yarns don’t work well with the changing stitch count.
Recommended needle size
[always use a needle size that gives you the gauge listed below - every knitter's gauge is unique]
![]() US #5/3.75mm circular needle, 32 inches/80 cm or longer
US #5/3.75mm circular needle, 32 inches/80 cm or longer
Notions
![]() a postal or kitchen scale
a postal or kitchen scale
![]() 2 stitch markers
2 stitch markers
![]() small yarn needle
small yarn needle
![]() blocking pins
blocking pins
![]() blocking wires (optional)
blocking wires (optional)
GAUGE
20-22 sts/28-34 rows to 4 inches/10 cm in stockinette stitch.
Note: Gauge is only approximate. Because of the scrappy nature of this shawl, gauge will vary as you change yarns. The most important consideration is that the material has a good drape for a shawl.
PATTERN NOTES
[Knitty's list of standard abbreviations and techniques can be found here.]
Construction method: This shawl is worked from the top down, starting with a garter tab. Increases with an e-loop expand the body of the shawl, and the edge is finished with a simple crown stitch edging.
Organizing Your Yarn
Wind your oddments into small balls. The random color distribution in the Oddment Shawl comes from allowing the weight of each yarn ball to dictate its place in the shawl. Using a postal or kitchen scale, weigh your balls and arrange them from smallest to largest. Choose a ball approximately 2 grams to start the shawl to allow for some set up before the striped chaos takes over.
You can join each color as you go, or you can join your yarns all at once and wind up a ‘magic ball’ of many colors. If you wind a magic ball by hand, start with the largest balls first; if you use a ball winder, take care to pull from the correct end, so that the smallest amounts are at the beginning of the shawl and the largest amounts are at the end.
Changing Colors
This pattern calls for changing colors by joining the new yarn to the old yarn, mid-row, with a sewn Russian Join. This join minimizes the ends that must be woven in, ensures a clean color transition, and means the color change doesn’t need to happen at the end of a row, allowing for the irregular placement of garter and eyelet rows. Colors can be joined as you go or joined and wound into a magic ball before beginning.
When you are making a color change, work one of the following Color Change patterns – see below. Color changing variations are optional and each knitter can choose to use only eyelets, only garter ridges, a combination of both, or to knit the entire shawl in stockinette.
Color Change Row - Variations
When you change colors, there will be a section where you work the new color over stitches of the previous color. That is, the stitches to be worked will be a different color than the working yarn. When you are working those stitches, choose one of the following transitional stitch patterns, working the RS or WS version as appropriate. Start the new pattern as soon as you hit the overlapping yarns of your Russian join, and continue until the stitches to be worked on your left needle match your working yarn. Note that if you change colors near the end of a row, you'll end up working the transitional stitch pattern in two sections – for those last few stitches of the row, and then later on, on the following row, after you worked over the new-color stitches.
- Eyelet color change pattern – RS rows: If the color change happens at the beginning of the row, begin the row as normal, with (k4, yo), then work [k2tog, yo] to the end of the color change. If the eyelet color change starts in the middle of a row, work [k2tog, yo] to the end of the row, working the row-end (yo, k4) as normal as required. Always start with a k2tog and end with a yo to keep the count correct. After you have worked all the overlapped yarn, proceed with stockinette.
- Eyelet color change pattern – WS rows: If the color change starts at the beginning of the row, begin the row as normal, with (k4, p1), then work [p2tog, yo] to the end of the color change. If the eyelet color change starts in the middle of a row, work [p2tog, yo] to the last 5 sts, working (p1, k4) as normal. Always start with a p2tog and end with a yo to keep the count correct. After you have worked all the overlapped yarn, proceed with stockinette.
- Garter color change pattern – RS rows: If the color change happens at the beginning of the row begin the row as normal, with (k4, yo), then purl to the end of the color change. If the eyelet color change starts in the middle of a row, purl to the end of the row, working the row-end (yo, k4) as normal as required. After you have worked all the overlapped yarn, proceed with stockinette.
- Garter color change pattern – WS rows: If the color change starts at the beginning of the row, begin the row as normal, with (k4, p1), then knit to the end of the color change. If the eyelet color change starts in the middle of a row, knit to the last 5 sts, working (p1, k4) as normal. After you have worked all the overlapped yarn, proceed with stockinette.
M1: Use the backwards loop make one. Make a twisted loop on your left thumb (it should look like a lower-case cursive ‘e” and slide it onto the right needle.
Adjusting the size:
If you wish to use more scraps and have a larger shawl, repeat Section Five once or twice more. This will alter your stitch count by quite a lot. For each increase row (Row 125) use larger amounts of yarn as laid out throughout sections 2-5 of the pattern. If you choose to add a section or two, you will have a much longer bind off. The bind off row needs to have a multiple of 5 stitches – work an increase or decrease as required in your final WS row.
DIRECTIONS
Garter Tab (use approximately 1.5-2.5 grams for first color, remainder of Section One uses 1g or less of each color)
CO 4 sts.
Knit 6 rows.
Rotate work 90 degrees and pick up and knit 3 sts along the edge of the tab.
Rotate work another 90 degrees and pick up 4 sts in the cast-on edge. 11 sts.
Section One
Row 1 [RS]: K4, yo, k1, m1, k1, m1, k1, yo, k4. 15 sts.
Row 2 [WS]: K4, p to last 4 sts, k4.
Row 3: K4, yo, [k1, M1] 6 times, k1, yo, k4. 23 sts.
Row 4: K4, p to last 4 sts, k4.
Row 5: K4, yo, k to last 4 sts, yo, k4. 2 sts increased.
Row 6: K4, p to last 4 sts, k4.
Repeat Rows 5-6 once more. 27 sts.
Note: Rows 5-6 set the main pattern for the shawl. You will repeat these throughout; the only row that is different is the first of each section, where you work an increase row to significantly increase the stitch count, in a manner similar to a Pi shawl.
Section Two (use your 1-2g scraps for these rows)
Row 9: K4, yo, [k1, M1] to last 5 sts, k1, yo, k4. 47 sts.
Row 10: K4, p to last 4 sts, k4.
Row 11: K4, yo, k to last 4 sts, yo, k4. 2 sts increased.
Rows 12-27: Work Rows 10-11 8 more times. 63 sts.
Row 28: Repeat Row 10.
Section Three (use your 2-3g scraps for these rows)
Row 29: K4, yo, [k1, M1] to last 5 sts, k1, yo, k4. 119 sts.
Row 30: K4, p to last 4 sts, k4.
Row 31: K4, yo, k to last 4 sts, yo, k4. 2 sts increased.
Rows 32-69: Work Rows 30-31 19 more times. 159 sts.
Row 70: Repeat Row 30.
Section Four (use your 4-6g scraps for these rows)
Row 71: K4, yo, [k2, M1] to last 5 sts, k1, yo, k4. 236 sts.
Row 72: K4, p to last 4 sts, k4.
Row 73: K4, yo, k to last 4 sts, yo, k4. 2 sts increased.
Rows 74-131: Work Rows 72-73 29 more times. 296 sts.
Row 132: Repeat Row 72.
Section Five (use your 7+g scraps for these rows)
Row 133: K4, yo, [k3, M1] to last 7 sts, k3, yo, k4. 393 sts.
Row 134: K4, p to last 4 sts, k4.
Row 135: K4, yo, k to last 4 sts, yo, k4. 2 sts increased.
Rows 136-161: Work Rows 134-135 13 more times. 421 sts.
Row 162: Repeat Row 134.
Edging (minimum of 20g needed)
Break working yarn and attach yarn you wish to use for edging.
Row 1 [RS]: K4, yo, k to last 4 sts, yo, k4. 2 sts increased.
Row 2: Knit.
Row 3: Repeat Row 1.
Bind off as follows: Bind off 5 sts, [slip st from right needle to left needle, [{cast on 2 sts using a knitted cast on, bind off 2 sts, slip remaining st to left needle} 3 times, bind off 6] to the end.
FINISHING
Because this pattern uses a sewn Russian join, all the ends are woven in. Weave in the beginning, ending, and bind-off edge. Wet block by soaking the shawl for 20-30 minutes in tepid water. Gently press out the water without wringing. Spread the shawl on a flat surface such as blocking mats or a yoga mat, pinning into shape to settle the eyelets and define the edge.
ABOUT THE DESIGNER
 Taylor Rutledge is a wife, mother, and knitter living in Eugene, Oregon. Inspired by yarn, stories, nature, and a deeply rooted curiosity, she designs knitting patterns that are fun to knit, easy to explore, and delightful to share. Taylor also works and teaches at her LYS, Cozy, and helped to found Yarnies 541, a local 501c3 dedicated to supporting and expanding her fiber artist community. When she’s not knitting, she’s probably spending time with her three amazing kids and wonderful husband.
You can see more of Taylor’s work on her Substack, or you can follow Taylor on Ravelry, Instagram, and BlueSky. Her patterns are also available on PayHip.
Pattern & images © 2025 Taylor Rutledge