Revisited, a free knitting pattern from Knitty.com.
INTRODUCTION
Revisited
by Veronica Ory

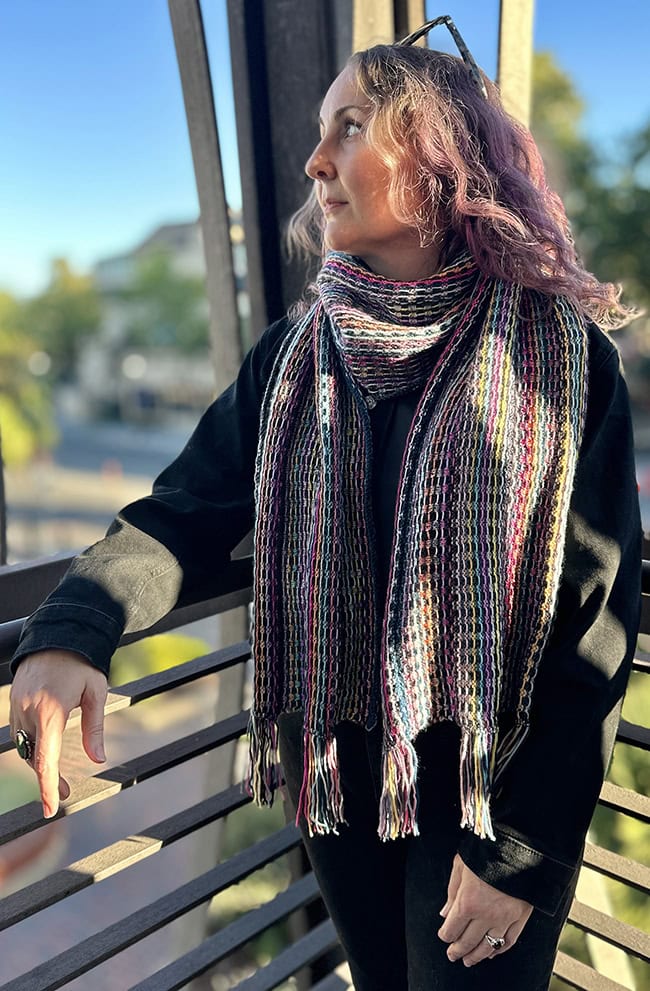
As you knit up your colorful fingering weight scraps in this scarf, you may find yourself reminiscing on the previous projects all your yarns came from. Celebrate, remember, and revisit old creations in a new project that will display a truly unique record of your knitting history. From a distance, the colors blend; up close, they pop.
Revisited is a big scarf with lots of slipped stitches that give an almost woven appearance. You only have to weave in your cast-on and bind-off tails; the rest become fringe! This scarf is knit lengthwise and leans into the properties of stockinette stitch curling to provide extra texture and volume. Finally, it’s fully reversible and suitable for any wearer, always a bonus for a scarf.
 model: Veronica Ory
photos: John Galati
SIZE
One size, adjustable
FINISHED MEASUREMENTS
Length: 78 inches/198 cm, not including fringe
Width: 11 inches/28 cm
MATERIALS
Yarn
![]() Fingering weight yarns in a variety of colors, 1200 yds/1100 m (approx. 300g) or more, divided into two groups, light and dark. You will need about 10% more dark color yarn than light.
Fingering weight yarns in a variety of colors, 1200 yds/1100 m (approx. 300g) or more, divided into two groups, light and dark. You will need about 10% more dark color yarn than light.
Yarn Characteristics
![]() The sample shown uses a variety of fingering-weight wool and wool-blend yarns for softness and elasticity. Using a variety of yarns with different textures will add interest to your project, but try to keep them about the same weight. I chose semi-solid and speckled colorways for my scarf, and avoided high-contrast variegated yarns.
The sample shown uses a variety of fingering-weight wool and wool-blend yarns for softness and elasticity. Using a variety of yarns with different textures will add interest to your project, but try to keep them about the same weight. I chose semi-solid and speckled colorways for my scarf, and avoided high-contrast variegated yarns.
Recommended needle size
[always use a needle size that gives you the gauge listed below - every knitter's gauge is unique]
![]() US #6/4mm circular needle, 40-inch/100 cm or longer, to accommodate large number of stitches
US #6/4mm circular needle, 40-inch/100 cm or longer, to accommodate large number of stitches
Notions
![]() yarn needle
yarn needle
GAUGE
23 sts/60 rows = 4 inches/10 cm in slipped stitch pattern.
PATTERN NOTES
[Knitty's list of standard abbreviations and techniques can be found here.]
Construction method: This scarf is knit flat, casting on and binding off on the long sides.
Selecting yarns to use: Gather a variety of fingering-weight yarns, and then divide them into two groups: light and dark. You’ll need slightly more dark color yarn (abbreviated DC) than light (abbreviated LC).
For my scarf, I chose very dark yarns for the dark color, and an assortment of medium-light yarns for the light color. You can take a photo and change it to grayscale to help see the contrast between the two groups. I also included a few very bright colors in my light pile, and I excluded a whole color family entirely: green. This will help the whole project look a little more put together.
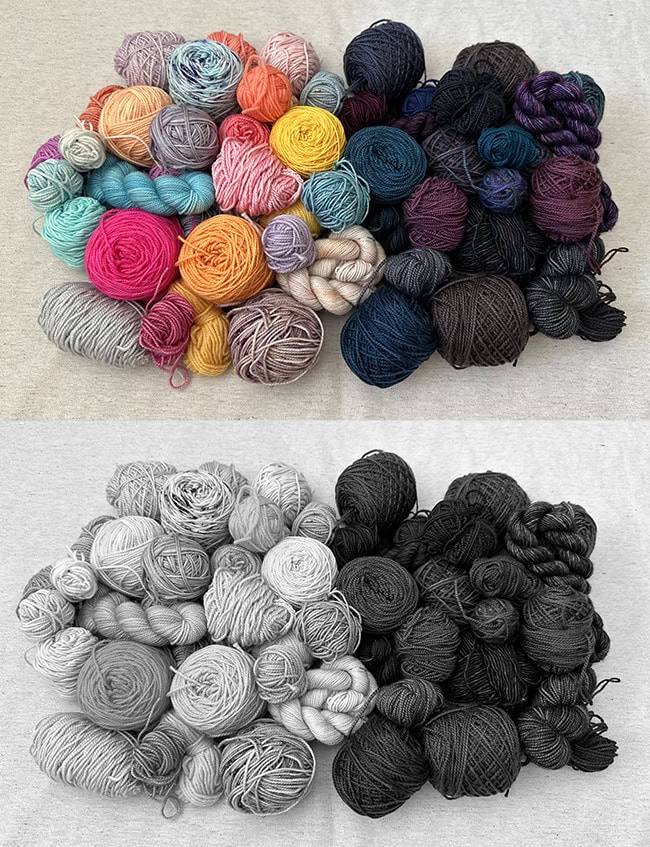
This is more yarn than required for the scarf, but should help give a sense of the color distribution.
- Throughout the project, I chose from the various DC and LC yarns more or less at random. You could also arrange your yarns in a repeating pattern, or in a gradient!
- If you run out of a yarn mid-row, join another similar color and continue. I recommend using the Russian Join or your favorite splicing method to add new yarn mid-row, as there are few stitches to hide the tails of new yarn in.
- Slipped stitches are always worked with the yarn held to the front (on both the right and wrong sides). Try not to pull them too tight.
- To modify the length of your scarf, cast on a number of stitches divisible by 4. An adjustment of 24 stitches will change the length of your scarf by approximately 4 inches/10 cm.
- To use a different weight of yarn for this pattern, try larger needles than are usually used for your yarn weight. The slipped stitches compress the fabric.
CHARTS
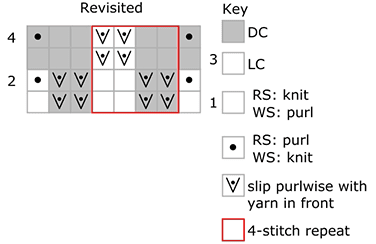
Revisited slip-stitch pattern:
Row 1 [RS]: With LC, k1, (sl2 wyif, k2) to last 3 sts, sl2 wyif, k1.
Row 2 [WS]: With LC, k1, sl2 wyif, (p2, sl2 wyif) to last st, k1.
Row 3: With DC, k1, (k2, sl2 wyif) to last 3 sts, k3.
Row 4: With DC, k1, p2, (sl2 wyif, p2) to last st, k1.
DIRECTIONS
SCARF
Using the long-tail method and DC, CO 448 sts. You can use 2 balls of yarn or both ends of one ball to avoid measuring out the long tail.
P 1 row and cut DC, leaving a 6 inch/15 cm tail.
Pattern Section
Using chart or written directions, work 4 rows of Slipped Stitch Pattern a total of 7 times, then work Rows 1-3 once more. Each time you will change colors after 2 rows, and each time you join or cut the yarn, leave a 6 inch/15 cm tail. These tails will become the fringe.
As you work, knot the yarn tails in pairs at the beginning/end of rows as close to the work as possible, within a row or two of joining, using an overhand knot.
You will now switch the right and wrong sides of the work as follows - what was so far the knit side of the work will become the purl side.
Transition row 1 [old WS of work]: With DC, k1, p to last st, k1.
Transition row 2 [new WS of work]: With DC, k1, p to last st, k1. Cut DC, leaving a 6 inch/15cm tail. This yarn tail should be at the opposite end of the work from all your previous yarn tails.
Work the Pattern Section – each time ending with the 2 Transition rows – 3 more times.
Final Section
Using chart or written directions, work 4 rows of Slipped Stitch Pattern a total of 7 times, and work Rows 1-3 once more.
Final row: With DC, k1, p to last st, k1.
With DC, bind off.
FINISHING
Weave in the cast-on and bind-off yarn tails, plus any mid-row yarn tails as needed.
Double check that you have knotted all the fringe tails close to the body of the scarf.
Wash your scarf in cool water with a small amount of wool wash. Roll in a towel to squeeze out excess water, then lay flat to dry. There is no need to stretch or pin.
After your scarf is dry, trim fringe to an even length.
ABOUT THE DESIGNER
 Veronica Ory is a 3rd-generation yarn wrangler, knitwear designer, and the "chief enabler" at Miss Babs, where she delights in being part of fiber artists’ creative journeys. She knits, crochets, gardens, and paints in the California Bay Area.
You can reach her on Ravelry, Instagram or Bluesky.
Pattern & images © 2025 Veronica Ory