|
|
 |
|
|

Velvet Morning began as a quest for the ideal slouchy cardigan.
I imagined throwing it on with jeans before heading out on a
weekend morning to grab a coffee, or meet friends for brunch.
It had to be the kind of cardigan that is effortless to wear
and super comfortable. It had to have lots of interesting visual
details so that it would make anything you are wearing an outfit,
without having to spend time thinking about what else would go
with it. The body is worked in one piece from the bottom up. Sleeves are knitted flat and seamed. The collar/neck edging is worked separately and sewed on. |
||
|
|

|
Tweet
|
|
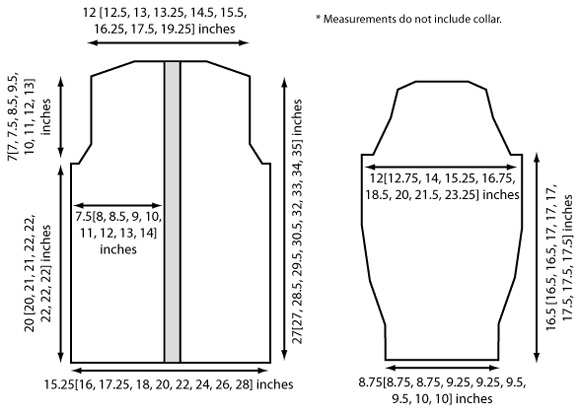
SIZE |
|
|
FINISHED MEASUREMENTS |
|
MATERIALS Color Option 2 (Sand): Notions |
|
GAUGE |
| 20 sts / 22 rows = 4" in Stockinette stitch after blocking |
|
PATTERN NOTES |
|
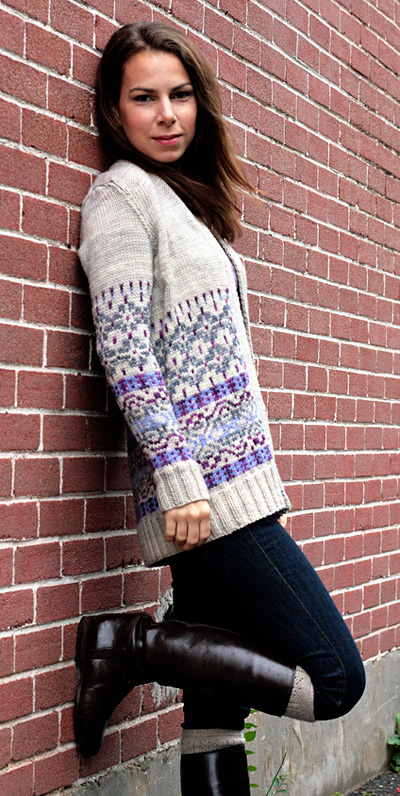 Sweater is intended to be oversized, and worn with 4-6 inches of positive ease. For ease of knitting, there are two colorwork charts to correspond to the two colorways displayed in the samples. The colorwork will not be perfectly symmetrical for both Left and Right fronts. Simply work in pattern across row, repeating motif in border, and finish by working remaining sts in pattern as per chart. Remember to continue from left to right over these same sts in the following WS row. All stitches for colorwork chart are knit on the RS and purled
on the WS.
Charts |
|
DIRECTIONS 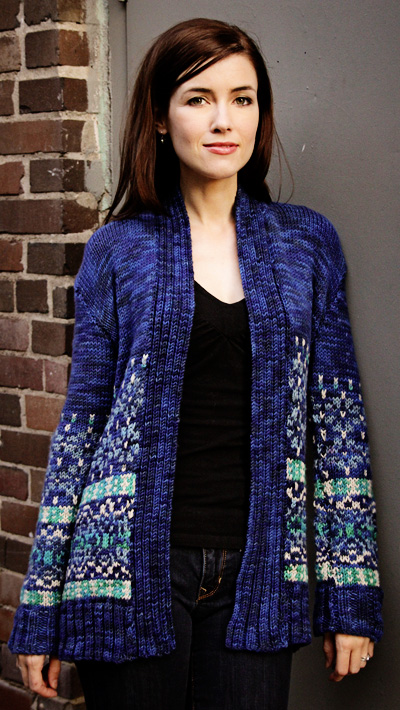
Using MC, cast on 150[160, 170, 180, 200, 220, 240, 260, 280] sts. Work in k2, p2 ribbing for 3[3, 3, 3, 3.5, 3.5, 4, 4, 4] inches. Beginning with a RS row, work two rows in St st. Work Rows 1-66 of Colorwork Chart (Sand or Midnight) once. With MC only, begin working St st once more, AT
THE SAME TIME,
on the first row, pm after first 37[40, 42, 45, 50, 55, 60, 65,
70] sts, then pm 76[80, 86, 90, 100, 110, 120, 130, 140] sts
after that. Shape Armholes: LEFT FRONT Cont working even in St st until piece measures 7[7, 7.5, 8.5, 9.5, 10, 11, 12, 13] inches from armhole bind off. BO 3[3, 4, 4, 4, 5, 5, 6, 6] sts at beg of next 4 RS rows. BO rem sts. RIGHT FRONT Cont working even in St st until piece measures 7 [7, 7.5, 8.5, 9.5, 10, 11, 12, 13] inches from armhole bind off. BO 3[3, 4, 4, 4, 5, 5, 6, 6] sts at beg of next 4 WS rows. BO rem sts. 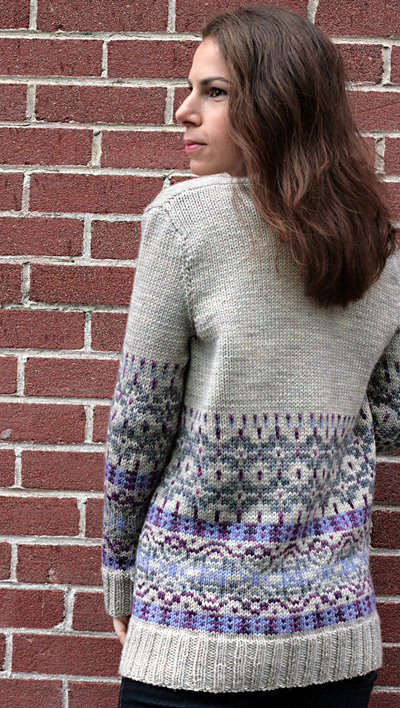 With RS facing, attach MC to Back. Next Row [RS]: K1, ssk, knit to last 3 sts, k2tog, k1. Next Row [WS]: Purl. Rep last 2 rows 4[5, 6, 7, 8, 10, 12, 13, 14] times more. 60[62, 65, 66, 72, 77, 81, 88, 96] sts Cont working even in St st until back measures same length as front to shoulder. Bind off all rem sts. SLEEVE [Make 2] Shape sleeve cap: 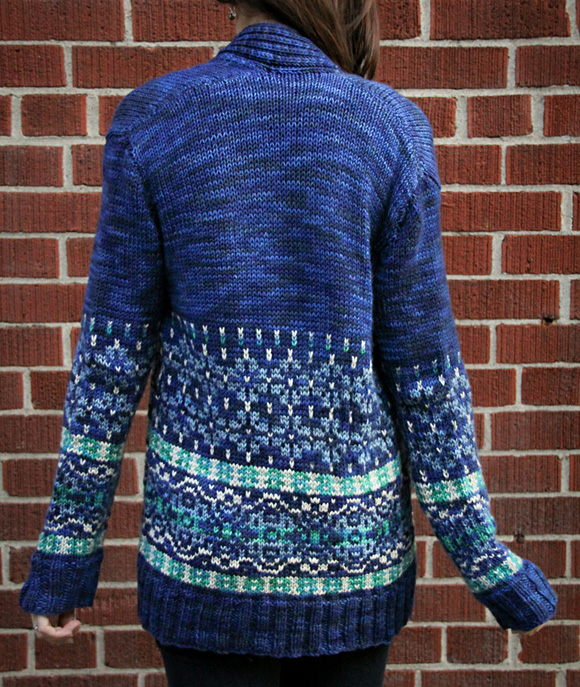
Seam shoulders of sweater. CO 22 sts. Work in k2, p2 rib until collar/neck edging is the same length as the sweater from left front hem, circling up and around the back of the neck, and down the right front to the hem. BO in rib and seam on to sweater. |
|
FINISHING |
|
| ABOUT THE DESIGNER |
|
|
|
Pattern & images © 2011 Julie Crawford. Contact Julie |