Knitty: little purls of wisdom
Phat Fiber
Title
beauty shot Weaverknits

Tangy

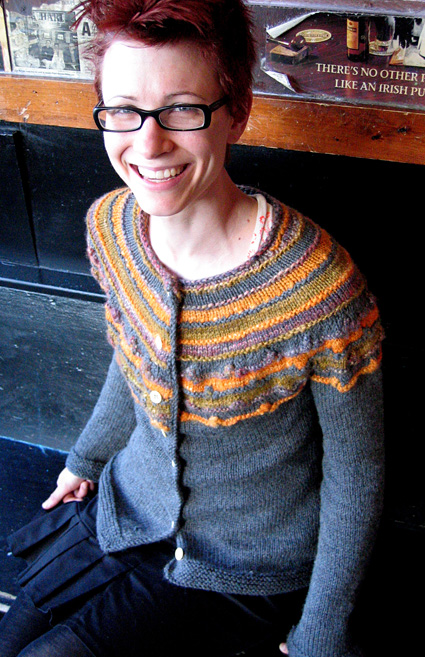
I like to spin. Since getting a wheel a few years ago, I’ve managed to develop the skills necessary to create some neat barber-pole type 2-ply worsted and chunky weight yarns. I like them a lot. I like their thick-and-thin nature, and I even like the fact that, depending on the day, they may be a bit over- or under-twisted. Some day I might get pretty good at making other sorts of yarns, but I’m in no rush. Until that day, I’ve decided to celebrate my special yarns, with something larger than a hat or mittens...a sweater of confidence!

King of Confidence allows spinners of all levels to incorporate spinning into a gorgeous garment designed to be forgiving to your yarn’s special traits. The body of the sweater is worked in a worsted-weight commercial yarn, and the piece is worked in one piece from the bottom up, with sleeves and body joined at the yoke. 

In the case of the sample, the handspun yarns were chunkier than the worsted weight Main Color (coming in at 10 WPI as opposed to 13 WPI for the Cascade 220). 


Since the cardigan is knit at a rather loose gauge, all yarns blocked out to a comparable gauge in my very generous test swatch.  Additionally, the textured yoke of the sweater is designed to be heavier in look and feel than the body. 

When spinning, aim for a weight close to the weight of your MC, and be sure to swatch a few stripes or a repeat or two of the yoke pattern, alternating MC and handspun yarns, and steam block it well before beginning your project to make sure your yarns are compatible.

So have confidence in your yarn, or support handspinners who sell their products.  Three 4 oz. skeins of worsted to chunky weight handspun purchased from a spinner is a relatively economic way to use luxury yarns in a cardigan!

spacer model: Ann Weaver spacer photos: Chris Bergh

SIZE
XS[S, M, L, 1X, 2X, 3X] (shown in size S)

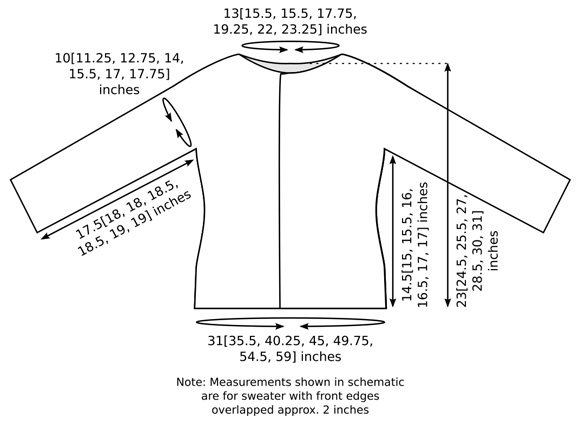
FINISHED MEASUREMENTS
Chest: 31[35.5, 40.25, 45, 49.75, 54.5, 59] inches, with front edges overlapped approx. 2 inches
Length: 23[24.5, 25.5, 27, 28.5, 30, 31] inches
Note:  This cardigan is designed to fit with approx. 4 inches of positive ease for winter layering and a warm, cozy look. Cardigan shown measures 36 inches, and is worn by a model with a 31-inch bust.

spacer

MATERIALs
Note: This sweater as shown is a combination of commercial and handspun yarn. To knit this sweater entirely in commercial yarn, replace the handspun with approximately 400 (460, 530, 560, 595, 620, 650) yards at 17 sts/24 rows = 4" in St st, one third of the total in each color.

Commercial Yarn
spacer [MC] Cascade 220 [100% Peruvian Highland Wool; 220yd/200m per 100g skein]; color: #8400; 4[4, 5, 6, 6, 7, 8] skeins

Fiber
Briar Rose Fibers [100% Bluefaced Leicester; top]
spacer [CC1] BFL208a (orange base); 2 [2, 2.5, 2.5, 3, 3, 3] ounces
spacer [CC2] BFL160 (slate grey base); 2 [2, 2.5, 2.5, 3, 3, 3] ounces
spacer [CC3] BFL126 (olive green base); 2 [2, 2.5, 2.5, 3, 3, 3] ounces
Note: Ounces are approximate; your yardage per ounce may vary!

Finished Yarn:
spacer Wraps per inch: approx. 10
spacer Yardage used: 225 (250, 275, 300, 325, 350, 375, 400) yds

Drafting Method:
spacer Long draw

Recommended needle size
[always use a needle size that gives you the gauge listed below -- every knitter's gauge is unique]
spacer 1 set US #9/5.5mm double point needles (used for working sleeves; larger sizes may prefer a 16-inch circular needle)
spacer 1 US #9/5.5mm circular needle, 32 inches or longer
spacer 1 spare set of double-point needles or circular needle, US #9/5.5mm or smaller

gearbox

Spinning Tool: Ashford Traditional Spinning Wheel [single drive] + at least 3 bobbins
Niddy Noddy: Ashford 1.5m
Lazy Kate: Ashford upright

Tools
spacer Yarn needle
spacer 8 buttons, approx. 0.75 inch diameter (select buttons after garment is complete to ensure correct size)
spacer 2 stitch holders or waste yarn
spacer 4 stitch markers
spacer Sewing thread in coordinating color
spacer Sewing needle

spacer

GAUGE
17 sts/24 rows = 4" in stockinette stitch using MC

spacer

PATTERN NOTES
[Knitty's list of standard abbreviations and techniques can be found here.]

For sizes L, 1X, 2X and 3X, front of sweater will be approx. 1 inch wider than back when buttoned. This is done to give slightly more ease over the bust.

Working wraps together with wrapped sts on RS rows:
Insert tip of right needle into front of wrap and knit it together with wrapped st.

Working wraps together with wrapped sts on WS rows:
Insert tip of left needle into back of wrap and knit or purl it together with wrapped st in pattern.

spacer

DIRECTIONS
LOWER BODY
Using long circular needle and MC, CO 140[160, 180, 200, 220, 240, 260] sts.

Work 12 rows in garter st (k all sts).

Next Row [RS]: K37[42, 47, 53, 58, 63, 68], place marker, k66[76, 86, 94, 104, 114, 124], place marker, k37[42, 47, 53, 58, 63, 68].

Work in stockinette st until work measures 2.75[2.5, 3.5, 3.25, 3, 4.5, 3.75] inches, ending with a WS row.

Buttonhole Row 1 [RS]: K3, BO 2 sts, k to end.

Buttonhole Row 2 [WS]: P to bound off sts, CO 2 sts, p to end.

When working lower body and yoke, work one buttonhole every 2.75[3, 3, 3.25, 3.5, 3.5, 3.75] inches until 8 buttonholes have been worked.

Last buttonhole will fall approx. 1 inch below neckline.

Continue in stockinette st until work measures 5.5[6, 6, 6.5, 6.5, 7, 7] inches, ending with a WS row.

Shape Waist:
Waist Decrease Row [RS]: [K to 2 sts before marker, ssk, slip marker, k2tog] twice, k to end.
Work 9 rows in stockinette st, then work Waist Decrease Row once more. 132[152, 172, 192, 212, 232, 252] sts.

Work 19 rows in stockinette st.

Waist Increase Row [RS]: K to 1 st before marker, m1, k1, slip marker, m1, k to next marker, m1, slip marker, k1, m1, k to end.

Work 9 rows in stockinette st, then work Waist Increase Row once more. 140[160, 180, 200, 220, 240, 260] sts.

Continue in stockinette st until work measures 14.5[15, 15.5, 16, 16.5, 17, 17] inches or desired length to underarm, ending with a RS row.

Next Row [WS]: [K to 4[4, 5, 5, 6, 6, 7] sts before marker, BO 8[8, 10, 10, 12, 12, 14] sts, removing marker] twice, k to end. 124[144, 160, 180, 196, 216, 232] sts:
33[38, 42, 48, 52, 57, 61] sts for each front, 58[68, 76, 84, 92, 102, 110] sts for back.
Set aside and work sleeves. Do not break yarn.

SLEEVES
Using double-point needles (or 16-inch circular needle), CO 42[48, 54, 60, 66, 72, 76] sts. If using double-point needle, divide sts between needles. Place marker and join to begin working in the round, being careful not to twist.
Round 1: K all sts.
Round 2: P all sts.
Repeat these 2 rounds 5 times more for garter st cuff.

Work in stockinette st until sleeve measures 17.5[18, 18, 18.5, 18.5, 19, 19] inches or desired length to underarm, ending last round 4[4, 5, 5, 6, 6, 7] sts before marker. BO next 8[8, 10, 10, 12, 12, 14] sts, removing marker. Break yarn and place remaining 34[40, 44, 50, 54, 60, 62] sts on spare needle(s).

Make second sleeve in the same way, but do not remove sts from needles.

YOKE
Note: Don't forget to continue working buttonholes as you work the yoke!

Joining Row: Using long circular needle and yarn attached to lower body, k 33[38, 42, 48, 52, 57, 61] sts of right front, k 34[40, 44, 50, 54, 60, 62] sts of one sleeve, k 58[68, 76, 84, 92, 102, 110] sts of back, k 34[40, 44, 50, 54, 60, 62] sts of other sleeve, k  33[38, 42, 48, 52, 57, 61] sts of left front. 192[224, 248, 280, 304, 336, 356] sts on needle.

Sizes XS, S, 1X Only:
P 1 WS row, evenly decreasing 2[4, -, -, 4, -, -] sts. 190[220, -, -, 300, -, -] sts.

Sizes M, 2X, 3X Only:
P 1 WS row, evenly increasing -[-, 2, -, -, 4, 4] sts. -[-, 250, -, -, 340, 360] sts.

Work in stockinette st until yoke measures 1[1, 1, 1.5, 2, 2.5, 3.5] inches from Joining Row, ending with a WS row.

Note: As you work yoke pattern below, if Buttonhole Row 1 will fall anywhere between Rows 1-6 of Textured Yoke Pattern, work first 10 sts of RS rows and last 10 sts of WS rows as follows:
For
Rows 1 and 2, work these sts in garter st. For Rows 3-6, work these sts in stockinette st.

If desired, place st markers between repeats of pattern. Number of sts in each repeat will increase from 10 sts to 16 sts on Row 1, then will be decreased back to 10 over the following rows. This will happen again on Row 7.

Textured Yoke Pattern:
Row 1 [RS]: Using CC1, [k2, (k1, yo, k1, yo, k1, yo, k1] in next st (1 st increased to 7 sts), k7] to end.
Row 2 [WS]: Using CC1, k all sts.
Row 3 [RS]: Using MC, [k1, k2tog, k5, ssk, k6] to end.
Row 4 [WS]: Using MC, [p6, p2tog tbl, p1, sl 1 with yarn held to front of work, p1, p2tog, p1] to end.
Row 5 [RS]: Using MC, [k1, k2tog, sl 1 with yarn held to back of work, ssk, k6.
Row 6 [WS]: Using MC, p all sts.
Row 7 [RS]: Using CC2, [k7, (k1, yo, k1, yo, k1, yo, k1] in next st (1 st increased to 7 sts), k2] to end.
Row 8 [WS]: Using CC2, k all sts.
Row 9 [RS]: Using CC3, [k6, k2tog, k5, ssk, k1] to end.
Row 10 [WS]: Using CC3, [p1, p2tog tbl, p1, sl 1 with yarn held to front of work, p1, p2tog, p6] to end.
Row 11 [RS]: Using CC3, [k6, k2tog, sl 1 with yarn held to back of work, ssk, k1.
Row 12 [WS]: Using CC3, p all sts.
Rows 13-14: Using MC, work as for Rows 1-2.
Rows 15-18: Using CC1, work as for Rows 3-6.
Rows 19-20: Work as for Rows 7-8, again using CC2.
Rows 21-23: Using MC, work as for Rows 9-11. If you were using st markers, remove them now.

First Yoke Decrease Row [WS]: Using MC, [p1, p2tog] to last 1[1, 1, 1, 0, 1, 0] sts, p1[1, 1, 1, 0, 1, 0]. 127[147, 167, 187, 200, 227, 240] sts.

Yoke Stripe Pattern:
Rows 1-2: Using CC3, k all sts.
Rows 3-6: Using CC2, work in stockinette st.
Rows 7-8: Using CC1, k all sts.
Rows 9-11: Using CC3, work in stockinette st.

Size XS Only:
Row 12 [WS]: Using CC3, [p1, p2tog] to last st, p1. 85 sts.
Rows 13-14: Using MC, k all sts.
Rows 15-18: Using CC1, work in stockinette st. Proceed to Neck Shaping.

Sizes S, M, L, 1X, 2X, 3X Only:
Row 12 [WS]: Using CC3, p all sts.
Rows 13-14: Using MC, k all sts.
Rows 15-18: Using CC1, work in stockinette st, EXCEPT:
For sizes S, M, L, and 1X work Row -[16, 16, 18, 18, -, -] as follows: [p1, p2tog] to last -[0, 2, 1, 2, -, -] sts, p-[0, 2, 1, 2, -, -]. -[98, 112, 125, 134, -, -] sts.

Rows 19-20: Using CC2, k all sts.
Rows 21-24: Using MC, work in stockinette st, EXCEPT:
For sizes 2X and 3X, work Row 24 as follows: [p1, p2tog] to last -[-, -, -, -, 2, 0] sts,
p-[-, -, -, -, 2, 0]. -[-, -, -, -, 152, 160] sts.

Sizes S, M, L Only:
Proceed to Neck Shaping.

Sizes 1X, 2X, 3X Only:
Rows 25-26: Using CC2, k all sts.
Rows 27-30: Using CC1, work in stockinette st. Proceed to Neck Shaping.

Neck Shaping:
At beginning of neck shaping, there are 85[98, 112, 125, 134, 152, 160] sts.

Rows 1-2: Using CC3, k all sts.
Row 3 [RS]: Using CC2, k all sts.

Sizes XS, S Only:
Row 4 [WS]: Using CC2, [p2, p2tog] to last 1[2, -, -, -, -, -] sts, p1[2, -, -, -, - ,-]. 64[74, -, -, -, -, -] sts.

Sizes M, L, 1X, 2X, 3X Only:
Row 4 [WS]: Using CC2, [p1, p2tog] to last -[-, 2, 1, 2, 2, 2, 1] sts, p-[-, 2, 1, 2, 2, 2, 1] sts. -[-, 75, 84, 90, 102, 107] sts.

All Sizes:
Neckline will now be shaped using short rows worked across back neck.
Row 5 [RS]: Using CC2, k17[20, 20, 22, 24, 27, 28], place marker, k30[34, 35, 40, 42, 48, 51], place marker, W&T.
Row 6 [WS]: Using CC2, p to marker, slip marker, W&T.

When working following rows, pick up wraps and work them together with wrapped sts (see Pattern Notes). In next row, CC1 will be joined at beginning of short row (not at edge of sweater).

Row 7 [RS]: Using CC1, k to wrapped st, k2, W&T.
Row 8 [WS]: Using CC1, k to wrapped st, k2, W&T.
Row 9 [RS]: Using CC2, k to wrapped st, k2, W&T.
Row 10 [WS]: Using CC2, p to wrapped st, p2, W&T.
Row 11 [RS]: Using CC2, k to end, removing markers.

For sizes M, L, 2X and 3X, work 2 more rows in stockinette st.

For all sizes, loosely BO all sts.

spacer

FINISHING
Front Edges:
Using longer circular needle and MC, with RS facing and beginning at lower right front corner, pick up and k1 st for every 2 rows along right front edge to neckline. K 2 rows.
Loosely BO all sts.
Work edging for left front in the same way.

Sew sleeves to bdy along BO edges at underarms. Weave in ends.

Steam or wet block cardigan. Use sewing thread to sew buttons to cardigan opposite buttonholes, with fronts overlapped approx. 2 inches.

spacer
ABOUT THE DESIGNER

Weaverknits is a family enterprise begun by two sisters who have been making things since they were born.

Ann, currently employed as a bread baker, designs and knits garments with the inspiration and input of her design student sister, Beth, and the rest of her supportive family. She blogs here, and can be found on Ravelry as weaverknits.

spacer