Knitty: little purls of wisdom
Yarniverse
Title
beauty shot

Tangy

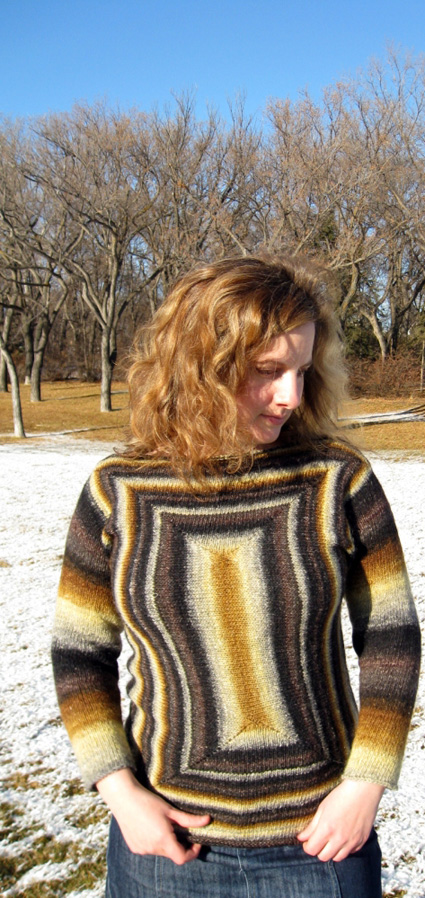
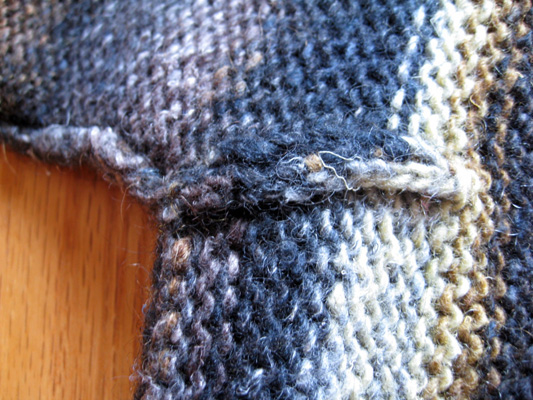
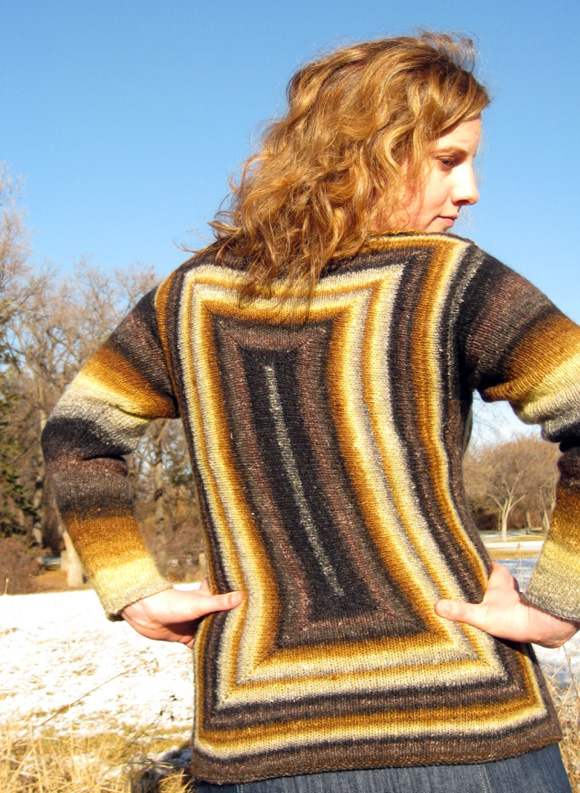
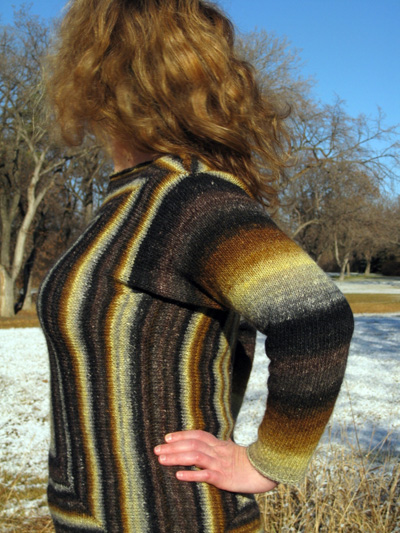
Who says you need to start at the top, the bottom, or even the side when you knit a sweater?

I guess in food terms, this is like starting with neither the dessert or salad course, but jumping right to the entrée, leaving the other less substantial dishes to come later. But all the parts of a sweater are there when you need them.

The front and back are cast on with provisional cast on, then knit out with mitered corners to the join for the sleeves. The body of the sweater is knit out for a few more rows to shape the underarms and to form the rest of the bottom and the sides. The shoulder seams are then sewn and the sleeves are knit from remaining the live stitches in one piece.

Finally the centers of the squares are grafted together, which makes an invisible join and hides the method of construction, but if the grafting intimidates you, feel free to use a 3-needle bind off.


spacer model: Sarah Sutherland spacer photos: Jonathan Cross

SIZE
XS[S, M, L, 1X, 2X, 3X] (shown in size L)

spacer

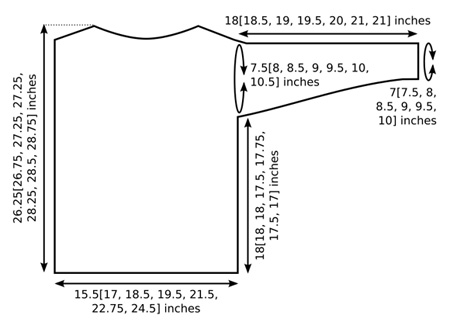
FINISHED MEASUREMENTS
Chest: 31[34, 37, 39, 43, 45.5, 49] inches
Length: 26.25[26.75, 27.25, 27.25, 28.25, 28.5, 28.75] inches

spacer

MATERIALS
Yarn

spacer Noro Silk Garden Lite [45% silk, 45% mohair, and 10% lambswool; 136yd/124m per 50g skein]; color: #2034; 7[8, 9, 10, 12, 13, 14] skeins

Recommended needle size
[always use a needle size that gives you the gauge listed below -- every knitter's gauge is unique]
spacer 1 set US #7/4.5mm double-point needles (for Sizes 1X, 2X, 3X only)
spacer 1 16-inch US #7/4.5mm circular needle
spacer 1 24-inch US #7/4.5mm circular needle
spacer 1 32-inch US #7/4.5mm circular needle (optional – useful for all sizes, especially recommended for larger sizes)

Notions
spacer Waste yarn
spacer 10 stitch markers; be sure one is different from the others
spacer Stitch holders (optional; waste yarn may be used instead)
spacer Yarn needle

spacer

GAUGE
20 sts/27 rows = 4" in stockinette stitch
Note: For this project, the yarn is knit at a looser gauge than is listed on the ball band. If substituting yarn, choose a yarn with a recommended ball band gauge of approx. 22 sts = 4 inches.

spacer

PATTERN NOTES
[Knitty's list of standard abbreviations and techniques can be found here.]

This project uses a provisional cast on. Use your preferred provisional cast on technique; directions for one technique may be found here.

Instructions for Backstitch can be found here.

Instructions for Mattress Stitch can be found here.

Instructions for grafting can be found here.

Corner Increase
Worked on RS: K to marker; st after marker will be a p st, followed by another marker. Use right needle to pick up st which sits below p st on needle; k this st. Slip marker, p next st, slip marker. Use left needle to pick up st below the st you just purled; this will be the same st you picked up for the first increase. K this st. 2 sts increased.

Worked on WS: P to marker; st after marker will be a k st, followed by another marker. Use right needle to pick up st which sits below k st on needle (this will be the upper strand leading out from behind the k st); p this st. Slip marker, k next st, slip marker. Use left needle to pick up st below the st you just knit; this will be the same st you picked up for the first increase. P this st. 2 sts increased.

spacer

DIRECTIONS

spacer
FRONT
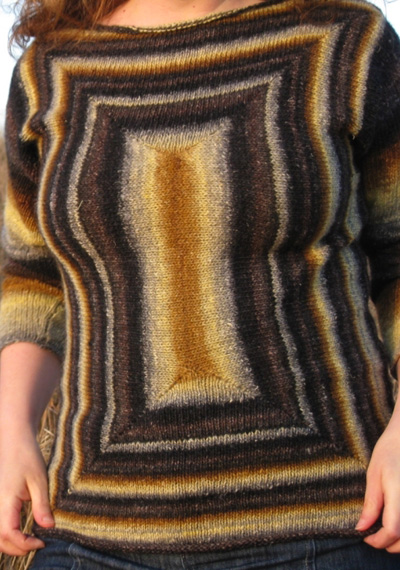
With shortest circular needle for sizes XS, S, M and L or double-point needles for sizes 1X, 2X and 3X, CO 118[112, 100, 88, 76, 68, 52] sts using provisional CO technique. Do not join.

Note: When working Set-up Row, do not place unique marker; this marker will be placed at end of Round 1.

Set-up Row:
K57[54, 48, 42, 36, 32, 24], place marker, p1, place marker, p1, k57[54, 48, 42, 36, 32, 24], place marker, p1, place marker, p1. Join to begin working in the round, being careful not to twist.

Round 1: [K to marker, work corner increase, placing marker after p st and before second increase] four times, placing unique marker before second increase of last corner increase, to indicate beginning of round. 126[120, 108, 96, 84, 76, 60] sts.

Increase Round: [K to marker, work corner increase] four times.
Repeat Increase Round once more. K 1 round. 142[136, 124, 112, 100, 92, 76] sts.

Work Increase Round three times.
K 1 round.
Repeat these 4 rounds 8[9, 10, 11, 13, 14, 15] times more, switching to longer needles as required. 358[376, 388, 400, 436, 452, 460] sts.

Sizes M, L, 3X Only:
Work -[-, 1, 2, -, -, 1] more Increase Round(s). -[-, 396, 416, -, -, 468] sts.

All Sizes:
There are 60[66, 74, 82, 90, 96, 104] sts in each short section and 117[120, 122, 124, 126, 128, 128] sts in each long section.

Shape Armholes:
Next Round: Work in pattern until you have worked second corner increase of round (at end of short section), k81[81, 81, 80, 80, 79, 76] (82[82, 82, 81, 81, 80, 77] sts on right needle after marker). Place marker and turn work; from this point,  front will be worked back and forth in rows.

For size L, next row will be worked without increases. For all other sizes, work increases.

Next Row [WS]: Work in pattern until you have worked two corners, p82[82, 82, 81, 81, 80, 77] (83[83, 83, 81, 82, 81, 78] sts on right needle after marker). Place last 36[39, 41, 44, 46, 49, 52] sts of this section and corner st on one st holder or length of waste yarn for sleeve, place 60[66, 74, 82, 90, 96, 104] sts of short sction on another holder for neckline, place corner st and 36[39, 41, 44, 46, 49, 52] sts of remaining long section (all sts to newly placed marker) on third holder for other sleeve. Remove new marker; front will now be worked back and forth over remaining sts.

Work 8 more rows in pattern, increasing at corners on three of every four rows as set. 256[262, 270, 272, 284, 288, 290] sts.

Loosely BO all sts.

Shape Neckline:
Place 60[66, 74, 82, 90, 96, 104] held sts of neckline on needle and join yarn with RS facing.
Next Row [RS]: BO 3[3, 4, 4, 3, 4, 3] sts, k17[19, 23, 21, 23, 21, 17] (18[20, 24, 26, 30, 33, 40] sts on right needle) and place all sts just worked on st holder; BO next 18[20, 18, 22, 24, 22, 18] sts, k to end. 21[23, 28, 30, 33, 37, 43] sts.

Right Shoulder:
Row 1 [WS]: BO 3[3, 4, 4, 3, 4, 3] sts, p to end.
Row 2 [RS]: BO 6[7, 8, 9, 7, 7, 7] sts, k to end. 12[13, 16, 17, 23, 26, 33] sts.
Repeat these two rows 1[1, 1, 1, 2, 2, 3] times more. BO remaining 3[3, 4, 4, 3, 4, 3] sts.

Left Shoulder:
Place held sts of left shoulder on needle and join yarn at neck edge with WS facing.
Row 1 [WS]: BO 6[7, 8, 9, 7, 7, 7] sts, p to end.
Row 2 [RS]: BO 3[3, 4, 4, 3, 4, 3] sts, k to end.
Repeat these two rows 1[1, 1, 1, 2, 2, 3] times more.

BACK
Work as for Front.

spacer
SLEEVES
Sew shoulder seams using backstitch.

Remove front and back held sts of one armhole from holders and place on needle, join yarn at underarm with RS facing. 74[80, 84, 90, 94, 100, 106] sts on needle.

Work 6 rows in stockinette st, ending with a WS row.

Next Row [RS]: K16[13, 18, 24, 26, 32, 35], [k2tog, k1] 14[18, 16, 14, 14, 12, 12] times, k16[13, 18, 24, 26, 32, 35]. 60[62, 68, 76, 80, 88, 94] sts.

Continue in stockinette until sleeve measures 4.5[5, 3, 5, 5.5, 3.5, 2] inches, ending with a WS row.

Note: As written, sleeve measures 18[18.5, 19, 19.5, 20, 21, 21] inches. If longer or shorter sleeve is desired, work more or less length at this point.

Decrease Row [RS]: K1, k2tog, k to last 3 sts, k2tog, k1.
Work 7[7, 7, 5, 5, 5, 5] rows in pattern.
Repeat these 8[8, 8, 6, 6, 6, 6] rows 10[10, 12, 15, 15, 18, 20] times more, then work Decrease Row once more. 36[38, 40, 42, 46, 48, 50] sts.

Work 2 more rows in stockinette st, then loosely BO all sts.

FINISHING
Carefully remove waste yarn from sts at center of front and back, placing resulting live sts on needles. Graft sts of long sections together.

Sew the following seams using mattress stitch:
Sew side seams. Sew top portion of sleeve edges to underarm edges, then sew sleeve seams. See photo above.

Weave in ends and block sweater.
spacer
ABOUT THE DESIGNER

designernamespacer Sarah lives in a part of Canada where there are no months in the year when you can be sure you won’t need a sweater. She spends an inappropriate amount of time thinking about knitting, crocheting and yarn. 

Her designs have been published in Knitting in the Sun, Knitty, and Yarn Forward, and she blogs at Parallax Knitting.

spacer