Knitty: little purls of wisdom
Jimmy Beans
Title
beauty shot

Tangy

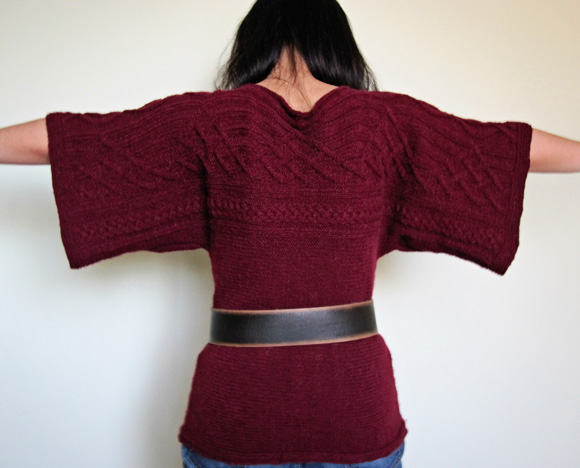
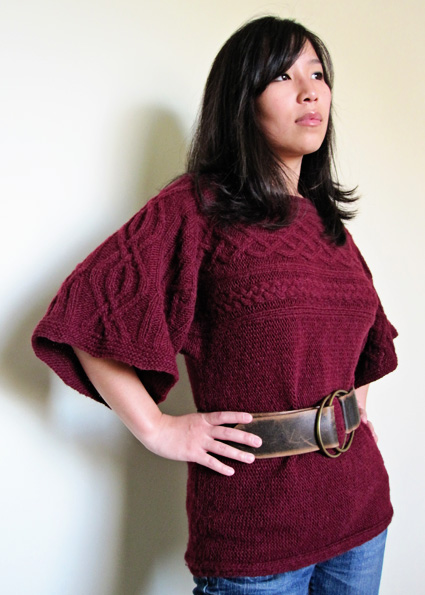
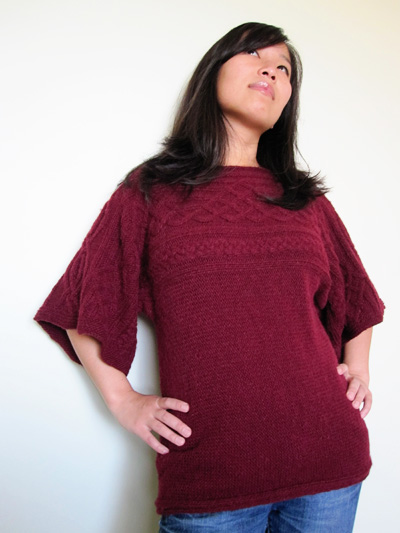
Who says boxy sweaters can’t be fun and fashionable?

This sweater is great for a beginner who wants to venture into the world of cables.

Knit cuff to cuff in one piece, it requires only two side seams to be sewn at the end.

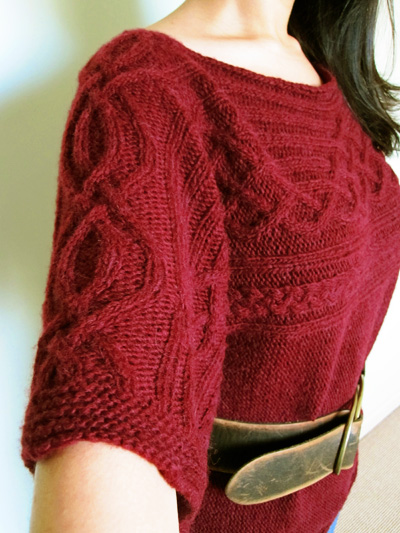
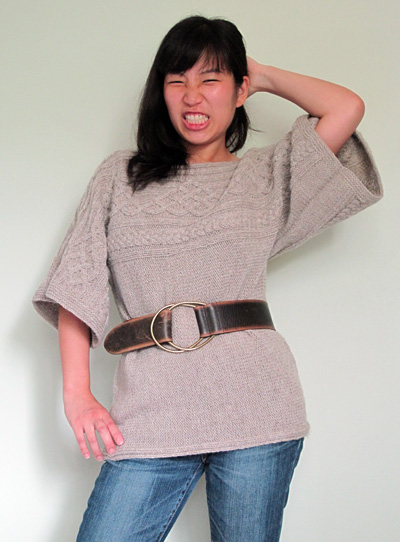
The boxiness of the sweater is accentuated with the kimono sleeves and boatneck, while the horizontal cable pattern adds visual interest.

Wear it as is or add a wide belt for a more fitted work without the shaping!

spacer model: Beautia Dew spacer photos: Davneet Minhas

SIZE
XS[S, M, L, 1X, 2X, 3X]
(Claret version shown in size S, Oatmeal version at bottom shown in size M.)

spacer

FINISHED MEASUREMENTS
Chest: 33[36, 39, 42, 45, 48, 51] inches
Length: 23[23.5, 24, 24.5, 25, 25.5, 26] inches

spacer

MATERIALS
Yarn

Claret version:
spacer Tahki Dove [44% Extrafine Merino Wool, 44% Alpaca, 12% Nylon; 163yd/150m per 50g ball]; color: #007 Claret; 6[6, 7, 8, 8, 9, 9] balls

Oatmeal Version:
spacer Elann Peruvian Highland Wool [100% wool; 109yd/100m per 50g skein]; color: 282 Oatmeal Heather; 8[9, 10, 11, 11, 12, 13] skeins


Recommended needle size
[always use a needle size that gives you the gauge listed below -- every knitter's gauge is unique]
Claret Version:
spacer 1 US #5/3.75mm circular needle, 16 inches or longer (straight needles may also be used)
spacer 1 US #6/4mm circular needle, 32 inches or longer

Oatmeal Version:
spacer 1 US #5/3.75mm circular needle, 16 inches or longer (straight needles may also be used)
spacer 1 US #7/4.5mm circular needle, 32 inches or longer

Notions
spacer Stitch markers
spacer Cable needle
spacer Yarn needle

spacer

GAUGE
20 sts/25 rows = 4" in stockinette st using larger needle

spacer

PATTERN NOTES
[Knitty's list of standard abbreviations and techniques can be found here.]

C3BP: Slip next st to cable needle and hold to back of work; k2 from left needle, p1 from cable needle.
C3FP: Slip next 2 sts to cable needle and hold to front of work; p1 from left needle, k2 from cable needle.
C4B: Slip next 2 sts to cable needle and hold to back of work; k2 from left needle, k2 from cable needle.
C4F: Slip next 2 sts to cable needle and hold to front of work; k2 from left needle, k2 from cable needle.

Instructions for the Cable Cast On can be found here.

Charts
The charts for this pattern are very large. Each fits on a letter-sized page.
Click the chart name below and print the resulting page.

Chart A, E & FChart B Chart C Chart D

image

DIRECTIONS

spacer
LEFT SLEEVE
Using smaller needle, CO 110[116, 120, 126, 130, 136, 140].

Work 9 rows in garter st (k all sts).

Switching to larger needle, begin working cable pattern as follows:

Important: When working Set-up Row, work Row 12[4, 48, 42, 34, 30, 22] of Charts B, C and D, and Row 4[4, 4, 2, 2, 2, 2] of Chart A.

Set-up Row [WS]: K4[7, 9, 12, 14, 17, 19], place marker, work Chart A over next 16 sts, place marker, work Chart B over next 24 sts, place marker, work Chart C over next 22 sts, place marker, work Chart D over next 24 sts, place marker, work Chart A over next 16 sts, place marker, k4[7, 9, 12, 14, 17, 19].

From this point, work sts at beginning and end of row in reverse stockinette st, and work all other sts following charts as set, beginning with Row 13[5, 1, 43, 35, 31, 23] of Charts B, C and D, and Row 1[1, 1, 3, 3, 3, 3] of Chart A.

Work 54[57, 57, 58, 61, 61, 64] rows in pattern, ending with Row 18[13, 9, 4, 47, 43, 38] of Charts B, C and D. Work measures approx. 10.5[11, 11, 11, 11.5, 11.5, 12] inches from beginning.
spacer
BODY
When casting on sts for the lower body in the next step, use cable cast on technique (see Pattern Notes).

Sizes XS, L, 3X Only:
Next Row [RS]: CO 60 sts, k2, p2, k2, place marker, p to next marker, work in pattern to end.

Next Row [WS]: CO 60 sts, p2, k2, p2, place marker, k to next marker, work in pattern to last marker, p2, k2, p2. 230[-, -, 246, -, -, 260] sts.

Sizes S, M, 1X, 2X Only:
Next Row [WS]: CO 60 sts, p2, k2, p2, place marker, k to next marker, work in pattern to end.

Next Row [RS]: CO 60 sts, k2, p2, k2, place marker, p to next marker, work in pattern to last marker, k2, p2, k2. -[236, 240, -, 250, 256, -] sts.

All Sizes:
From this point, work first and last 6 sts in 2x2 rib as set, work sts of lower body in reverse stockinette st, and maintain cable panels as set.

Work 6[11, 15, 20, 25, 29, 34] rows in pattern, ending with Row 26 of Charts B, C and D.

Neckline
Work 14[13, 12, 12, 11, 10, 9] more rows in pattern, EXCEPT work Chart E over center 22 sts instead of Chart C. End with Row 14[13, 12, 12, 11, 10, 9] of Chart E.

Sizes S, 1X, 3X Only:
Next Row [WS]: Work in pattern to fourth marker (beginning of Chart E), k2, p2, k3, p2; attach second ball of yarn, BO 4 sts, p1 (2 sts on right needle after bound off sts), k3, p2, k2, work in pattern to end. Two sets of 113[-, 118, 121, -, 126, -] sts form front and back of sweater.

Sizes XS, M, L, 2X Only:
Next Row [RS]: Work in pattern to fourth marker (beginning of Chart E), p2, k2, p3, k2; attach second ball of yarn, BO 4 sts, k1 (2 sts on right needle after bound off sts), p3, k2, p2, work in pattern to end. Two sets of -[116, -, -, 123, -, 128] sts form front and back of sweater.

All Sizes:
You will have just completed Row 41[40, 39, 39, 38, 37, 36] of Charts B and D.
Working both front and back sets of sts at the same time with attached balls of yarn, work 59[61, 63, 63, 65, 67, 69] rows in pattern, ending with Row 4[5, 6, 6, 7, 8, 9] of Charts B and D. Work measures approx. 9.5[9.75, 10, 10, 10.5, 10.5, 11] inches from bound off neckline sts.

image spacer
Rejoin Front and Back
Next Row: Work first set of sts in pattern, CO 4 sts using cable cast on; using same ball of yarn, continue in pattern across second set of sts. 230[236, 240, 246, 250, 256, 260] sts. Break yarn connected to second ball.

Note: For Chart F, unlike the other charts for this pattern, odd-numbered rows are WS rows.

Next Row:
Work all sts in pattern, working Row 1[2, 3, 3, 4, 5, 6] of Chart F over center 22 sts.

Work 13[12, 11, 11, 10, 9, 8] more rows in pattern, ending with Row 14 of Chart F and Row 19 of Charts B and D. On the next row, resume working Chart C over center 22 sts, beginning with Row 20.

Work 7[12, 16, 21, 26, 30, 35] more rows in pattern, ending with Row 26[31, 35, 40, 45, 1, 6] of Charts B, C and D.

RIGHT SLEEVE
BO 60 sts at beginning of next 2 rows. 110[116, 120, 126, 130, 136, 140] sts.

Work 54[56, 56, 58, 61, 61, 64] rows in pattern, ending with Row 34[42, 46, 4, 12, 16, 24] of Charts B, C and D.

Using smaller needle, work 9 rows in garter st. BO all sts.

spacer

FINISHING
Block to measurements shown in schematic. Sew side seams and sleeve seams.  Weave in ends.

schem

spacer
ABOUT THE DESIGNER

designernamespacer Beautia lives in Pittsburgh.

Her knitting and other crafty projects can be found on her blog

spacer