
|
|
 |
|
|
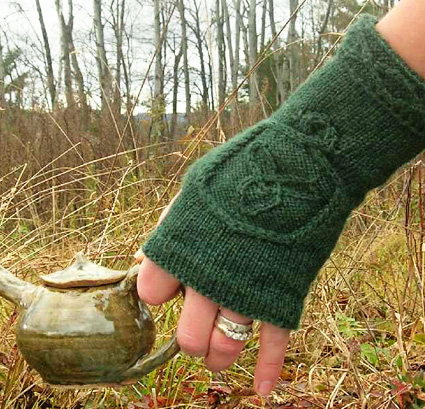 |
Lots of people loved my Kingdom
gloves. However
I read a lot of comments from people all saying
the same thing – that
they were amazing but too fiddly, too detailed,
and/or too complicated for people to knit, and
wouldn’t it
be nice if they were fingerless? |
|
SIZE |
|
FINISHED MEASUREMENTS |
|
MATERIALS Notions |
|
GAUGE |
|
PATTERN NOTES |
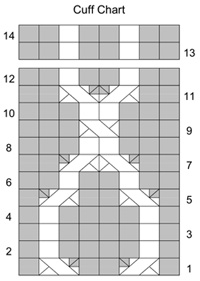
Chart |
|
DIRECTIONS 
CO 18 sts. Do not join; cuff is worked back and forth in rows. Set-up Row [WS]: K8, p1, [k2, p1] twice, k3. When working Cuff Chart pattern
as directed below, work as follows: Work Rows 1-12 of Cuff Chart 5[5, 6, 6, 7] times, then
work 1[7, 0, 5, 0] more rows in pattern following Rows
13 and 14 of chart. Break yarn, leaving a tail approx. 6 inches long. Use tail to sew CO edge to BO edge, lining up sts of cable. Lozenge shape formed by cable pattern at join may be longer than other lozenge shapes. WRIST With WS (stockinette st side) facing and beginning at
seam, pick up and k 43[45, 49, 53, 57] sts (approx. 2 sts
for every 3 rows) evenly around edge of cuff lining. Round
begins at cuff seam. Work in stockinette st until work measures 1 inch from picked-up edge. Next Round: K to end of Needle 1, work Row 1 of Hand Chart
over sts on Needle 2, to end of Needle 3. Continue in pattern until you have completed Row 12 of Hand Chart.
 Set-up round for Thumb Gusset is worked differently for right and left hands. As you work thumb gusset, continue to work Hand Chart over sts on Needle 2, and work all other sts in stockinette st. Left Hand: Right Hand: Both Hands: Size XS Only: Sizes S, M Only: Sizes L, XL Only: 
Note: Once all rows of Hand Chart have been completed, work sts on Needle 2 in stockinette st. In the next round, sts will be bound off for thumb opening. BO these sts using this technique: Sl next 2 sts to right needle, pass first slipped st over second slipped st (1 st bound off), [sl next st to right needle, pass previous slipped st over next st] until required number of sts have been bound off; pass last slipped st back to left needle. This technique leaves working yarn attached to sts on right needle. Left Hand: Right Hand: Both Hands: Next Round: P all sts to form turning ridge for upper
hem facing. |
|
FINISHING Weave in ends and block. |
| ABOUT THE DESIGNER |
|
|
|
Pattern & images © 2009 Becky Herrick. Contact Becky |
 C2B: Slip next st to cable needle and hold to back of work;
k1 from left needle, k1 from cable needle.
C2B: Slip next st to cable needle and hold to back of work;
k1 from left needle, k1 from cable needle.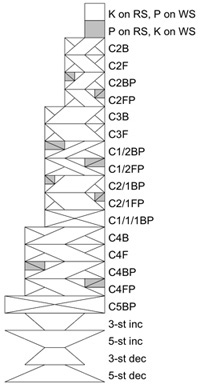 C2/1FP: Slip next 2 sts to cable needle
and hold to front of work; p1 from left needle, k2 from cable
needle.
C2/1FP: Slip next 2 sts to cable needle
and hold to front of work; p1 from left needle, k2 from cable
needle. 