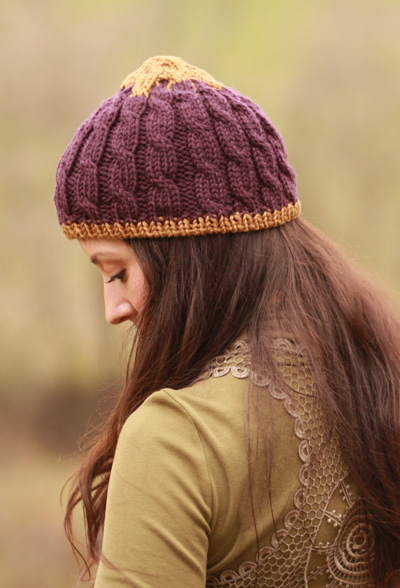
This hat was built around cables. Since I learned how to cable
without a cable needle, I have really enjoyed knitting them.
I wanted to try designing a hat from the top down using cables.
So I cast on stitches and started knitting. Four stitch cables
are easy to do without a cable needle, so that was the designated
size, and when I had enough stitches I added cables. I continued
them in a spiraling effect for the rest of the hat.
I used
Louet Gems 100% Merino Wool Bulky/Chunky
Weight. I had been admiring the wonderful colors of this yarn
for several month and this seemed to be the perfect opportunity
to create something with it.
The
gold and purple looked so good together I decided
to use them both. This yarn turned out to
be a great choice. It shows the cables very
nicely and is the perfect weight for a hat. It also was softer
than I expected, and very lovely to knit with.
model: Jenna
Barbee and Amanda Boli photos: Katie
Norrell
SIZE One
FINISHED MEASUREMENTS
Circumference: 18 inches, stretches to fit 23 inches.
Length: 9 inches
Recommended needle size [always use a needle
size that gives you the gauge
listed below -- every knitter's
gauge is unique]
1
16-inch US #10/6 mm circular needle
1 set US #10/6 mm double-point needles OR
1 longer US #10/6 mm circular needle for magic loop method
Notions
Yarn
needle
Cable needle
GAUGE
16 sts/22 rows = 4 inches in stockinette stitch in the round
22 sts/24 rows = 4 inches in pattern stitch in the round
PATTERN NOTES [Knitty's list of standard abbreviations and techniques can be found here.]
C4F: Sl 2 sts onto cn and hold to front, knit
2 sts, knit 2 sts from cn.
Cabling Without a Cable Needle for C4F:
Slip 2 stitches to RH needle, knit the next 2 stitches
on the LH needle. With the LH needle in front of work slip
it into the 2 stitches that were slipped (these will be
the 3rd and 4th stitches in from the point of the RH needle).
Pinch the yarn under the 2 knitted stitches (these will
be the 1st and 2nd stitches on the LH needle, the pinching
keeps them from coming undone). Pull the RH needle out
of all 4 sts and sl the 2 knitted sts back on the RH needle.
This puts the 2 original slipped stitches back on the LH
needle, ready to be worked. Finally, knit these 2
sts.
More information on Cabling Without a Cable Needle can be found here and
here.
Instructions for Elizabeth Zimmermann's
Sewn Bind Off can be found here.
RLI-K (Right Lifted Increase): Use the
right needle to pick up the stitch below the next stitch
on the left needle. Place it on the left needle, then knit
into it. 1 stitch has been increased.
LLI-K (Left Lifted Increase): Use
the left needle to pick up the back
of the stitch 2 below stitch just knitted,
then knit into it. 1 stitch has been
increased.
RLI-P (Right Lifted Increase): Use
the right needle to pick up the stitch
below the next stitch on the left needle.
Place it on the left needle, then purl
into it. 1 stitch has been increased.
LLI-P (Left Lifted Increase):
Use the left needle to pick up the
back of the stitch 2 below stitch just
knitted, then purl into it. 1 stitch
has been increased.
Cable Pattern: Round 1: [[K4, p2] 3 times, C4F, p2]
to end of rnd. Round 2 and all even rounds: [K4, p2]
to end of rnd. Round 3: [[K4, p2] twice, C4F, p2, k4,
p2] to end of rnd. Round 5: [K4, p2, C4F, p2, [k4, p2] twice]
to end of rnd. Round 7: [C4F, p2, [k4, p2] 3 times]
to end of rnd.
Increasing the size of the hat:
If you wish to make a bigger hat you
may add more purl stitches in the same manner as Rounds
19 & 21
DIRECTIONS
Hat Crown
Using CC and dpns or longer circular needle, CO 8 sts and join for working
in the round, being careful not to twist.
Round 1: Kfb to end of round. 16 sts.
Round 2: Knit.
Round 3: [K4, LLI-P, RLI-P] to end of
rnd. [24 sts].
Round 4: [C4F, p2] to end of round.
Round 5: [K4, p1, LLI-K, RLI-K, p1] to
end of rnd. [32 sts].
Round 6: [K4, p1, k2, p1] to end of rnd.
Round 7: [K4, p1, k1, LLI-K, RLI-K, k1,
p1] to end of rnd. [40 sts].
Round 8: [K4, p1, C4F, p1] to end of
rnd.
Round 9: [K4, RLI-P, p1] to end of rnd.
[48 sts].
Round 10: [K4, p2] to end of rnd.
Join MC here and work with both colors as indicated.
Round 11: [(K4, p1) with CC, RLI-K MC,
p1 CC] to end of rnd. [56 sts]
From here, all new sts will be worked with MC, old sts
will switch to MC after a cable rnd.
Round 12: [(C4F, p1) with CC, k1 MC,
(p1, k4, p1) with CC, k1 MC, p1 CC] to end of rnd.
Round 13: [K4 MC, p1 CC, (RLI-K, k1) with MC, (p1, k4,
p1) with CC, (RLI-K, k1) with MC, p1 CC] to end of rnd.
[64 sts] Round 14: [K4 MC, p1 CC, k2 MC, (p1,
K4, p1) with CC, k2 MC, p1 CC] to end of rnd. Round 15: [K4 MC, p1 CC, (k1, RLI-K,
k1) with MC, (p1, k4, p1) with CC, (k1, RLI-K, k1) with
MC, p1 CC] to end of rnd. [72 sts]. Round 16: [K4 MC, p1 CC, k3 MC, (p1,
C4F, p1) with CC, k3 MC, p1 CC] to end.
Cut CC, and continue only in MC from here. Round 17: [K4, p1, k1, RLI-K, k2, p1]
to end of rnd. [80 sts]. Round 18: [K4, p1, C4F, p1, [k4, p1]
twice] to end of rnd. Round 19: [K4, RLI-P, p1, k4, p1] to
end of rnd. [88 sts]. Round 20: [C4F, p2, k4, p1, k4, p2, k4, p1] to end
of rnd. Round 21: [K4, p2, k4, RLI-P, p1] to
end of rnd. [96 sts].
Hat Body
Work Cable Pattern 3 times or until hat
is half an inch short of desired finished
length.
Cut MC and rejoin CC.
Ribbing round: [K1, p1] to end.
Repeat Ribbing round once more.
Bind off using Elizabeth Zimmermann’s Sewn Bind
Off.
FINISHING
Weave in all loose ends.
ABOUT THE DESIGNER
Jennifer Wood designs for Wood House Knits.
She taught herself to knit 10 years ago
and loved it so much she began designing her own patterns. It has
been wonderful outlet for her creative energy. She has an absolutely
wonderful husband,
three amazing children, a fine son-in-law,
and two bad dogs.