|
  3timesChic 3timesChic
by
Bonne Marie Burns

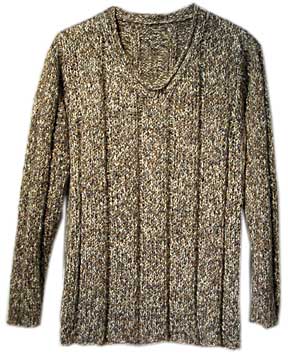
This
EASY pullover works in any yarn that knits to a 3sts/inch
gauge.
Looks
great in a bulky cotton, wool, mohair or ribbon!
AND
has a surprise twist in the pattern finishing!
[Be
sure to read the pattern through before starting.]
|
|
 photo:
Bonne Marie Burns photo:
Bonne Marie Burns
|
| FINISHED
MEASUREMENTS |
Directions
given for women's size Small (Medium, Large)
Width: 40 (44, 48)"
Length: 22 (23, 24)"
Sleeve: 17" [slight drop shoulder adjusts length for
size] |
| |
| MATERIALS
|
|
4 (5, 6) skeins Lion
Brand Homespun - shown in "Shaker" & "Prairie"
US#8/5mm 16" circular needle [bamboo works best with
this yarn]
1 pair US#10/6mm straight needles [bamboo works best
with this yarn]
Try
one of these yarns that can be knit at the correct
gauge of 3 stitches per inch. Be sure to make a gauge
swatch from the information on the ball band for correct
needle size before starting.
Alafoss
Lopi
Artful Yarns Dance
Berroco HipHop | Pronto | Seta
Brown Sheep Lamb's Pride Bulky
Classic Elite
Fantasy Lace | Forbidden | Gatsby | LaGran
Colinette Circe | Zanziba
GGH Bandola
| Goa
Lion Yarn Chenille | Homespun | Jiffy | Wool
Ease | Bulky
Patons
Up Country
Rowan Cork | Polar | Rowanspun Chunky
Tahki Soho Bulky
Trendsetter Dolcino
|
| |
| GAUGE
|
| 12
sts/18 rows = 4 inches |
| |
DIRECTIONS
BACK |
| CO
61 (67, 73) sts using #10/6mm needles. |
| |
| PATTERN
|
[WS]:
p7 (p10, p13), *k2, p7* 6 times, p0 (p3, p6).
[RS]: k7 (k10, k13), *p2, k7* 6 times, k0 (k3, k6).
Work in pattern until piece measures 14 inches ending
with a ws row. |
| |
| ARMHOLE
SHAPING |
DEC
1 st each side every RS row 6 times. 49 (55, 61) sts
remain.
Continue working in pattern
until piece measures 22 (23, 24) inches ending with
a WS row. |
| |
| SHOULDER
SHAPING |
BO
5 (6, 7) sts at the beginning of the next 4 rows.
BO 4 (5, 6) sts at the beginning of the next 2 rows.
Next row: BO remaining 21 stitches. |
| |
| FRONT |
| Work
as for back until armhole shaping is finished, ending
with a WS row. |
| |
| NECK
SHAPING [RIGHT SHOULDER] |
[RS]:
Work 25 (28, 31) sts, then
put on holder.
Finish row.
DEC 1 st at neck end every other row 10 (4, 1) times.
Then dec 1 st every 3rd row 0 (6, 9) times.
Work even until piece measures 8 (9, 10) inches from
beginning of armhole shaping. |
| |
| SHOULDER
SHAPING |
BO
5 (6, 7) sts at armhole edge twice.
BO 4 (5, 6) sts at armhole edge once. |
| |
| NECK
SHAPING [LEFT SHOULDER] |
Re-attach
yarn at neck edge with WS facing you to finish other
side.
Purl first 2 sts tog.
Finish row.
Then work decreases as for right shoulder. |
| |
| SLEEVES |
|
CO
28, (30, 32) sts using #8/5mm needles.
Work pattern as follows:
[WS]: p4 (5, 6), *k2, p7* twice, k2, p4 (5, 6).
[RS]: k4 (5, 6), *p2, k7* twice, p2, k4 (5, 6).
Work last two rows twice more [6 pattern rows completed].
Change to #10/6mm needles and continue sleeve, working
increases as follows:
Small: INC 1 st each side every 6 rows 7 times
then every 7 rows 3 times. [48 sts]
Med: INC 1 st each side every 5 rows 7 times
then every 6 rows 5 times. [54 sts]
Large: INC 1 st each side every 4 rows 5 times
then every 5 rows 9 times. [60 sts]
Work even in established
pattern until piece measures 16.5 (17,
17.5) inches.
DEC 1 st each side every RS row 6 times. 36 (42, 48)
stitches remain.
BO all stitches.
|
| |
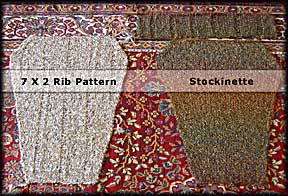
| FINISHING |
While
I was knitting this sweater, every time I worked a wrong
side row, I was more and more pleased with the way that
side looked! This sweater has many personalities!
The wrong side is reverse stockinette stitch broken
up by columns of 2-stitch ribbing. Very chic! THIS could
be your right side if you wish!
Then I took it one step further and made a sleeve in
stockinette stitch, starting out with a little ribbing
like on the other version. It was great!
SOOO depending on the yarn you use, one of these looks
might enhance the texture, color, or feel of it better
than the other. YOU DECIDE! |
|
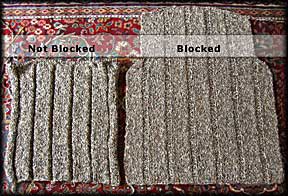
Look
#1:
Block all pieces using cold block method: lay out
all pieces to match diagram measurements and and saturate
with cold water using a spray bottle. Let dry. It
will make assembly easier and more professional looking.
OR: if you want a very natural fit, leave it un-blocked
and it will look like the sample on the left:
|
|
Look
#2:
Use the wrong side as the right side to get cool ridges
between reverse stockinette stitch like this:
 
|
|
on
left: Interior on
right: Exterior
|
Look
#3:
Forget the ribbing and just make the whole thing
using stockinette stitch: knit the right side rows
and purl the wrong side rows!
Use your #8 needle to cast on and work 6 rows; this
will make a great rolled hem!
Or start with some rib using #8 needles for the
6 rows.
|
| |
| ASSEMBLY
AND NECK EDGE FINISHING |
|
Sew
all shoulder seams and side seams.
Using
#8/5mm circular needle and RS facing you, attach yarn
at the right shoulder seam, and pick up (23) around
the back of the neck, and 28 (34, 40) around the left
side of the neck, and 28 (34, 40) around the right
side of the neck.
With RS facing you, join and knit 2 rows in the round.
BO all stitches.
Sew in sleeves.
VOILA! You are three times a ChicKnit
lady!!!
|
| |
|
|
| |
| ABOUT
THE DESIGNER |
|
 Bonne
Marie Burns, founder of the hugely popular and highly
entertaining ChicKnits.com,
believes in never letting her beer budget get in the
way of her chic champagne tastes! Bonne
Marie Burns, founder of the hugely popular and highly
entertaining ChicKnits.com,
believes in never letting her beer budget get in the
way of her chic champagne tastes!
Currently,
she is fascinated by flares and darts.
©2002
Bonne Marie Burns for non-commercial use only.
Contact Bonne Marie
|