| 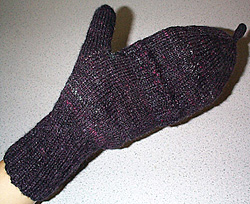
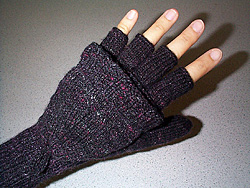
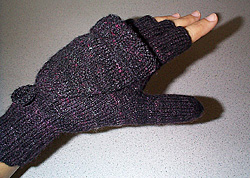
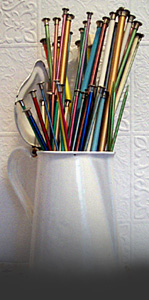
 photo:
Janis Cortese photo:
Janis Cortese
|
Broad
Street Mittens
by
Janis Cortese

I
visit home for the winter holidays, not surprisingly,
and flying from southern California to Philadelphia
at or near the shortest day of the year is probably
proof of something about humans that I can't fathom
at the moment. Thankfully, there is a nice stash
of warm things at home in my mom's house, and
I usually raid that for a pair of ratty but incredibly
warm old mittens that I've had since I was in
high school. My mom and I always go into Center
City when I get home for the holidays, and about
the time I have to fish around in my jeans pocket
for a train ticket, I remember just what the problem
is with mittens.
They're
the warmest things going, much warmer than gloves.
But you can't use your fingers even a little bit
unless you take them completely off. And the wind
whipping around 15th and Chestnut on December
22nd can pretty much freeze your skin solid in
about 0.8 microseconds if it's a bad winter.
And
thus was born the Broad Street Mitten, a mitten
that's actually a hobo glove if you catch it when
it's not looking. This pattern makes a men's medium
or a woman's large. I've got big hands, so it's
hard to judge for me. Reverse everything for the
right hand. To pull back the mitten shell most
comfortably, grasp the top of the mitten shell
with your other hand, curl your fingers up inside
the mitten, then push your fingertips through
the slit on the palm. The shell will dangle off
the knuckles. Sew a button down on the cuff (not
shown), and you can fasten it down along the back
of your hand so it doesn't flap around. |
|
| MATERIALS |
|
Approximately 300-350 yds of sock-weight wool. Merino
is nice.
5
US#2/2.75mm double pointed needles
5
US#3/3.25mm dpns
yarn
needle
Editor's
note: Janis spun the yarn for this project herself.
She suggests 6-ply Regia as an alternate. It and other
options can be obtained at Patternworks. |
| |
| GAUGE |
|
28 sts = 4 inches in stockinette stitch |
| |
DIRECTIONS
CUFF |
| With
US #2 needles, CO 16 stitches on each of three
needles [48 stitches total], and work 30 rounds
of k2p2 rib. If you like very a long cuff,
work 50 rounds or more!
Work *k3, INC 1.* [to INC,
use K1P1 in the same stitch.] Repeat to end.
You should have 20 st on each of the 3 needles.
Divide these 60 sts equally onto four needles, so that
there are 15 sts on each. |
| |
| LEFT HAND |
| Note:
The first two needles work the palm side, the last two
are the back of the hand.
K 4 rounds even.
THUMB
GUSSET INCREASE:
Next row: k to the second-to-last st on the second needle.
P second-to-last stitch.
Do a twisted make-one (pick up the yarn between two
stitches, twist it a half turn, place on left needle,
then knit it), k to end of row.
[On all following rows until gusset is complete, purl
the purled stitch to mark the point for the gusset increases.]
Next row: work even.
Repeat these two rows - increasing one stitch after
the purled stitch using a twisted make-one every other
round - until you've added 12 stitches.
Finish with a k-even round.
Place these added stitches along with the purled stitch
and the stitch at the end of the needle [14 stitches
in all from the second needle] onto a holder, and co
11 stitches.
K the last cast-on stitch together with the first stitch
on the third needle. [This prevents a gap from forming
between the second and third needles.]
K 1 row even.
THUMB GUSSET DECREASE:
You've effectively increased a 14-stitch wide thumb
gusset, and will be making a decreased gusset above
it now.
Row 1: K to 14th st on the second needle [the 14th st
in this and other odd rows is the first sl st.] ssk,
k6, k2tog, k to end of round. [You've decreased those
added 10 stitches to 8.]
Row 2: K even.
Row 3: K to 14th st on the second needle, ssk, k4, k2tog,
k to end of round.
Row 4: K even.
Row 5: K to the 14th st on the second needle, ssk, k2,
k2tog, k to end of round.
Row 6: K even.
Row 7: K to 14th stitch, ssk, k2tog, k to end of round.
Row 8: K even. You're now back to 15 stitches on each
needle!
K 6 rounds even. |
| |
| PINKY FINGER |
| Put
the palm stitches on one stitch holder and the back-of-hand
stitches on another. Pick up 7 stitches from the palm
and 8 from the back of the hand. CO 1 st on the ring-finger
side in the gap [16 stitches in all]. K for 10 rounds,
then BO loosely.
Important:
Before starting the other fingers, knit around the remaining
palm and back of hand stitches for 4 rounds, picking
up 2 more stitches from the corner of the pinky finger.
This brings the crotches of the remaining 3 fingers
up a bit from where the pinky is, and makes the glove
fit better.
End the fourth round over the back of the hand nearest
the pinky.
Put the palm stitches on one stitch holder, and the
back-of-hand stitches on another. |
| |
| RING FINGER |
Pick
up 8 stitches from the palm, 7 from the back of the hand,
and the 2 added stitches from the pinky finger side [17
stitches in all].
K for 10 rounds, then BO loosely. |
| |
| MIDDLE
FINGER |
Pick
up 7 stitches from the palm, and 8 from the back of the
hand.
Pick up 2 stitches from the corner of the ring finger
[17 stitches in all].
K for 14 rounds, then BO loosely. |
| |
| INDEX FINGER |
Pick
up remaining 8 stitches from the palm, and remaining 7
from the back of the hand.
Pick up 2 stitches from the corner of the middle finger
[17 stitches in all].
K for 14 rounds, then BO loosely. |
| |
| THUMB |
| Slip
the 14 thumb gusset stitches onto two needles, putting
6 stitches on the needle closest to the palm, and 8
on the other.
Pick up 12 stitches from the cast-on edge of the thumbhole,
twisting them when needed to keep holes from forming.
Move 2 stitches from the needle with the 12 picked-up
stitches to the needle that has only 6 stitches on it.
[You will have 10 stitches on the needle in the crotch
of the thumb, and 8 on the other two.]
K the two needles with 8 stitches on them, SSK, k6,
k2tog on the needle in the thumb crotch. [You've turned
the 10 picked-up stitches into 8.]
K the next round even.
K the two needles with 8 stitches on them, SSK, k4,
k2tog on the needle in the thumb crotch. [You've turned
the 10 picked-up stitches into 6.]
K evenly until the thumb is the length of the base of
your fingernail (16-18 rds).
THUMB
DECREASE:
You will decrease until you have 5 or 6 stitches left.
*k3, k2tog* around. k2 "leftover" sts.
K one round even.
*k2, k2tog* around. K 1 round even.
*k1, k2tog* around.
K 1 round even.
*k2tog* around.
K 1 round even.
Cut yarn leaving a 6 inch tail. Run the yarn through
remaining 5 or 6 sts. Tug yarn and thread yarn through
to wrong side. Weave end in. |
| |
| MITTEN
SHELL | STAR DECREASE |
| Shape
the mitten shell with a star decrease, an all-around
set of eight decreases that narrows the top
of the mitten evenly. [You can also use a flat
sock-toe decrease if you prefer.]
CO
30 stitches on a #3 dpn.
Work back and forth on it for 9 rows in k2p2 ribbing,
then split onto two needles, 15 stitches on each one.
Pick up 30 stitches across the knuckles of the glove,
and put them on two needles, 15 on each one. [60 sts]
K even around all four needles for 17 rounds.
Then, on each needle -- k to the last two stitches,
k2tog.
K one round even. [56 sts]
On each needle:
k5, k2tog. [52 sts]
K 5 rounds even.
K4, k2tog on each needle.
K 4 rounds even.
K3, k2tog on each needle.
K 3 rounds even.
K2, k2tog on each needle.
K 2 rounds even.
K1, k2tog on each needle.
K 1 round even.
K2tog on each needle.
K 2 inches of I-cord on these 4 stitches.
Draw the end of the yarn through all four stitches and
tug the little I-cord closed, then stitch the end of
the I-cord down at the tip of the mitten shell to make
a loop.
Stitch
the edges of the ribbing flap down along the sides of
the hand. When you fold the mitten shell over, fold
the ribbing back over the shell so it lies flat. See
where the loop on the top of the shell hits the cuff?
Sew a button to the cuff where the loop from the shell
hits it - then you can fasten down the shell so it doesn't
flap around.
Make
a second mitten for the right hand, reversing the directions.
Voila!
You've got yourself a pair of Broad Street
Mittens!
|
| ABOUT
THE DESIGNER |
|
 Janis
Cortese knits way too much, and if she lives to be as
old as she must in order to master everything she's
interested in, she'll be playing pinochle with Methusela
someday. Quilting
and tatting vie for her attention, but knitting seems
to have won out for sheer portability and low-tech appeal. Janis
Cortese knits way too much, and if she lives to be as
old as she must in order to master everything she's
interested in, she'll be playing pinochle with Methusela
someday. Quilting
and tatting vie for her attention, but knitting seems
to have won out for sheer portability and low-tech appeal.
Janis lives in southern California with the Cutest Cat In
The Universe. |
| Pattern
& images © Janis
Cortese. Contact Janis. |
|