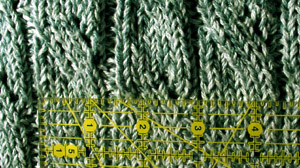
Body Stitch Pattern
Worked in the round
R1: * P2, k6, p2, yo, k2,
ssk, k2; repeat from * around.
R2: * P2, k6; repeat from
* around.
R3: * P2, k6, p2, k1, yo,
k2, ssk, k1; repeat from * around.
R4: * P2, k6; repeat from
* around.
R5: * P2, k6, p2, k2, yo,
k2, ssk; repeat from * around.
R6: * P2, k6; repeat from
* around.
R7: * P2, yo, k2, ssk, k2,
p2, k6; repeat from * around.
R8: * P2, k6; repeat from
* around.
R9: * P2, k1, yo, k2, ssk,
k1, p2, k6; repeat from * around.
R10: * P2, k6; repeat from
* around.
R11: * P2, k2, yo, k2, ssk,
p2, k6; repeat from * around.
R12: * P2, k6; repeat from
* around.
Charted
Body Stitch Pattern
Read chart from bottom to
top, right to left.
|
| |
| |
| |
| |
| |
| |
- |
- |
| |
| |
| |
| |
| |
| |
- |
- |
|
| |
| |
| |
| |
| |
| |
- |
- |
* |
| |
| |
o |
| |
| |
- |
- |
|
| |
| |
| |
| |
| |
| |
- |
- |
| |
| |
| |
| |
| |
| |
- |
- |
|
| |
| |
| |
| |
| |
| |
- |
- |
| |
* |
| |
| |
o |
| |
- |
- |
|
| |
| |
| |
| |
| |
| |
- |
- |
| |
| |
| |
| |
| |
| |
- |
- |
|
| |
| |
| |
| |
| |
| |
- |
- |
| |
| |
* |
| |
| |
o |
- |
- |
|
| |
| |
| |
| |
| |
| |
- |
- |
| |
| |
| |
| |
| |
| |
- |
- |
|
* |
| |
| |
o |
| |
| |
- |
- |
| |
| |
| |
| |
| |
| |
- |
- |
|
| |
| |
| |
| |
| |
| |
- |
- |
| |
| |
| |
| |
| |
| |
- |
- |
|
| |
* |
| |
| |
o |
| |
- |
- |
| |
| |
| |
| |
| |
| |
- |
- |
|
| |
| |
| |
| |
| |
| |
- |
- |
| |
| |
| |
| |
| |
| |
- |
- |
|
| |
| |
* |
| |
| |
o |
- |
- |
| |
| |
| |
| |
| |
| |
- |
- |
Chart Legend
- Purl
| Knit
* SSK
o Yarn Over
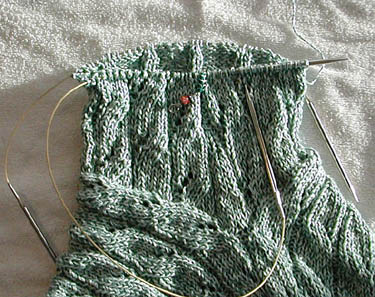
Note:
For ease in keeping track of pattern rows
versus plain ribbing rows, use a double beaded
stitch marker, where one side is green and
one side is red [see picture]. When on an
"easy" row use the green side of
the marker [green = go!], when on a "pattern"
row where you must do your yarn-overs and
corresponding decreases, use the red side
[red = caution, go slower and pay attention].
This makes it easier to put down your work
and pick it up again at any point in a row.
Simply check to see which side of the marker
is up, and you'll know where you are in the
pattern much more quickly.
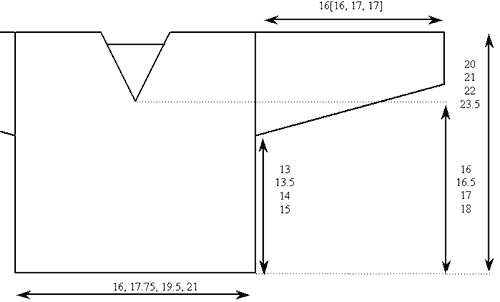
Body
CO 160[176, 192, 208] sts
with largest circular needle.
Work p2 k6 ribbing back
and forth until work measures 1 inch in length,
ending with a RS row. Join and start working
Body Stitch pattern in the round, making sure
sts aren't twisted. Mark the side seam by
placing a stitch marker in between first two
purl stitches. Work Body Stitch pattern for
13[13.5, 14, 15] inches.
Front
Turn and start working back
and forth [place the back half of the sts
on a holder] in pattern until work measures
16[16.5, 17, 18] inches.
Even numbered rows in pattern
are now WS rows: k1, * p6, k2; repeat from
* to last st, k1. End with WS row.
Front Neckline
To form v-neck make decreases
on every RS row at neck edge working both
sides of the neckline at once.
Decrease Row: Work
38[42, 46, 50] sts in pattern, k2tog. Join
new ball of yarn, ssk, work remaining 38[42,
46, 50] sts in pattern.
When doing the lace pattern
at the neckline, make sure you always have
a YO for every SSK. Stop the lace pattern
when there aren't enough sts along the decrease
edge to support it.
Continue alternating RS
decrease row with patterned WS row until 26[29,
32, 36] sts remain on each side of neck. Put
sts on a holder.
Back
Place remaining body sts on largest
needle, join new ball of yarn and work back and
forth in pattern for 19[20, 21, 22.5] inches as
for front, ending with WS row.
Work final four rows of back as:
RS [Decrease Row 1]: Work
26[29, 32, 36] sts in pattern, k2tog. Place
24[26, 28, 28] sts on a holder. Join second
ball of yarn: Ssk, work remaining 26[29, 32,
36] sts in pattern. 78[86, 94, 102] sts total.
WS: Work each side of neck
opening in pattern
RS [Decrease Row 2]: With
ball 1: work 25[28, 31, 35] sts in pattern,
k2tog. With ball 2: Ssk, work remaining 25[28,
31, 35] sts in pattern.
WS: Work each side in pattern.
Shoulder Seams
With right sides together,
join shoulder seams using three-needle bind
off.
Sleeves [Make
2]
 Sleeves
are created by picking up sts and working
down to the cuff. Use two circular needles,
or one shorter circular needle switching to
DPNs when nearing the cuff and the circular
needle is too large.
Sleeves
are created by picking up sts and working
down to the cuff. Use two circular needles,
or one shorter circular needle switching to
DPNs when nearing the cuff and the circular
needle is too large.
Using largest circular needle,
start at bottom of armhole and pick up 36[40,
44, 48] sts along front and 36[40, 44, 48]
sts on back for a total of 72[80, 88, 96]
sts. Place marker at bottom of armhole.
Work 2 rounds: K3, *p2,
k6; repeat from *; p2, k3.
Sleeve Stitch Pattern
Worked
in the round.
R1: * P2, k6, p2, k2, k2tog,
k2, yo; repeat from * around.
R2: * P2, k6; repeat from
* around.
R3: * P2, k6, p2, k1, k2tog,
k2, yo, k1; repeat from * around.
R4: * P2, k6; repeat from
* around.
R5: * P2, k6, p2, k2tog,
k2, yo, k2; repeat from * around.
R6: * P2, k6; repeat from
* around.
R7: * P2, k2, k2tog, k2,
yo, p2, k6; repeat from * around.
R8: * P2, k6; repeat from
* around.
R9: * P2, k1, k2tog, k2,
yo, k1, p2, k6; repeat from * around.
R10: * P2, k6; repeat from
* around.
R11: * P2, k2tog, k2, yo,
k2, p2, k6; repeat from * around.
R12: * P2, k6; repeat from
* around.
Charted Sleeve Stitch
Pattern
Read chart from bottom to
top, right to left.
|
| |
| |
| |
| |
| |
| |
- |
- |
| |
| |
| |
| |
| |
| |
- |
- |
|
| |
| |
| |
| |
| |
| |
- |
- |
| |
| |
o |
| |
| |
/. |
- |
- |
|
| |
| |
| |
| |
| |
| |
- |
- |
| |
| |
| |
| |
| |
| |
- |
- |
|
| |
| |
| |
| |
| |
| |
- |
- |
| |
o. |
| |
| |
/. |
| |
- |
- |
|
| |
| |
| |
| |
| |
| |
- |
- |
| |
| |
| |
| |
| |
| |
- |
- |
|
| |
| |
| |
| |
| |
| |
- |
- |
o |
| |
| |
/. |
| |
| |
- |
- |
|
| |
| |
| |
| |
| |
| |
- |
- |
| |
| |
| |
| |
| |
| |
- |
- |
|
| |
| |
o |
| |
| |
/. |
- |
- |
| |
| |
| |
| |
| |
| |
- |
- |
|
| |
| |
| |
| |
| |
| |
- |
- |
| |
| |
| |
| |
| |
| |
- |
- |
|
| |
o. |
| |
| |
/. |
| |
- |
- |
| |
| |
| |
| |
| |
| |
- |
- |
|
| |
| |
| |
| |
| |
| |
- |
- |
| |
| |
| |
| |
| |
| |
- |
- |
|
o |
| |
| |
/. |
| |
| |
- |
- |
| |
| |
| |
| |
| |
| |
- |
- |
Chart legend
-
Purl
|
Knit
/. K2tog
o
Yarn Over
Decrease
Schedule:
Work 4 rounds as: k3, *
Sleeve Stitch pattern *, p2, k3. [The first
and last 3 sts of each round are not in pattern
to allow for decreases.]
Work Decrease Round:
K2tog, work in pattern to last 2 sts, ssk.
Work 4 rounds in Sleeve
Stitch pattern. Work decrease round.
Continue working 4 rounds
in pattern, then a decrease round until 60[72,
76, 76] sts remain. Then begin decreasing
every 3rd round instead of every 5th.
While following above decrease
schedule:
When sleeve measures 11.75
inches long from picked up sts, switch to
US#7/4.5 mm needle.
When sleeve is 13.25 inches
long from picked up sts, switch to smallest
needle.
Continue following decrease
schedule until 42[42, 50, 50] sts remain.
Work even in pattern until sleeve measures
15[15, 16, 16] inches from picked up edge.
Work in Cuff pattern: k4
*p2, k6* to last 6 sts, p2, k4 for 1 inch.
BO loosely.