  by
Carol Sulcoski by
Carol Sulcoski

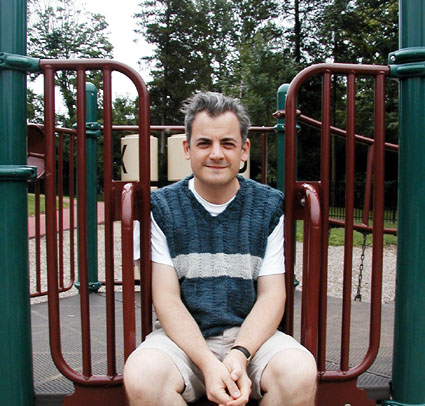
My husband, though an all-around
swell guy, is very particular and thus not easy to
knit for. After a series of intensive negotiations
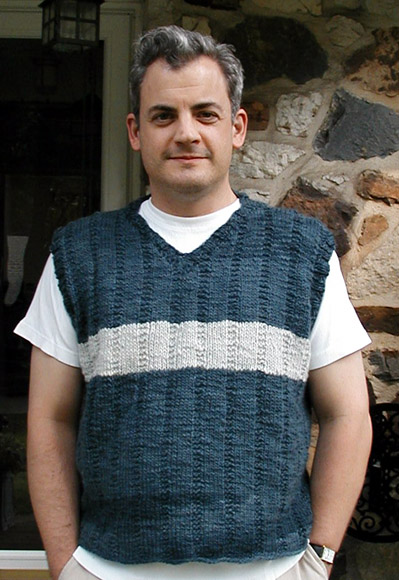
-- and swatches -- we came up with this vest.
Classic and understated enough for
him; interesting enough for me to knit, and at a gauge
of 4 stitches to the inch, a project I was actually
able to finish in this lifetime. For truly conservative
tastes, omit the contrast color stripe; wilder guys
can have fun picking from the 90-odd shades that Manos
del Uruguay yarn comes in.
The vest is knitted in the round
from bottom to armholes, then the front and back are
worked back and forth separately.
|
|
 model: Tom
Speranza
  photos: Carol
Sulcoski
|
|
| Men's S [M, L, XL, XXL] |
| |
|
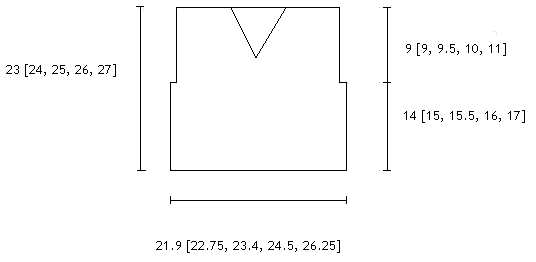
Chest: 43.75 [45.5, 47.25, 49, 52.5] inches
Length 23 [24, 25, 26, 27] inches
|
| |
|
|
|
  (MC) Manos del Uruguay [100% wool; 137 yd/approx.
125 m per 100g skein]; color: 27 petrol;
5 [5, 6, 6, 7] hanks
 (CC) Manos del Uruguay [100% wool; 137 yd/approx.
125 m per 100g skein]; color: 64 pewter; 1 hank
 small amount of worsted or DK weight yarn in a color
similar to MC, for joining shoulders [optional]
 1 24-inch US #9/ 5.5mm circular needle, or size needed
to get gauge
 1 16-inch US#8/ 5 mm circular needle, or one size
smaller than above
 Stitch marker
 Spare needle or length of waste yarn
 Safety pin
 Tapestry needle
|
|
|
|
16 sts/24 rows = 4" in stockinette
stitch
|
| |
| [Knitty's list of standard
abbreviations can be found here]
Main
Body Pattern (worked in the round over
a multiple of 7 sts)
Rnd
1: K all sts.
Rnd 2: [K5, p2]
to end.
NOTE: When this pattern is worked back and
forth after dividing for the armholes, Round
1 will become:
Row 1 [WS]: P all sts.
2x2 Rib
(worked in the round over a multiple of 4 sts):
Rnd 1 [RS]: [K2,
p2] to end.
Every row is the same.
|
|
|
 Body Body
Using larger circular
needle, CO 175 [182, 189, 196, 210] sts in MC.
Being careful not to twist, place marker
and join work to begin working
in the round.
Work in Main Body Pattern until work measures 11.25
[12.25, 12.75, 13.25, 14.25] inches, ending with
Rnd 2.
Join CC and cont in patt for an additional 2.75
inches, ending with Rnd 2. Break CC and rejoin MC.
Divide for Upper Back &
Front
K 1 rnd.
Place last 87 [91, 95, 97, 105] sts just worked
on spare needle or piece of waste yarn for front.
You will now begin working back and forth on the
rem 88 [91, 94, 99, 105] sts to create the back.
Beg with Row 2,
work 2 rows in stitch pattern as set.
NOTE: As the piece is now being knit back and
forth, Row 1 will be a purl row instead of a knit
round.
Shape Armholes
Cont in patt as set,
BO 4 [4, 4, 5, 6] sts at beginning of next
2 rows. 80 [83, 86, 89, 93] sts
Dec 1 st at each end of every RS row a total
of 7 [8, 8, 8, 9] times. 66[67, 70, 73, 75]
sts
Cont without further shaping until back measures
23 [24, 25, 26, 27] inches from beg.
BO all sts.
Front
Transfer 87 [91, 95, 97,
105] sts for front onto working needle.
Work 2 rows in pattern as set.
NOTE: Read through
the next sections before continuing.
Shape Armholes and
Neckband
Cont in patt as set,
work armhole shaping as for back.
AT THE SAME TIME, when front
measures 16 [17, 17.5, 18, 19] inches from
beg, prepare to begin neck shaping on next
WS row as follows:
Work in pattern to center st, place
next st on safety pin, attach a new ball of
yarn, work in patt to end.
Working each side separately, work neck shaping
as follows:
Next row [RS] First half: Work to last
3 sts, ssk, k1. Second half: K1, k2tog, work
to end.
Next row [WS] Work each half without
shaping, in patt as set.
Work these 2 rows a total of 13 [14, 14, 15,
16] times. 19 [19, 21,
20, 21]sts remain for each half.
Cont without further shaping until front measures
same as back.
BO all sts.
|
|
Use tapestry needle to weave in ends.
Block [see Note 1 below].
Sew shoulder seams, using thinner yarn [see Note 2
below].
Armhole bands
Using smaller circular needle and with RS facing,
pick up and knit 80 [84, 88, 92, 100] sts around armhole
using MC. [See Note 3 below.]
Work for 1 inch in 2x2 rib, then BO all sts in rib
patt.
Neckband
Using smaller circ needle, with RS facing and beg
at one shoulder, pick up and knit 33 [36, 40, 44,
50] down left neck edge; place marker to mark center
st, k center st from safety pin; pick up and knit
33 [36, 40, 44, 50] up right neck edge; and pick up
and knit 30 (32, 36, 40, 44) sts across back. 97[105,
117, 129, 145] sts
Place marker to show beg of rnd.
Next Round: Work neckband in (k2, p2) rib
until 2 sts before center front marker, SSK, k1, k2tog,
work to end in rib patt.
Rep this round until neckband is 1 inch wide.
BO all sts in rib pattern.
Weave in remaining ends.
-
Blocking a garment knit in the round presents
its own challenges; just do your best. I know
many of you will be tempted to skip this step
but blocking is especially helpful to give a professional-looking
result. Try sliding the vest onto your ironing
board and blocking a section at a time. Alternately,
this piece may be wet blocked.
-
Because Manos is unevenly and loosely spun,
as well as relatively chunky, I prefer to use
a thinner, plied yarn to sew seams with. (For
the terminally curious, in the sample garment,
I used a piece of Jaeger Matchmaker Merino in
DK weight.)
-
When picking up stitches for the neck and armhole
bands, use your judgment in deciding whether you
need to pick up a few more or less than the specified
number. Make sure that the sweater body doesn't
pucker where you've picked up stitches (if it
does, you need to pick up more) or, conversely,
that the band itself isn't rippling (if it does,
you need to pick up less). This will make a tremendous
difference in the look of the finished garment.
After picking up sts, increase or decrease evenly
around to get a number of sts that is divisible
by 4 (for 2x2 rib to fit evenly).

|
|
  Carol
Sulcoski is a former attorney who now is a stay-at-home
mom to three, count 'em, three children. She is also
a staff member at Rosie's Yarn Cellar in Philadelphia
and regularly designs for the shop. Carol
Sulcoski is a former attorney who now is a stay-at-home
mom to three, count 'em, three children. She is also
a staff member at Rosie's Yarn Cellar in Philadelphia
and regularly designs for the shop.
Carol lives with her long-suffering husband and adorable
children in Villanova, Pennsylvania. This is her second
pattern for Knitty. Contact email:
|
| Pattern & images
© 2004 Carol Sulcoski. Contact Carol |
|

