The second dimension: more width adjustments
A broader view
The easiest of adjustments to accommodate a larger (or to fit a smaller) bust, waist, or hip is typically made with front-back symmetry: as in the last article, if three inches are to be added to a hip circumference, we actually add 1.5 inches to each of the front and back; the added (or subtracted) stitches are more or less evenly distributed on the front and back.
The "asymmetric" adjustments discussed here refer to adjustments that lack front-back symmetry, and are meant to accommodate the actual differences between the back and the front of the body.
However, sometimes fitting issues call for different kinds of asymmetric adjustments. Not everybody has left-right symmetry; one shoulder may be lower than the other, or one arm may be longer than the other. A post-mastectomy woman may find that the left and right halves of the front neckline fall differently because different amounts of fabric are needed to cover each half of the torso, which requires alteration of one armscye (and of the corresponding sleeve cap) to correct. Sue Mink wrote about making these kinds of alterations in "Tailoring for Survivors: Get a Great Fit Even After Reconstructive Surgery", InKnitters Vol. 5, No. 18 (Fall 2005).
|
Not every adjustment needs to be made with this type of symmetry. A well-known example of an asymmetric bust adjustment is the addition of short rows. This is an adjustment that adds extra length to the front, but not the back, of a garment, where the extra length is effectively "darted" out through the short rows (discussed here and here). When speaking of girth, it is sometimes very apparent that the full bust measurement is not evenly divided between the front and the back; for example, a pregnant belly protrudes in front, and the cross-back measurement can be inches narrower than the front measurement over the full bust, especially on a busty body. When a fitted, hand knit garment is put on those body shapes, the side seams may be pulled more toward the front than they should be.
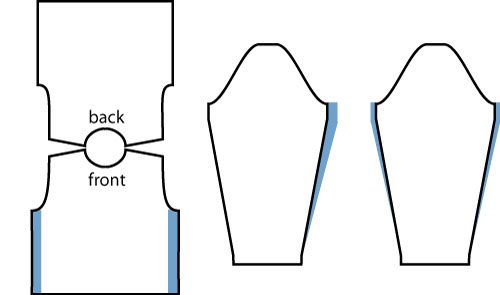
Hand knitting patterns tend to be drafted for a fictional body that has front-back symmetry at the shoulders; the only accommodation that is uniformly made for our front-back asymmetry is for the placement of the neck, which is tilted forward on our bodies (this is why the front neck is always lower than the back neck in a garment, unless a particular cowl, boatneck or funnel-neck style calls for something different). In fact, when you view your upper half from the side, you can see that it isn't only the neck that is front-back asymmetric (besides your breasts and belly) -- your shoulders and the placement of your arms is asymmetric, too. Some knitting patterns do account for these other differences between front and back, but most do not -- and for the most part, that's fine, either as long as hand knit garments aren't as tight-fitting as cut and sewn garments can be, and as long as hand knitting is as bulky as it is, because both the ease and the bulk of the fabric camouflages the imprecise fit.
Short rows have been around for a long time, but they weren't always used. In the mid-20th century, when styles were fitted, Vogue knitting patterns directed the knitter to make a front piece longer than the back, and to ease in the excess length around the bust level when the side seams were sewn.
In a patterned sweater where short rows might cause a jarring discontinuity, easing in the excess might be a workable solution, but if an especially large bust dart is required, there may be too much fabric to ease inconspicuously into the side seam.
|
But breasts and bellies can create a more pronounced difference between the front and the back. A consideration of where you need to add extra girth will also help you pick the right size and the right kind of alternation that you need to knit to fit. Earlier we considered that when choosing the right pattern size, particularly in a set-in sleeve style, it was important to fit the shoulders first, and worry about the bust later. And we looked at ways that extra room could be added below the armhole bind-off to add the extra width that was needed. But what if you had chosen the right size for your shoulders, and realized that while the back as written was a perfect fit, what you really needed was a bit more room in the front?

Bun in the oven
The easiest example is the maternity top. During pregnancy, the shoulder width doesn't change, but the full bust measurement, cup size (and oh, right, the rest of the body below) increases. Let's say we've started out with a basic top pattern that needed a touch more room at the bust, and a lot more room at the bottom. If the pattern called for waist shaping, it could be omitted -- waist shaping will be irrelevant.
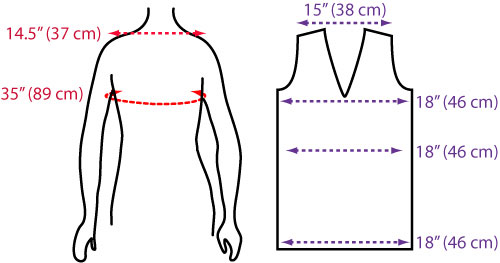 |
| Our fit model for this exercise has picked a pattern that fits her cross-shoulder measurement, but she needs more room in the bust and some more in the belly. To begin with, our pattern has identical front and back width measurements. The gauge is 4 stitches and 6 rows to the inch [2.5 cm].
|
In this example, the top appears to have enough room at the bust with a little bit of ease, but we have decided to be forward thinking and add an extra inch of ease for good measure (if the top is to be worn in the early post-partum stage, then it may be desirable to add even more ease). The lower front, of course, will need a lot more wearing ease, which will need to start above the natural waist -- almost as high as right under the bust -- and flare out to the hem. Here, we've estimated that we'll want to add another 12 inches [30 cm] to the front to accommodate a protruding belly (this may not be a top to be worn at full term; some individuals will grow out a lot more than others!). At the pattern's gauge of 4 stitches to the inch [2.5 cm], that will mean an extra 4 stitches at the bust. At the belly, this will mean an extra 48 stitches. Since we've computed that we're adding another 4 stitches at the bust already, this means we'll need a further 44 stitches at the belly.
Note that we've said "at the belly" -- not at the hem. Because of the protruding belly, we'll need more length than usual if the top is intended to cover the same vertical space that it would cover on a non-pregnant body, and the hem of the garment may not fall at fullest part of the belly -- it will be lower. If we think that we need an extra 12 inches to accommodate the extra girth, then simply rewriting the pattern to flare out to add that 12 inches at the hem will mean that fewer than 12 inches are being added where they're needed. To maintain a flared line, the width at the hem may need to be even greater. You can actually do a little math to figure out just how much wider it will be right now, but in this example, we'll leave it for later.
Next, we need to decide where these stitches are going to be added to the front. The small number of stitches to be added to the bust can be added at the sides; the rest of the stitches for the belly, however, can be added at different points, with differing results. Last time we did work through the exercise of widening a pullover at the hip, and we saw that stitches could be added at the side or at a dart line, and with minor adjustments, it may not matter all that much where it's added. Here, the impact of adding so much more width will be noticeable.
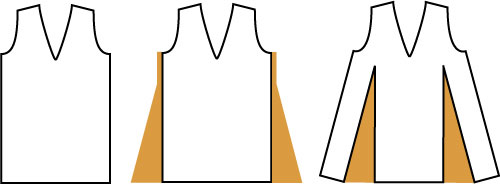 |
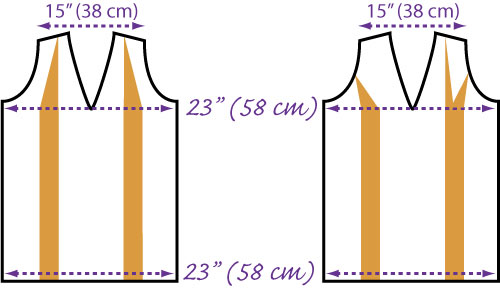
| Adding all the extra stitches (shaded orange) to the side seam (center) will result in a very trapezoidal front that will enhance the ride-up effect when the top is worn -- plus, the front side seam will be longer than the back side seam. Adding extra stitches to an interior part of the garment (right) minimizes the ride-up effect, and leaves the side seam length the same.
|
Simply adding the extra width at the sides of the front piece looks a little odd. It might also result in some fudging, if a side seam needs to be sewn to finish the garment: the front side seam will be longer than the back side seam (you can use your trigonometry to figure out that if you reach the +12 inch adjustment about 10 inches [22 cm] below the armhole bind-off, the front side seam will be at least 1.7 inches [4 cm] longer than the back side seam). Adding the extra width at the sides only will also increase the "riding-up" effect -- garment fabric will be taken up by the bulge at center front already, and the fact that the top at center front is actually shorter than the top at the sides will visually emphasize this effect. Although riding-up can be counteracted with the insertion of short rows to add length in the front without adding to the side seam length, depending on your future plans for the top once the pregnancy is over, it may not be desirable to rely very heavily on short row shaping in the belly area.
Distributing the extra stitches away from the side seams (or in more than two places on the front) will reduce the visual impact of the ride-up effect, although this effect will still be in evidence. Again, short rows in the belly area can help add some length, if desired. The greater benefit of adding the stitches in the interior portion of the garment is that the side seams of the front will remain the same length.
Wherever the extra stitches are added, the computations are very similar. We'll assume that this top is being knit from the bottom up.
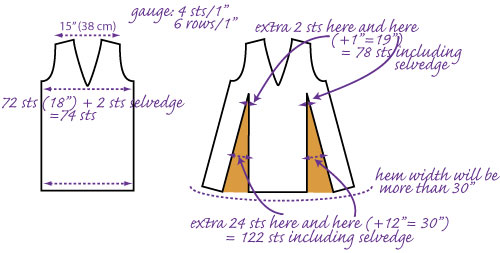 |
| If you determine the correct number of stitches to be added to accommodate a pregnant belly, you may need to add even more at the hem to preserve the flared shape of the front.
|
If we determine that we need the extra 12 inches [30 cm] of stitches around the fullest part of the belly, these extra 48 stitches (at our gauge) must be present somewhere below the natural waist (when it exists) and above the hip -- let's estimate about 10 inches [25 cm] below the armhole bind-off. At our gauge of 6 stitches per inch, that's 60 rows below the armhole bind-off. We also need to make sure that 4 stitches are added around the full bust point of the front -- we'll estimate that is 2 inches [5 cm], or 12 rows, below the armhole bind-off.
To compute the rate of decreasing (since we're working bottom-up) from the point 60 rows below the armhole to the armhole bind-off is simple math. Once the rate of decreasing for the region above the fullest point of the belly is established, the same rate can be used right down to the hem, if the total length of the front is known.
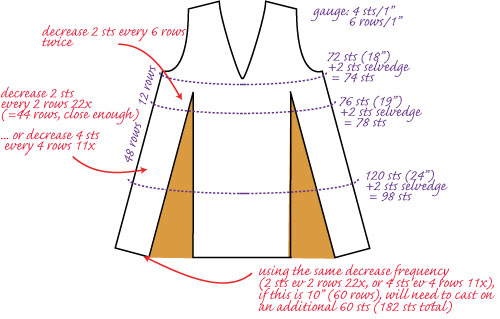 |
| Knowing the stitch counts at the bust and the belly, the decrease rates for these regions can be computed, and extrapolated to determine the full width of the front at the hem.
|
This type of gradual flare works well when the belly does not protrude like a shelf below the bust! For others, it may be better to have an abrupt increase under the bust by increasing all necessary stitches in a single row.
In this example, we've added this excess width only to the front. However, depending on the style, it may be desirable to add a little flare to the back to balance out the appearance of the top; some of the stitches added to the front could be moved to the back. This alteration is still asymmetric, because the back flare would not be as pronounced as the front.
This example also presumed that increases were added to the interior of the front, and not the side edges. If the bust was widened at the side edges, however, the armscye perimeter would be increased on the front (you can see that the armhole bind-off on the front would be deeper than the bind-off on the back). The sleeve would accordingly be looser at the bicep line, because additional stitches would be added to make the sleeve cap fit into the armscye.
 |
| If extra width is added right at the side edge, thus extending the armhole bind-off (left), then extra stitches need to be added to the front bind-off of the sleeve cap, resulting in an asymmetric sleeve (center). While the extra stitches can be reallocated to make the sleeve symmetric again, when sewing in the sleeve you must remember that the sleeve seam and the body side seam will not intersect (right).
|
Technically, these extra stitches are added to the front only; this means that the sleeves are no longer symmetric, and you would need to keep track of which sleeve was meant for which side. However, you could distribute these extra stitches evenly on either side of the sleeve so that they were symmetric again; but when sewing the sleeves to the body, you would need to remember that the sleeve seam is no longer aligned with the body side seam at the underarm. This makes flat assembly of a garment (in which the front and back are knit flat, then joined at the shoulder, then the sleeve cap sewn to the armscye before the side and sleeve seams are sewn) more difficult, but still possible.
Huge tracts of land
Not every large breast fitting issue can be fixed with short row shaping. If the pattern size chosen happens to have enough ease to fit the wearer's full bust measurement, then adding extra fabric length to the front and darting it out with short rows will add the length needed to keep the front from riding up at the hem. This presumes, however, that the pattern size chosen is the one that fits the bust -- as discussed before, sometimes it is more important to make sure the pattern fits the shoulders first, and to adjust the rest of the pattern to fit the body.
Our fit model in this example needs this kind of support. In this example, the fit model is slim with a 40 inch [100 cm] full bust measurement and a D cup. In the CYC yarn standards, a woman with this full bust measurement is given a cross-back measurement of 17-17.5 inches [43-44.5 cm] (which may correspond to about a 16 inch measurement from shoulder point to shoulder point); but in this case, our small-boned model only measures 14.5 inches [37 cm] from shoulder point to shoulder point, so choosing a pattern size that fits her actual bust measurement will result in badly-fitting shoulders and set-in sleeves. In addition, her front is wider than her back: if we take her cross-section at the bust point, we find that her back, from side to side, is only about 17 inches [43 cm], while her front is 23 inches [58 cm] -- a 6 inch [15 cm] difference.
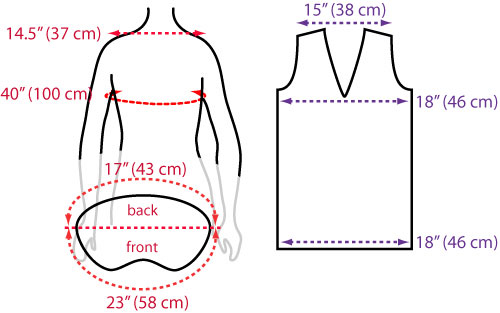 |
| In this example, the fit model has a 40-inch [100 cm] full bust measurement (not bra size). If you viewed a cross section of her body at the bust line (left), you would see that her front is larger than her back. While the sample pattern (left) fits her shoulders, it does not fit her bust.
|
Coincidentally, it appears that the pattern from the previous example will fit the bill nicely -- it has the right shoulder width. What it doesn't have is the right finished bust measurement, falling 4 inches [10 cm] short -- more if there is supposed to be positive wearing and design ease. Here, let's assume that there should be about an inch of wearing ease, meaning that to fit our model, the pattern needs an additional five inches [12.5 cm], or 20 stitches, added to the circumference of the top at the bust.
The fact that the actual front and back measurements are unequal doesn't mean that all the adjustment needs to be made to the front. For example, if it turned out that the width of the back was not wide enough either, it may be necessary to add some of these 20 stitches to the back, and the balance to the front. In this case, we won't do this. The cross-back measurement at the underarm in this pattern is 18 inches [46 cm], and our fit model's cross-back measurement at the same place is 17 inches.
There are a few places where we can choose to add the needed five inches. Some of this width could be added at the side seams (with a consequential change to the sleeve cap and width of the sleeve, as discussed above). It could be added at the center front, in the shoulder area, or in the underarm area -- but in these three regions, if the extra width is simply inserted all the way from bottom to top, the front shoulders or neckline will be misaligned with the back. But we don't need to have this extra width in the shoulders, because we chose the pattern size to fit our model's shoulders. What we need to do, then, is add the extra width to the body, but decrease those stitches before before the completion of the shoulders.
If the five inches were added in the region below the shoulder, one way of decreasing these stitches is to add extra decreases in the armhole shaping or in the middle of the shoulder region itself. If a large number of stitches needs to be decreased, this technique could be disruptive to the fit in the upper body (it would also noticeably disrupt any stitch patterning). Instead, or in combination with this device, we can create a bust dart that ends at the armhole:
 |
| If the needed additional stitches are added in the region below the shoulder (gold shading), then decreases can be worked between the armhole and the shoulder in the shoulder region to reduce the stitch count to the original number at the shoulders (left figure). These decreases may be in the middle of the shoulder region, or nearer to either the neckline or armscye, but the appearance of the decreases will create a line wherever they are placed. Alternatively, the decreases can be placed so that the line is pointed towards the armscye, resulting in less obtrusive dart shaping (right figure, left-hand shading); these decreases may be split between an armhole "dart" and a shoulder "dart" (right figure, right-hand shading).
|
This method creates a curvature immediately above the full bust which mimics the body shape.
To work this type of armhole dart (the one shown in the left-hand shading in the right-hand figure above) when knitting from hem to shoulder, the first decrease will be placed just above and to the side of the bust point, but very close -- perhaps within an inch or less of the bust point when the garment is worn. The last decrease will be placed near the armscye (perhaps next to the selvedge stitch) some inches above the first decrease. The exact locations may require some tweaking and will depend on the desired effect, but in this example we could try working with the region between the bust point (which we have estimated is 2 inches [5 cm] below the armhole bind-off; the exact horizontal position can be determined by measurement) and extending for 4 inches [10 cm].
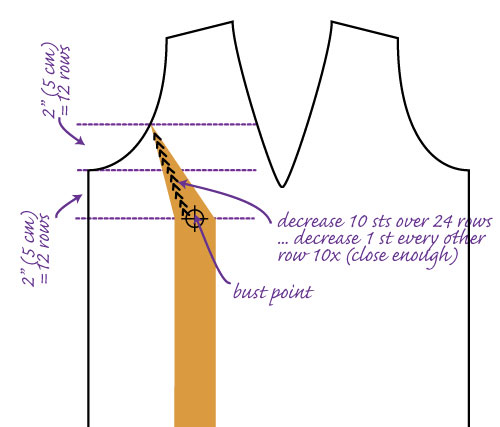 |
| Create an armhole dart by working a series of decreases from the bust point to the armscye over the space of a few or several inches. The exact placement of the decreases and the choice of decrease will depend on the design, but the decreases should be placed along a line that points toward the armscye.
|
On either side of the front, we know that we have 10 stitches to decrease, since a total of 20 stitches were added to the body width. If we work with a region 4 inches [10 cm] high, this gives us 24 rows within which to decrease these 10 stitches, given a row gauge of 6 stitches per inch [2.5 cm]. A good estimate for this is a decrease of 1 stitch every two rows -- ten repeats of this is twenty rows. At the same time, the armhole bind-off and other decrease shaping will be worked as originally directed in the pattern.
The decreases should not be stacked up, one right on top of the other in a column -- if they are arranged that way, they would become a shoulder dart instead. Rather, each successive decrease should be worked closer to the armscye so that the dart line "points" to the armscye. How closely they need to be placed will depend on the actual number of stitches between the position of the first and last darts.
As you might guess, this type of shaping works best when thought is put into the types of decreases used on the left and right sides -- mirrored decreases on the left and right an obvious choice, but the actual selection of the decrease type will either accentuate or downplay the actual dart line.
In this example, we haven't addressed the fact that
the extra room might not be needed all the way down -- we have actually
widened the front by five inches everywhere but the shoulder region.
If this extra five inches was not needed in the waist or hip area, it
could have been added above the waist with a series of increases. |


 Snarly on the outside
with a soft, chewy filling.
Snarly on the outside
with a soft, chewy filling.