Make
a Swatch
I
keep hearing about knitters who, anxious to get
started, immediately cast on for their garment and
then start measuring about 3 inches into it to see
if they've achieved gauge. Horror of horrors! If
you're going to spend the time it takes knitting
a sweater, you should hold off on the instant gratification
and spend a day or two making a gauge swatch.
That's
right, I said a day or two. It's little enough time
to spend if you really want your end product to
come out right. And you do get to work with that
new, fabulous yarn right away, even if you're itching
to begin the first piece. So let's get started at
the real beginning of any knitted garment.
First
off, always buy an extra ball for swatching. It's
worth the investment and if you run out of yarn
for whatever reason, it's insurance. You can certainly
knit up a swatch and then rip it out if you need
the yarn but doesn't it make more sense to spend
a few dollars more and have a swatch you can keep
for reference?
 There
are a number of ways to make a swatch. This
is my tried-and-true method and I pass it
on happily. My flat-knit swatch consists of
4 rows of garter stitch, the stitch pattern
called for, keeping the first and last 4 stitches
in garter stitch, and then ending with 4 rows
of garter stitch. This will frame the area
to be measured and eliminate any curling,
if curling edges are a possibility. The number
of cast-on stitches depends upon a couple
of key factors: the weight of the yarn and
if the stitch pattern draws in the fabric
either vertically or horizontally - cables
or slip stitches, for example. You should
add at least 10% more stitches or rows to
your swatch if the stitch pattern pulls in
either direction. See the table below for
yarn weight and suggested minimum number of
stitches to cast on and rows to work.
There
are a number of ways to make a swatch. This
is my tried-and-true method and I pass it
on happily. My flat-knit swatch consists of
4 rows of garter stitch, the stitch pattern
called for, keeping the first and last 4 stitches
in garter stitch, and then ending with 4 rows
of garter stitch. This will frame the area
to be measured and eliminate any curling,
if curling edges are a possibility. The number
of cast-on stitches depends upon a couple
of key factors: the weight of the yarn and
if the stitch pattern draws in the fabric
either vertically or horizontally - cables
or slip stitches, for example. You should
add at least 10% more stitches or rows to
your swatch if the stitch pattern pulls in
either direction. See the table below for
yarn weight and suggested minimum number of
stitches to cast on and rows to work.
| Yarn
Weight |
Min.
Number of Pattern Stitches |
Garter
Stitches for edge borders |
Total
Number for Cast On |
Min.
Number of Rows incl. 4 rows garter at beg
and end |
| Fingering |
28 |
4+4 |
36 |
48 |
| DK |
24 |
4+4 |
32 |
44 |
| Sport |
20 |
4+4 |
28 |
40 |
| Worsted
|
16 |
4+4 |
24 |
36 |
| Bulky |
12 |
4+4 |
20 |
32 |
| Super
Bulky |
10 |
2+2 |
14 |
24 |
As
you can see, the figures for the cast-on and
the number of rows to knit are based roughly
on what the yarn weight in question generally
yields for a standard gauge and really represent
the bare minimum numbers you will need for
an accurate measurement. Remember, the bigger
the swatch, the more accurate your gauge will
be, so don't hesitate to make it as large
as you can. Of course, if you are working
a flat swatch in a stitch pattern, you'll
want to make sure you include at least 3 patterns
repeats AND any additional stitches included
at the end of the row.
 Now
you're asking, "What if I'm knitting
in the round? How do I handle the swatch?"
You can adapt the flat-knit swatch numbers
above for a circular swatch by eliminating
the garter stitch edges and knitting the bottom
and top edges in garter stitch (that's knit
one round, purl one round). OR in the case
of Fair Isle, you may want to knit a flat
swatch across, eliminate the entire garter
border, and then begin the next pattern row
and all subsequent rows with the right side
facing you, either cutting all colors at the
end of the rows or making long strands in
the back of the swatch. [Sweaters From
Camp, by Meg Swansen, Amy Detjen and
Joyce Williams, has the best explanation of
Fair Isle swatching that I have ever read.]
Whatever method you use, make sure that you
do a gauge swatch when you knit circularly
- don't presume that the gauge you get when
you knit flat normally will be identical to
your gauge when you knit in the round, because
you'll be wrong.
Now
you're asking, "What if I'm knitting
in the round? How do I handle the swatch?"
You can adapt the flat-knit swatch numbers
above for a circular swatch by eliminating
the garter stitch edges and knitting the bottom
and top edges in garter stitch (that's knit
one round, purl one round). OR in the case
of Fair Isle, you may want to knit a flat
swatch across, eliminate the entire garter
border, and then begin the next pattern row
and all subsequent rows with the right side
facing you, either cutting all colors at the
end of the rows or making long strands in
the back of the swatch. [Sweaters From
Camp, by Meg Swansen, Amy Detjen and
Joyce Williams, has the best explanation of
Fair Isle swatching that I have ever read.]
Whatever method you use, make sure that you
do a gauge swatch when you knit circularly
- don't presume that the gauge you get when
you knit flat normally will be identical to
your gauge when you knit in the round, because
you'll be wrong.
Wash
and Block The Swatch
Yes,
you heard me right! You're going to wash and
block the swatch BEFORE you measure it, according
to the fiber and stitch pattern requirements
(see the last issue of Knitty for a
great article on blocking). I feel your
pain! But unless you know everything there
is to know about how your fabric will behave,
you're treading on thin ice. Some wools absolutely
blossom once washed and blocked. A swatch
of cotton, that notoriously stretchy fiber,
should be washed and dried in the way the
finished garment will be; you will get a more
accurate gauge this way.
If
you're using a yarn and/or a stitch pattern that
may cause the finished garment to grow downwards,
you may want to try this little trick to see how
much the finished garment may lengthen. Once you've
washed and blocked your swatch, measure its length
and make a note of it (I'm sure everyone keeps detailed
records of all their gauge swatches in a notebook
or PDA or on their computer, right?). Then carefully
pin it to a wire hanger and let it hang for two
days. I often thread a double-pointed needle through
the bottom of the swatch for a bit of weight. Then
re-measure. This will give you an idea of what to
expect after wearing your sweater/coat/what-have-you
and you can adjust your pattern's directions for
length to compensate for el droop-o grande.
Measure
the Swatch
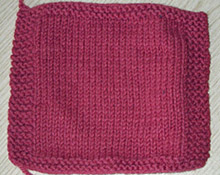
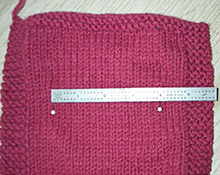 With
a ruler (not a tape measure - tape measures
stretch and do not give accurate measurements)
and some straight pins, measure a width of
either one inch or four inches, depending
upon the directions you are using, making
sure that you pick an area of the swatch away
from the borders to avoid distortion. Insert
the pins as shown in the photo at right. Write
down your stitch gauge. And be brutally honest
when measuring - no stretching, no finagling
to try to get the gauge. Then measure again
in two other places on the swatch. Average
your three measurements for your final gauge.
Note: If you prefer, you can run a piece of
yarn in a contrasting color on the side of
each end stitch - it's up to you. I find that
there's less chance of distorting the knitting
if I use pins. And you don't want to distort
the knitting in any way if you wish to be
accurate.
With
a ruler (not a tape measure - tape measures
stretch and do not give accurate measurements)
and some straight pins, measure a width of
either one inch or four inches, depending
upon the directions you are using, making
sure that you pick an area of the swatch away
from the borders to avoid distortion. Insert
the pins as shown in the photo at right. Write
down your stitch gauge. And be brutally honest
when measuring - no stretching, no finagling
to try to get the gauge. Then measure again
in two other places on the swatch. Average
your three measurements for your final gauge.
Note: If you prefer, you can run a piece of
yarn in a contrasting color on the side of
each end stitch - it's up to you. I find that
there's less chance of distorting the knitting
if I use pins. And you don't want to distort
the knitting in any way if you wish to be
accurate.
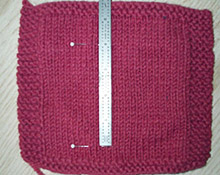 Repeat
for the row gauge as shown in the photo at
left.
Repeat
for the row gauge as shown in the photo at
left.
Stitch
gauge is almost always a mandatory measurement,
with the exception of those knitted items that will
not be shaped to fit, such as afghans, scarves,
washcloths and so on. Row gauge is absolutely critical
if you are knitting any raglan garment or a fully-fashioned
sleeve, if the pattern is Fair Isle, other colorwork,
or certain Aran designs, where the charted design
constitutes the entire garment piece and dictates
the finished length. Always analyze your pattern
to see if row gauge is critical to the finished
garment or not. Most of the time row gauge will
not matter too much but make sure you know when
it does.
My
Gauge is OFF!
What
can you do? If your swatch measures too few
stitches, you'll need to go down a needle
size or so to get more stitches - and you'll
need to reswatch and reblock. Yes, you will!
Otherwise, how will you know if changing needles
sizes will work? And this is exactly why you
want to buy an extra ball/skein, for these
moments of total exasperation. Of course,
conversely, if your swatch measures too many
stitches, you'll need to go up a needle size
or two. After 35 years of serious knitting,
I now know instinctively what needles I will
need to use for a particular weight of yarn
and stitch pattern. Nonetheless, I still swatch.
Experience only allows me the ability to select
the right size needles the first time, most
of the time. But it doesn't excuse me from
checking my gauge.
Don't
rely on blocking to remedy your gauge problems.
Blocking is not a universal panacea for gauge inaccuracy,
especially if you are working with acrylics or an
acrylic blend. While it's true that you can somewhat
enlarge a small garment knit in natural fibers by
blocking it out, often the blocking will not hold
once the garment is washed again. Your only true
guarantee is to knit to gauge to begin with.
Swatching
When Designing
If
you are interested in learning to design your
own knitwear, you'll find that swatching becomes
the most important part of the design process
- not only must you determine the gauge to
calculate your garment pieces but you'll need
to experiment with your yarns and stitch patterns
first. You may have a brilliant design concept
in your head but only your swatch will tell
you if your design will work in the yarn[s]
and stitch patterns you have chosen. Most
designers do a lot of swatching before they
begin to knit up their designs.
Here's
a prime example. When I started designing
the Koigu Crusoe
Socks for this issue of Knitty, I knew
that I wanted to do a particular slip stitch
pattern that had 2-stitch stranding and that
I wanted to use a particular Koigu colorway.
As I swatched, it was immediately obvious
to me that the colorway I had chosen was wrong.
The stranding simply didn't show up. However,
I completed an entire swatch so that I could
be totally sure. As a result of this swatch,
I ended up choosing a much brighter colorway
and the stranding stood out as I had intended.
Anything
Else?
Don't
forget to check your gauge after you've knit
about 2-3 inches of your first garment piece
and again about halfway through. It's not
uncommon for knitting tension to change for
a variety of reasons...you're tense, stressed
out, tired, etc. If your gauge is off, switch
needle size, frogging if needed back to where
your gauge was correct. And relax! Knitting
is fun!
As
Mr. Seeger says, read the fine print. Most good
knitting reference books have sections on gauge
and swatching. Above all, commit yourself
to taking the time needed to swatch, wash, block
and measure. If you do, you will rarely be disappointed
with your finished knitting.