
Increases and Decreases |
|
By
Theresa Vinson Stenersen
"After
a while she remembered that she still held the pieces
of mushroom in her hands, and she set to work very
carefully, nibbling first at one and then at the
other, and growing sometimes taller and sometimes
shorter, until she had succeeded in bringing herself
down to her usual height."
-
Alice's Adventures in Wonderland.

There
are as many ways to increase and decrease
in knitting as there are ways to shear the
proverbial sheep. I'm going to focus on some
of the most common and some personal favorites.
After you've tried these and the other possibilities
that exist in the wide, wide world of knitting,
you're sure to find the ones you prefer.
So
get out your favorite needles, some of that
spare yarn you have hiding in your stash,
cast on 20 sts or so and take these babies
out for a trial run by working some increases
then working some decreases...then increase
then decrease...just like Alice.
Increases
 |
m1
[make 1]
In
Knitting Without Tears, Elizabeth Zimmerman
listed her "make 1" increase
as the one she used most often. While
there are several versions of the "make
1" increase, Zimmermann's is perhaps
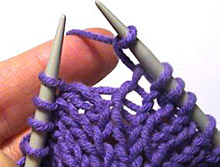
the simplest. Just make a backwards
loop on the right-hand needle as seen
here and on the next row, treat the
loop as a separate stitch. It's quick,
simple and effective. Make
sure to pull your working yarn tight
in order to snug that loop up to the
preceeding stitch in order to make sure
the increase doesn't leave an unsightly
hole.
|
|
knit
into the front and back
Amy,
our beloved editor, says her fav increase
is of the "knit into the front
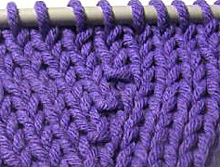
and back" variety. This particular
increase is very neat and tidy with
a little decorative purl bump at the
base of each increase.
|
.jpg) |
And
is done like this:
Insert
the needle into the front of the next
stitch as normal and knit it, then without
removing the new stitch from the needle,
re-insert the right-hand needle into
the back loop of the original stitch
and knit it again. Voila! Two stitches
from one. |
 |
To
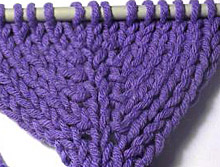
make a double increase using this increase,
mark a center stitch then knit into
the front and back of the stitch just
preceeding the marked stitch and into
the marked stitch itself on each row
in which you are to increase.
There
are lots of other options for increases
that involve using the stitches in the
row below, but I find myself coming
back to these two again and again. |
| |
|
| Decreases |
|
Decreases
are divided into two categories: right
slanting and left slanting.
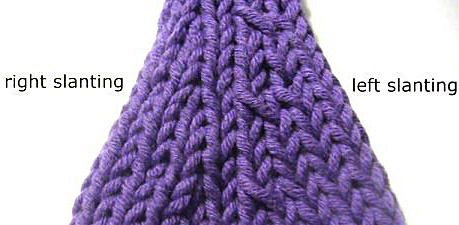
Left-slanting
decreases lean to the left: these include
k2tog tbl, ssk,
s1, k1,
psso.
Right-slanting decreases lean to the
right: K2tog is the
most commonly used of these.
You
may be asking yourself, "is this
really so important?" Well, not
when the decreases are spaced far apart
[as on the crown of a hat, for example.
In that case, you'll want to pick your
favorite decrease and use it throughout]
but if the decreases will be paired,
as they are above or as they are for
the gussets of a sock, you'll want to
use a left-slanting decrease on one
side and a right-slanting decrease on
the other for aesthetic reasons. It
just looks better that way.
|
|
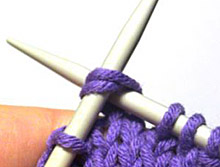 |
K2tog
[knit two together]
Insert
the right-hand needle into the next
two stitches on the left-hand needle
at the same time and knit them together
as if they were one stitch. In other
words, you'll be doing the exact same
thing as when you are making a normal
knit stitch, only with two stitches
at once. Voila! You now have one stitch
where there were two. |
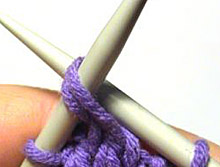 |
k2togtbl
[ knit two together through the back
loop]
Insert
the right-hand needle into the next
two stitches on the left-hand needle
through the back loops at the same time
and knit them together as if they were
one stitch.
I
talked a bit about knitting into the
back loop in the Winter
2002 issue of Knitty so might want
to check there if you're having one
of those "what the heck is she
talking about?!?" moments that
we all have from time to time. |
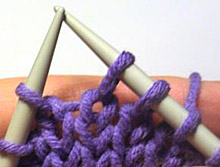 |
ssk
[slip, slip, knit]
Slip
as if to knit the next two stitches
on the left-hand needle one at a time
onto the right-hand needle, then... |
k.jpg) |
...insert
the left-hand needle into the fronts
of the two slipped stitches and knit
them together. If you look carefully
at this last picture and the picture
of "k2togtbl" you can see
that the end result will, of course,
be almost identical ... a left-slanting
decrease. There is another decrease
called "sl1, k1, psso" or
"skp" for short: slip 1 knitwise,
knit the next stitch and pass the slipped
stitch over the knitted stitch and off
the right-hand needle. The result is
quite similar to "ssk". You
can use k2tog and one of the left-slanting
decreases in combination on either side
of a center stitch to make a double
decrease like the one shown above.
|
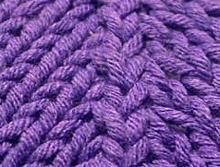 |
Yet
another method of making a double decrease
is to "sl 2, k1, p2sso" which
leaves a lovely decorative raised center
stitch [see left].
For
this double decrease, mark a center
stitch, then knit to within one stitch
of the marked stitch, slip 2 knitwise
at the same time, knit the next stitch
[the stitch directly after the
marked stitch] then pass the two slipped
stitches over the knitted stitch and
off the needles. Pretty, isn't it?
|
|
| |
| ABOUT
THE AUTHOR |
|   Theresa is currently dividing her time between
Norwegian language classes, looking for work
and waiting very impatiently for spring to arrive
and the sun to return.
She's
still finding some time to knit and taking tentative
steps towards spinning.
Follow
along on her progress at her weblog, Bagatell.
|
| ©
2003 Theresa Vinson Stenersen. Contact Theresa. |
|