learn to break the rules
I love to spin. I’m not
even a fair-weather spinner; I will spin in the
midst of the summer’s
onslaught of heat and humidity…conditions
which make the individual fibers stray and stick.
Plying for a smooth yarn can be a challenge in
humid weather. Slightly underspun singles stick
their heads up at irregular intervals giving
the yarn a blurred appearance. It’s usually
during these moments when I’m looking for
something to liven up my spinning…something
that will allow me to work with the fiber instead
of trying to wrestle it into a smooth strand
as it protests. I want a satisfying mix of artistic
expression and beautiful yarn.
There is so much more to spinning
plied yarns than the traditional plying method.
Singles can be manipulated so that the resulting
yarn still bears the benefits of a plied yarn,
but also enhances slubs, thin spots, haloed fibers
and irregularities that can occur under less-than-perfect
spinning conditions. These techniques will create
wild, unexpected, and highly textured yarns.
In fact, what is conventionally termed a defect
now becomes the focal point of an artistic skein.
With practice, you can repeat your results and
create many skeins of a particular type of yarn.
Work your yarn up into amazing textured garments
or accessories like mittens and hats. Even single
skeins can be used as button bands, cuffs, and
hem or collar accents.
Before you break with
convention, you must know what to keep and
what to change. You need to know how to ply
traditionally, and must ply well before moving
onto these challenging techniques. If you skip
the basics, your yarn quality will suffer,
and the techniques will be frustrating. Know
the rules, so you can break them effectively. A
primer on traditional plying can be found here.
All the techniques in
this article assume you are plying a normally
spun single. Singles can be of any weight,
and as even or uneven as you prefer. If you
are a new spinner wondering what your first
hanks of uneven singles are good for, dig them
out. These plying techniques will highlight
the beauty of even the most craptastic yarn.
Any special requirements will be noted in the
individual technique instructions.
Since these techniques
can often result in a bulky yarn, you’ll need to keep in mind
the size of your wheel’s orifice relative
to the yarn you’re spinning. Pay special
attention while spinning knots. It’s easy
to spin a knot too large to fit through the orifice
and wind onto the bobbin.

Inequality
Materials:
 Regular
single Regular
single
 Strong, lightweight thread Strong, lightweight thread
Simple, but effective.
Ply a regular single with a very thin thread.
The greater the disparity between the weights
of these singles, the more dramatic the appearance.
Be sure the thread you’re
using is strong enough to handle the plying process.
Sewing or machine embroidery thread work well.
A matching thread will blend in and create an
invisible squiggle. A contrasting thread will
add a bit of extra color to the textured yarn.

Lopsided
Materials:
 Regular single Regular single
 Thin
novelty yarn (optional) Thin
novelty yarn (optional)

Lopsided plying involves
spinning the singles together with uneven tension.
You’ll apply
more tension to one single than you do to the
other. This causes the singles to spin together
at a different rate, resulting in more texture.
Use my plying hold (See this
previous plying article for more details
but let one single be free – it will
pull up and form a ninety degree angle with
your tensioned single. Use your pointer finger
to guide the loose single as you spin. You
can apply a little pressure if it’s unruly.
Adjust as necessary until you get a result
you like.
The photo above shows what happens if you use
this technique with singles of very different
weights. I plied a rayon carrying weight yarn
with a loosely spun, bulky weight wool single.
The bottom three strands were spun with the bulky
single held under no tension. Below is a detail
of the lighter strand held under no tension.

Variations:
- Use two different weights of singles.
- Use one single, and one lightweight novelty
yarn or thread.
- Alternate the
untensioned single as you ply.

Knots
Materials
 Singles: due to the over twist used for plying,
your singles will benefit from being very firmly
spun. Singles: due to the over twist used for plying,
your singles will benefit from being very firmly
spun.  Short
draw is a good technique to use for a firm
single. Short
draw is a good technique to use for a firm
single.

These aren’t complicated, but it takes
a bit of fiddling to get them right. Keep practicing
and you’ll soon be whizzing.
You’ll need to hold one single in each
hand, as you’ll be moving them independently
of the other. Slow down the treadling, knots
take time to form. If you treadle too quickly,
you’ll remove too much twist from your
singles and they will break. Make sure the singles
you use are very overspun, or this technique
will be frustrating.
Hold one single taut. Move the other single
from a normal plying position to a ninety degree
angle and allow it to wind onto the taught single
in the same spot, forming a small bump. This
bump will anchor the single. Now continue to
move the single towards the orifice, allowing
it to wind on around the already plied yarn.
Once you reach the top of the knot, wind a few
turns in the same place to anchor, and continue
winding the single around the knot until you
reach the bottom. Again, anchor the single by
allowing it wind around the taut single at the
base of the knot. Anchoring prevents the knot
single from sliding freely along the taut single.
If you experience problems
with the single winding properly, adjust the
tension. Try loosening your hold on the base
single so it can spin a bit more freely. Use
less tension on the wrapping single so that
it can wrap on faster. Keep practicing, and
you’ll get the rhythm of this technique.
It takes quite a bit of coordination between
your hands and your feet.
Be aware that if you have a spinning wheel with
a narrow orifice, you will need to keep your
knots small so that they can fit through. Many
fibers will compress, and you can use your orifice
hook to help guide the knots through and onto
the bobbin. Knots benefit from being hand wound
onto your bobbin.

Variations:
- Place several consecutive knots by alternating
which single is being wrapped.
- Use two different colored singles for contrasting
knots.
Using these techniques
in combination with each other and regular
plying is great fun. You’ll
have lots of texture and variation along the
skein. Embrace the unexpected and let the yarn
whisper it’s secrets to you. Your results
will vary depending upon the characteristics
of the singles you spin. I find that the unexpected
often is the most satisfying part of spinning,
and a perfect opportunity for further fiber education.
These pictures illustrate
these techniques. You’ll notice that
I’ve further enhanced
the artistic texture of these yarns by using
different colors, different fibers, adding
Angelina sparkle, novelty yarn and more. Let
your creativity take you to new places in your
spinning.

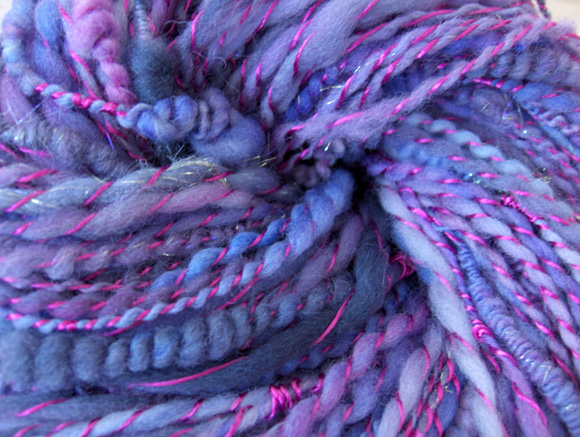
Purple Sparkles
This skein was created using the techniques in
this article. I used hand dyed, medium fine,
domestic wool in a variety of purple shades.
I hand carded Angelina fiber into the dyed
roving and spun this into the single at random
intervals. A hot pink, rayon novelty yarn was
used to ply.


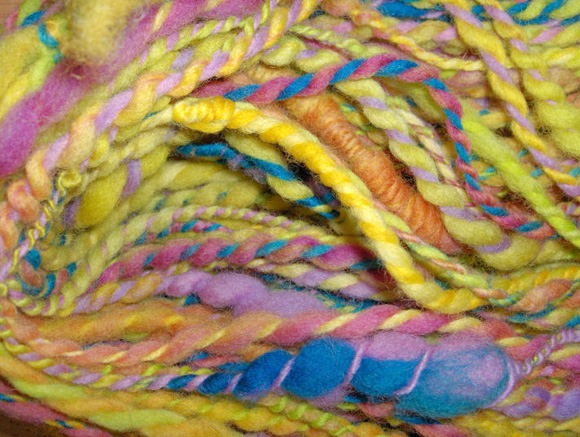
Treasure of Tortuga
A variety of colored, medium-fine wool roving
was used to spin a multi-color single. Large
slubs were intentionally placed into the single
at random intervals. I also tied lengths of
singles onto the yarn as I was spinning, before
I plied. The textured singles were then plied
together, incorporating knots and lopsided
tension. The ends of the tied on singles were
teased, so that they stick out of the yarn.


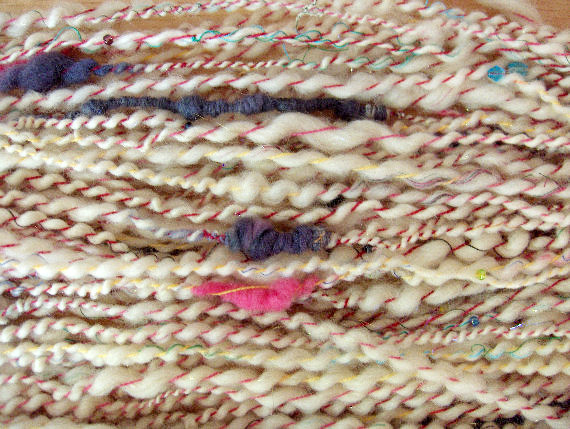
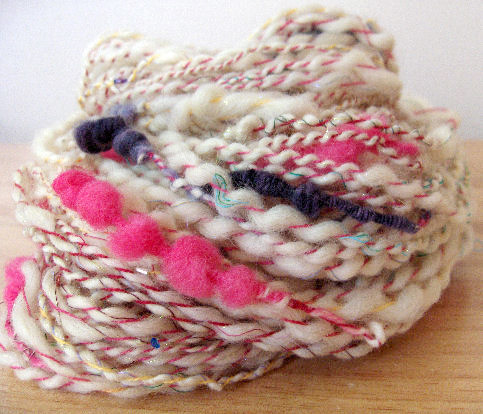
Ice Princess
I spun natural-colored merino wool roving into
firm singles, with random sections of brightly
colored roving incorporated. I also hand carded
Angelina and short lengths of multicolored
sewing threads into the natural colored wool
and spun this in at intervals. The single was
spun very unevenly, with large slubs and near
laceweight thin lengths. Once spun, the single
was plied with a multicolored, commercial lace
weight yarn, with hand strung seed beads. As
I plied I again used the lopsided plying technique
and knots.
|

