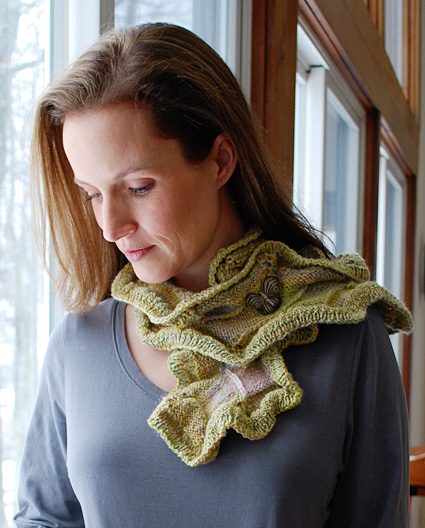
CHAIN OF RECTANGLES
First Rectangle:
Using long-tail method,
loosely CO 10 sts. Place
locking st marker or safety pin in last st of CO edge.
Row 1 [WS]: Sl 1 purlwise,
p9.
Row 2 [RS]: Sl 1 knitwise,
k9.
Repeat these 2 rows 8 times
more. Place a second locking marker or safety pin in
center of this piece, on RS of fabric. This indicates
RS of scarf; it is obvious now which side is RS, but
after you have worked a few more squares, this will be
a handy thing to refer to.
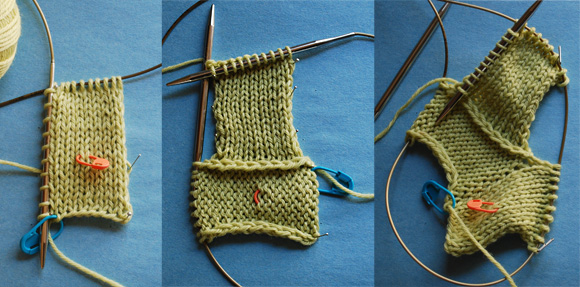
Second Rectangle:
Slide sts down cable of
needle, freeing up a
loop of cable. Turn rectangle
90 degrees clockwise.
With RS facing, pick
up and k 10 sts (1 st
in each slipped st) along
adjacent edge of piece
(see photo). From this
point on, work this
rectangle using second
circular needle.
Row 1 [WS]: Sl 1 knitwise,
k9.
Row 2 [RS]: Sl 1 purlwise,
p9.
Repeat these 2 rows 8 times
more, then work Row 1 once more.
Third Rectangle:
Slide sts down cable of
needle, freeing up a
loop of cable. Turn rectangle
90 degrees clockwise.
With WS facing, pick
up and k 10 sts (1 st
in each slipped st) along
adjacent edge of piece.
From this point on, work
this rectangle using
first circular needle.
Row 1 [RS]: Sl 1 knitwise,
k9.
Row 2 [WS]: Sl 1 purlwise,
p9.
Repeat these 2 rows 8 times
more, then work Row 1 once more.
Note: Second and third rectangles are the same, except
for the following things:
- Second rectangle is worked
in reverse stockinette st, third rectangle is worked
in stockinette st.
- Second rectangle is worked
using second circular needle, third rectangle is worked
using first needle. When these rectangles are complete,
their sts will remain on the needles with which they
were worked. This will make sense as work proceeds; all
rectangles that slant one way are worked with one needle,
rectangles that slant the other way are worked with the
other needle.
Repeat second and third rectangles until you have worked
24 rectangles, ending with second rectangle. If you wish
to lengthen or shorten the scarf, be sure to work an
even number of rectangles.
Do not turn your work at end of last row; edging begins
with WS facing.
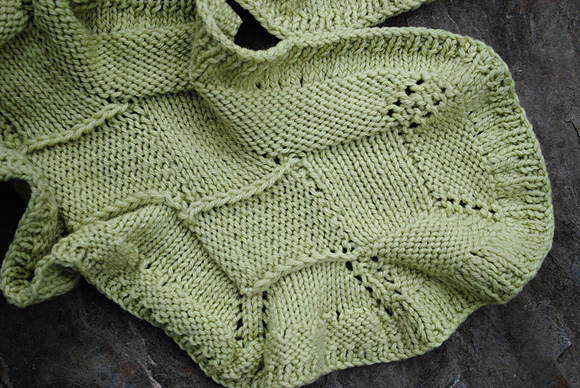
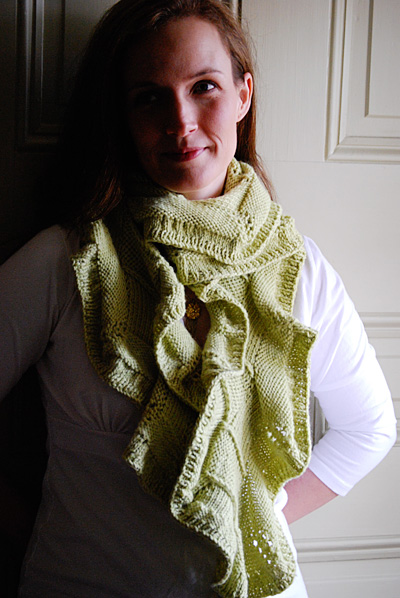
RIPPLE EDGING: FIRST TIER
Note: When placing markers in Set-up Round, use plain
markers unless otherwise indicated.
Drop second needle (needle you have just been working
with) and pick up first needle, bringing points of first
needle together as if to begin working in the round.
Pick up and k 10 sts along
left edge of rectangle just completed, place ornate marker
to indicate beginning of round.
[K 10 sts of rectangle immediately next to picked-up
sts, place marker, pick up and PURL 10 sts along adjacent
edge of same rectangle] 12 times or until all rectangles
on this needle have been worked; you will have reached
the lower corner of the first rectangle. 12 stitch markers
are in place; one at the outer corner of each triangle.
Drop first needle and pick up second needle.
Pick up and k 10 sts (1
st in each cast-on st) along CO edge of first rectangle.
You will have just reached locking st marker. Remove
this marker from work, place other ornate marker on
needle to indicate midpoint of round.
[Pick up and k 10 sts along edge of adjacent rectangle,
place marker, p 10 sts
of same rectangle] 12 times
or until all rectangles on this needle have been worked.
Join to work in the round. See Pattern Notes re. working
in the round using two circular needles; the edging is
worked using this technique.
Two Important Notes:
- The points at which you
switch from one needle to the next are not the beginning
and midpoint of the round (though they may appear that
way). The beginning and midpoint of the round are located
at the points where the ornate markers are placed.
- In the directions that
follow, treat the points between needles as if there
are plain markers placed there; work increases at these
points as are worked at all points with markers.
Using first needle, p10; you are now at beginning-of-round
marker.
Each half of the round (between beginning-of-round marker
and midpoint marker) contains three 10-st sections ('short
sections') and eleven (depending on the number of rectangles
worked) 20-st sections ('long sections').
Round 1: K all sts to midpoint marker; p all sts to
end-of-round marker.
Round 2: [K1, yo, k to
1 st before next marker, yo, k1] until you reach midpoint
marker; [p1, yo, p to 1 st before next marker, yo, p1]
until you reach beginning-of-round marker.
Repeat these 2 rounds three
times more, then work Round 1 once more. Each short section
now has 18 sts, and each long section now has 28 sts.
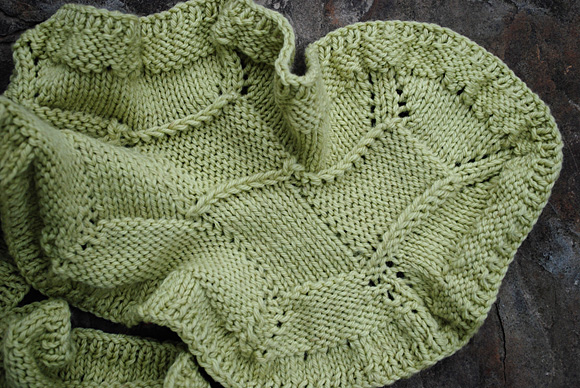
RIPPLE EDGING: SECOND TIER
Round 1: For first half of round, in each short section,
work [p1, yo, p2, yo, p3, yo, (p2, yo) three times, p3,
yo, p2, yo, p1]; in each long section, work [p1, yo,
p2, yo, p8, yo, (p2, yo) three times, p8, yo, p2, yo,
p1]. For second half of round, in each short section,
work [k1, yo, k2, yo, k3, yo, (k2, yo) three times, k3,
yo, k2, yo, k1]; in each long section, work [k1, yo,
k2, yo, k8, yo, (k2, yo) three times, k8, yo, k2, yo,
k1]. Each short section now has 26 sts, each long section
now has 36 sts.
When working next round, remove all plain markers, but
leave beginning-of-round marker and midpoint marker in
place.
Rounds 2-5: P to midpoint marker, k to end of round.
Rounds 6-8: [K1, p1] to
end.
BO all sts. |