Knitty: little purls of wisdom
The Loopy Ewe
Title
beauty shot

Tangy

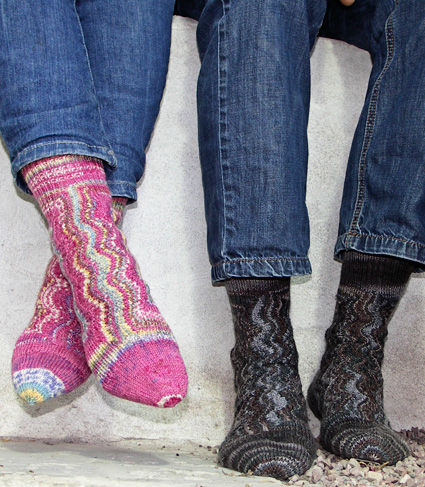
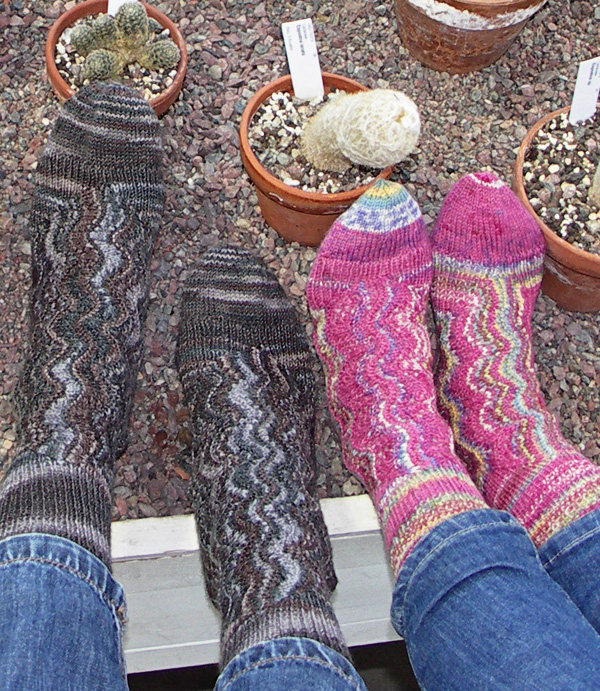
There is no need for a major in modern physics to knit these socks, only your curiosity and eagerness to try something new! If you have already knitted heaps of toe-up and top-down socks and want to try something different, this is the sock design to go for this time!

Knitted from the heel on upwards and sideways, these socks explode in a joyful Feather and Fan lace pattern. The instep is then joined at the center as you go. The toe and leg are worked last from either end of your work.

They do not only have a different and interesting construction, they also feel good to wear! The fit is so comfy with the rib hugging the foot and ankle at just the right spots. The wavy lace pattern adds elasticity to the instep -- not to mention that touch of lacy flair!

The innovative architecture and the spiraling lace pattern tickled my mind and were after some calculations very doable, while string theory of modern physics is equally tickling, but stays just out of grasp. I have decided to leave it there, and for today, let's stick to some inspired sock knitting!


spacer photos: Anita Grahn
   Pin It!


SIZE
XS[S, M, L]

FINISHED MEASUREMENTS
Foot circumference: 7.5[8, 8.25, 8.5] inches
Foot length: 8.75[9.25, 10, 10.5] inches

spacer

MATERIALS
Yarn

Brown socks
spacer Rowan Fine Art [45% wool, 20% mohair, 25% polyamide, 10% silk; 437yd/400m per 100g skein]; color: 308; 1 [1,1,1] skeins

Pink socks
spacer Drops Fabel [75% wool, 25% polyamide; 224yd/205m per 50g skein]; color: 161; 2 [2,2,2] skeins

Recommended needle size
[always use a needle size that gives you the gauge listed below -- every knitter's gauge is unique]
spacer US 1.5/2.5mm circular needle: 1 long for Magic Loop, or 2 short circulars.
Note: This pattern cannot be worked on DPNs due to the large number of stitches

Notions
spacer Yarn needle
spacer 6 stitch markers
spacer 20 inches of scrap yarn
spacer Spare DPNs or crochet hook of similar size to working needles

spacer

GAUGE

32 sts/42 rounds = 4 inches in stockinette stitch
38 sts/48 rounds = 4 inches in pattern
 

PATTERN NOTES
[Knitty's list of standard abbreviations and techniques can be found here.]

RLI (right leaning increase): lift the right leg of the st below the next st onto the left needle and knit it
LLI (left leaning increase): lift the left leg of the second st below the previous st onto the left needle and knit it through the back loop

Judy's Magic Cast On
Instructions for Judy's Magic Cast On can be found here.

Jeny's Surprisingly Stretchy Bind Off
Directions for Jeny's Surprisingly Stretchy Bind Off can be found here.

spacerCharts
The charts for this pattern are very large and fit on a letter-sized page.
Click here and print the resulting page. Chart C updated 4/19/14.

DIRECTIONS

spacer
Cast On and Heel
Using Judy's Magic Cast on method, CO 36[40, 44, 48] sts, half each on one needle.

Knit one round.

Rnd 1: [K1, LLI, [s1, k1] rep to last st of needle, RLI, k1] twice. 4 sts increased.

Rnd 2: [K1, LLI, knit to last st of needle, RLI, k1] twice. 4 sts increased.

Rnd 3: [K1, LLI, [k1, s1] rep to last st of needle, RLI, k1] twice. 4 sts increased.

Rnd 4: [K1, LLI, knit to last st of needle, RLI, k1] twice. 4 sts increased.

Repeat Rnds 1-4 1[1, 2, 2] more times.

Work Rnds 1-2 another 0[1, 0, 1] times. 68[80, 92, 104] sts.

Foot
Rnd 1: [RLI, k1, pm, k1, LLI, k13[16, 19, 22], k2tog, pm for center, ssk, k to last two sts of needle, RLI, k1, pm, k1, LLI] twice.

Rnd 2: [Knit to last st of needle, p1] twice.

Note: In the following rounds, you will be working [k1, p1] ribbing at the beginning and end of the needles. The ribbing at the start of the needle is to start with k1, the ribbing at the end of the needle is to end with a p1. The stitch count will vary, sometimes there will be an odd number of stitches, sometimes an even number. If you have an odd number of rib stitches, you will begin and end the start-of-needle ribbing with k1, and begin and end the end-of-needle ribbing with p1. If you have an even number of stitches, you will begin both sets of ribbing with k1 and end with p1. For the first repeat of Rnd 3, you will only have 1 st, so simply work k1 at the start of the needle and p1 at the end of the needle.

Rnd 3: [Work [k1, p1] ribbing to 1 st before first marker, RLI, k1, sm, k1, LLI, knit to two sts before center marker, k2tog, ssk, knit to last st before last marker on needle, RLI, k1, sm, k1, LLI, [k1, p1] to end of needle] twice.

Rnd 4: [Work [k1, p1] ribbing to 1 st before first marker, k1, sm, knit to last marker, k1, work [k1, p1] ribbing to end of needle. Rep once more to end of rnd.

Repeat Rnds 3-4 7[8, 9, 10] more times.

There should now be a total of 104[120, 136, 152] sts. 10+16+16+10[11+19+19+11, 12+22+22+12, 13+25+25+13] sts between markers on each needle.

Instep
Note: remove center marker from both needles on the next round.

Note: For sizes XS & M, the same chart is used on both needles; for S & L, different charts are used on the two needles.

Rnd 1, sizes XS and M only: [Work ribbing as set to 1 st before marker, RLI, k1, work chart A to last marker, k1, LLI, work ribbing as set to end of needle] twice.

Rnd 1, sizes S and L only: Work ribbing as set to 1 st before marker, RLI, k1, work chart B to last marker on needle, k1, LLI, work ribbing as set to end of needle. Work ribbing as set to 1 st before marker, RLI, k1, work chart C to last marker, k1, LLI, work ribbing as set to end of needle.

Rnd 2: [Work ribbing to 1 st before first marker on needle, k1; work Chart as set to last marker; k1, work ribbing as set to end of needle] twice.

Work Rnds 1-2 5[4, 5, 4] more times. There should now be a total of 162[172, 198, 208] sts. (16+49+16[16+54+16, 18+63+18, 18+68+18] sts, divided by markers on each needle.)

Rnd 3: [Work ribbing to 1 st before first marker on needle, RLI, k1; work Chart as set to last marker; k1, LL1, work ribbing as set to end of needle] twice.

Work Rnd 3 11[13, 15, 17] more times. There should now be a total of 234[256, 394, 316] sts. 28+61+28[30+68+30, 34+79+34, 36+86+36] sts between markers on each needle.

Slip the 28[30, 34, 36] sts to first marker and after second marker on scrap yarn, for both needles. 61[68, 79, 86] live sts rem in the center on both needles. DO NOT CUT THE WORKING YARN!

Fold your work in half, with wrong sides together, holding them so that the working yarn is on the left side. You are now going to join the two rows of sts from right side to left.

Use the dpn or a crochet hook to "seam" the sts together like this: slip one st from your front needle to the dpn, [slip one st from your back needle to the dpn, pull the first st over the second, slip one st from your forward needle to the dpn, pull the first st over the second] rep until all the sts of your front needle have been used. Slip the last st of your back needle to the dpn, pull the first st over the second. You should now have only one st left on your dpn. This stitch will become the first of the new round.

So far, the sock is completely symmetrical, and the toe and the leg can be worked from either end. To reduce the number of ends to be woven in, we work the leg starting from the still-attached yarn.

Leg
Return held stitches from the side of sock with the live yarn to your needles, including the stitch left over from the "seam". Join for working in the round. There should be a total of 57[61, 69, 73] sts, including the 1 left over from the seam.

First round: K2tog, [p1, k1] to last st, p1. 56[60, 68, 72] sts.

Ribbing rnd: [K1, p1] around.
Work Ribbing rnd as set for 4 inches.

Bind off using Jeny's Surprisingly Stretchy Bind Off.

Toe Setup
Return held stitches from other side of sock to your needles. Rejoin yarn, and join for working in the round. There should be a total of 56[60, 68, 72] sts.

Ribbing rnd: [K1, p1] around.
Work Ribbing rnd as set until the foot measures 2 inches than desired length of foot.

Toe Decreases
Knit one rnd.
Decrease rnd 1: K0[4, 4, 0], [k6, k2tog] to end of rnd. 49[53, 60, 63] sts.
Knit 6 rnds.
Decrease rnd 2: K2[6, 6, 2], k2tog, [k5, k2tog] to last 3 sts, k3. 42[46, 52, 54] sts.
Knit 4 rnds.
Decrease rnd 3: K3[7, 7, 3], k2tog, [k4, k2tog] to last st, k1. 35[39, 44, 45] sts.
Knit 3 rnds.
Decrease rnd 4: K0[4, 4, 0], [k2tog, k3] to end of rnd. 28[32, 36, 36] sts.
Knit 3 rnds.
Decrease rnd 5: K1, k2tog, [k2, k2tog] to last st, k1. 21[24, 27, 27] sts.
Knit one rnd.
Decrease rnd 6: [K1, k2tog] to end of rnd. 14[16, 18, 18] sts
Knit one rnd.
Decrease rnd 7: K2tog to end of rnd. 7[8, 9, 9] sts.

Cut yarn and pull the end through the remaining sts to secure.

FINISHING
Weave in all ends. Block.

spacer
ABOUT THE DESIGNER

designernamespacer Living in a house on the countryside outside Uppsala, Sweden, with teenage children, cats and angora rabbits, Anita Grahn just left the bioscience industry and started to work full time writing knitting patterns and holding classes and workshops -- not regretting it for a moment! Photoshoot at the Orangerie of the Botanical Garden in Uppsala, Sweden.

If you want to see more of her work, check out her website, or like AnitaYarn on Facebook for the latest news!

spacer