Collaboration Cowl, a free knitting pattern from Knitty.com. Free knitting pattern for a lace cowl knit from handspun, featuring a maple leaf pattern.
INTRODUCTION
Collab
![]()
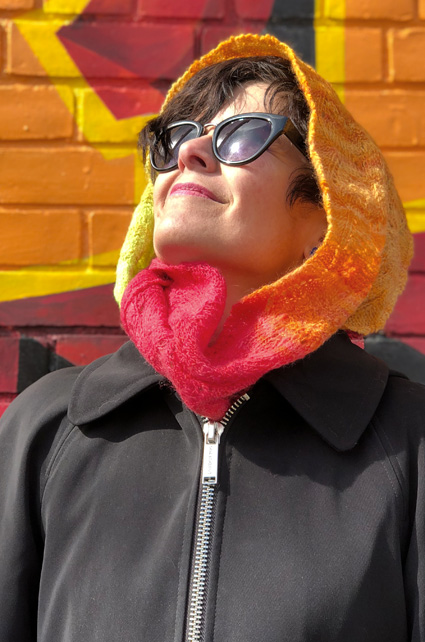
This cowl is a collaboration between the three members of Knitty's technical editing team, although everyone on the top of the Masthead had a little bit of a say in it.
It began with Kate expressing her love for some fiber dyed by Rachel (of PorpoiseFur). Rachel spun it up into an amazing gradient, and sent it off to Ashley to play with. Ashley designed a wonderful maple-leaf lace pattern, an homage to Knitty's Canadian origins.
Kate's challenge was to use the second half of the yarn to complement Ashley's work. When using a gradient like this, the goal is to keep the color changes from competing with each other. We could have just kept working straight, but that would have been too straightforward, too ordinary. And we're just not fans of the ordinary here at Knitty!
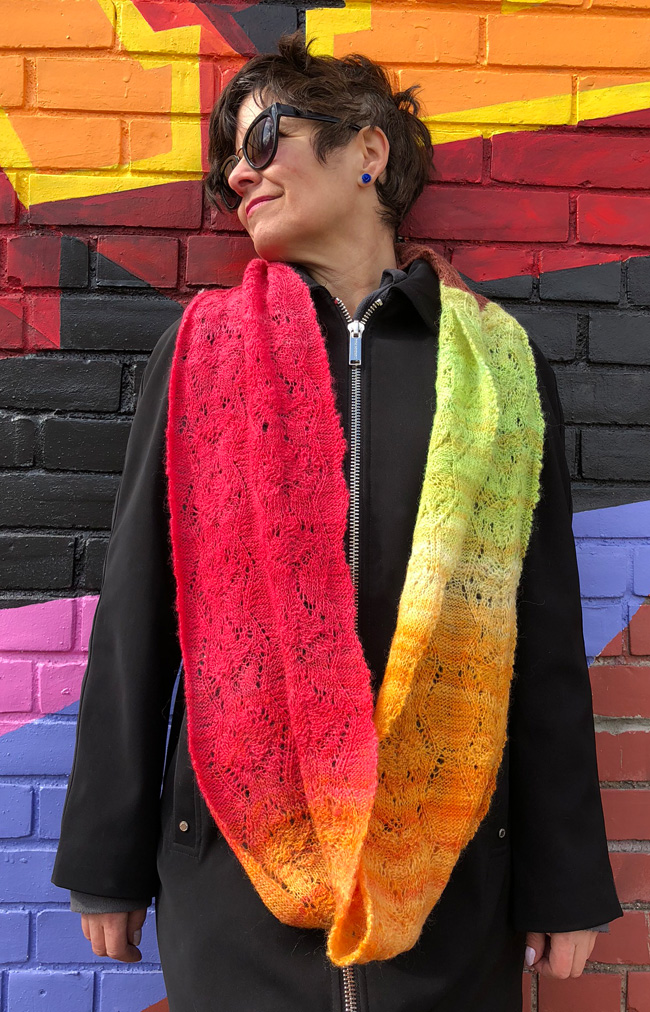
It was Knitty Editor, Amy, who suggested making a cowl rather than a standard stole. A long cowl is an immensely practical piece, as it can be triple-wrapped for protection on the hideously cold days of Toronto winters, double-wrapped for a bit of coziness in English winters, and worn singly and hanging for style in the spring and autumn.
And it was wise words from Knittyspin Editor, Jillian, that nudged Kate in the right direction for the lace pattern she used: a very lacy stitch, evocative of maple keys – the distinctive seed pods.
 model: Christy Conte
 photos: Amy Singer
SIZE
One
FINISHED MEASUREMENTS
Circumference: 64 inches/163 cm
Depth: 8.5 inches/22 cm
MATERIALS
Fiber
![]() Porpoise Fur Shetland top; color: Turning; 4 ounces
Porpoise Fur Shetland top; color: Turning; 4 ounces
Finished Yarn
![]() Wraps per inch: ~20-24
Wraps per inch: ~20-24
![]() Ply: Single
Ply: Single
![]() Yardage used: Approximately 550 yds/ 503 m
Yardage used: Approximately 550 yds/ 503 m
![]() Drafting method: Short forward draft
Drafting method: Short forward draft
Commercial yarn alternative
![]() Freia Ombre Merino Lace – Gradient [100% Merino, 712 yd / 651 m per 75 gr skein]; color: Ember; 1 skein
Freia Ombre Merino Lace – Gradient [100% Merino, 712 yd / 651 m per 75 gr skein]; color: Ember; 1 skein
Recommended needle size
[always use a needle size that gives you the gauge listed below - every knitter's gauge is unique]
![]() US #4/3.5mm needles for working flat
US #4/3.5mm needles for working flat
![]() US #4/3.5mm circular needle, 24 inch/60cm or longer
US #4/3.5mm circular needle, 24 inch/60cm or longer
Notions
![]() Scrap yarn and crochet hook for provisional cast on
Scrap yarn and crochet hook for provisional cast on
![]() Stitch markers (optional)
Stitch markers (optional)
![]() Yarn needle
Yarn needle
GAUGE
26 sts/36 rows = 4 inches/10 cm in stockinette stitch
PATTERN NOTES
[Knitty's list of standard abbreviations and techniques can be found here.]
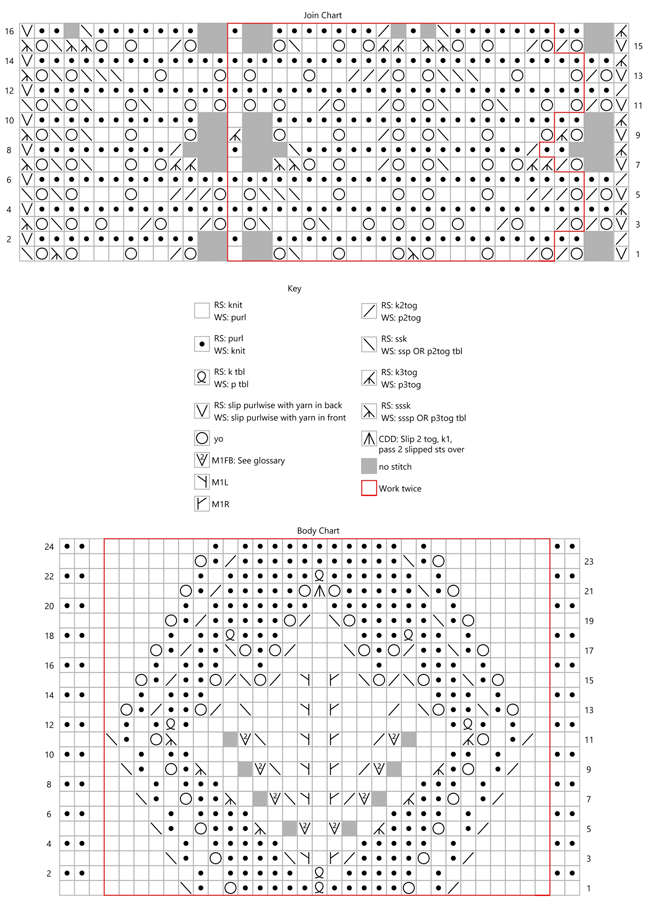
M1FB: Using the tip of the left needle, pick up the bar that runs between the last stitch worked and the first stitch on the left needle, from the back, as if for m1r. Knit into the front and back of this strand. 2 sts increased.
Decreases: Do pay attention to the decreases; a number of different ones are used.
When working the Join chart, there are left-leaning purlwise decreases worked on the WS. You can work them two ways, so do whichever you find easiest, either a p2tog-tbl/p3tog-tbl, or an ssp/sssp.
SSP: Slip next 2 sts, one-by-one, knitwise; return them to left needle without twisting them and p2tog-tbl.
SSSP: Slip next 3 sts, one-by-one, knitwise; return them to left needle without twisting them and p3tog-tbl.
Lace Bind Off:
K1, *k1, insert left needle into the fronts of these two sts (from left to right, as if to ssk) and knit them together.
Repeat from * until all sts have been worked.
Note: in this pattern, when binding off, you will work a decrease at the join point; see the specific BO instructions.
Techniques:
- Use your favorite provisional cast on, such as this one.
CHARTS
DIRECTIONS
Body of Cowl
Using scrap yarn, provisionally CO 65 sts.
Knit 4 rows.
Row 1 [RS]: Work Body Chart across, working repeat section twice as marked.
Repeat Row 1, working in patt as set until you have worked 19 repeats of the chart, or until you've used about four fifths of the yarn, ending the last repeat after Row 23 of the chart.
Knit 4 rows, working a k2tog in the center of the last row. 64 sts.
Slip the stitches to the circular needle. Break yarn, leaving a tail for weaving in.
Join
Note: the setup for this step requires careful and specific positioning. Make sure you have it correct before you proceed.
Lay the Body piece on a table with the WS facing up/RS facing down, the live sts on the left and the provisional CO sts on the right. Fold both ends up and towards the centre, leaving about an 8 inch/20cm gap between them. The RS of the ends should be facing up.
Carefully remove the provisional CO and place the stitches on the circular needle. You should have 64 stitches. You want the stitches to be positioned so that the cord of the needle is at the top, the stitches of the CO end (the sts from the provisional CO) are on the right end of the needle, and the live stitches from the end of the Body piece are on the left end of the needle.
Using long tail method and working yarn, CO 50 sts on the right tip of the needle – the end that's holding the stitches from the provisional CO.
You're going to be working back and forth on these 50 sts, working decreases at the end of every row, to join to the body of the cowl, in the manner of an attached edging. To accomodate the difference in stitch and row gauge, on some rows you will work a single joining decrease (an ssk or ssp/p2tog-tbl, decreasing 1 st from the body of the cowl), other rows a double joining decrease (sssk or sssp/p3tog-tbl, decreasing 2 sts from the body of the cowl). If you find it helpful, place a marker 1 stitch in from the end of the Join stitches, to mark the decrease/join position. The decrease/join will be worked after the marker on each row.
Row 1 [WS]: K49, p3tog, turn.
Row 2 [RS]: Sl 1, k48, sssk, turn.
Row 3 [WS]: Sl 1, k48, p3tog, turn.
Row 4 [RS]: Work Join Chart across, working repeat twice as indicated.
Continue as set until you have worked the Join Chart 4 times, and work Join Chart Rows 1-7 once more. 4 sts rem on each side.
Next row [WS]: Sl 1, k48, p2tog, turn. 3 sts on the right side, 4 sts on the left.
Next row [RS]: Sl 1, k48, sssk, turn. 2 sts on left side, 3 sts on right side.
Next row [WS]: Sl 1, k48, p3tog, turn. 2 sts on the left side, 1 st on the right side.
Next row [RS]: Sl 1, k48, sssk, turn. 0 sts rem on left side, 1 st on right side.
BO using the lace method, working a p2tog at the join point.

FINISHING
Wet block. Weave in ends.
ABOUT THE DESIGNER
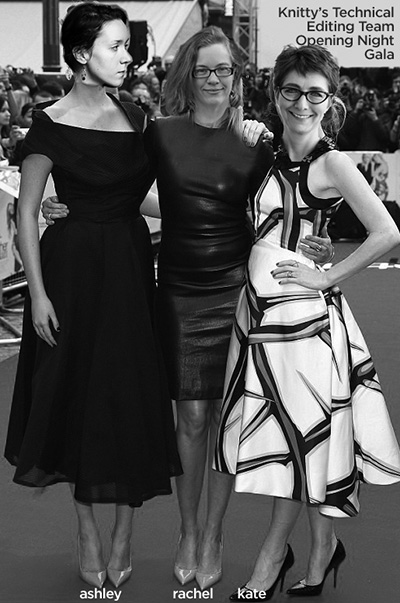 Ashley grew up on the other (some may say 'wrong') side of the Canadian border and has always been a bit jealous of the syrup, the poutine, and the nationally enduring love of The Tragically Hip. She's now a school librarian and lives in England with her husband, a cat who thinks she's a dog, and a dog who thinks she's a cat.
Rachel is an American transplant living in London, with a husband, two daughters, a Wee Ridiculous Dog and two Feline Overlords. Originally from New England (sort-of, almost Canada!), she misses leaf peeper season horribly every autumn and has to resort to dyed fiber to get her fall color fix.
Kate lives in Toronto, with her husband and their Beagle-cross Dexter. She's not really the outdoors type but enjoys admiring trees from the comfort of her back garden.
Pattern © 2018 Ashley Knowlton & Kate Atherley. Images @ Amy Singer


