  by
Holli Yeoh by
Holli Yeoh

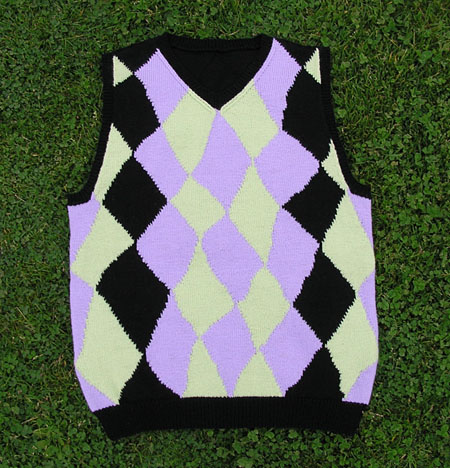
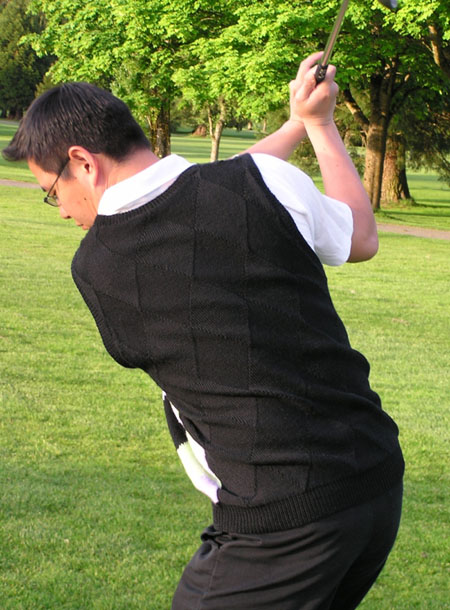
Equally at home on the links or in the office,
any man will be a hit in this non-traditional
argyle vest. Styled in soft, fingering weight
merino wool, it's perfect for the man who
is just too hot to wear those body covering
bulky handknits.
This sweater is unique -- the first ever requested
by my hot-blooded husband, Rod, so I could hardly
refuse.
With his collaboration this is definitely not your
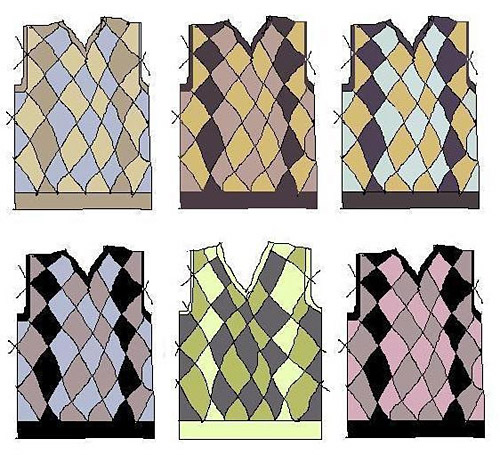
standard stuffy vest. And, perhaps in reaction to
his engineering background, the wonky intarsia diamonds
on the front have nary a straight line, in contrast
to the very regular, solid colour knit-and-purl stitch
pattern I designed for the back.
This one should keep him cool on the links or warm
in his air-conditioned office and hot in all the right
ways.
|
|
 model: Rod Yeoh
photos: Holli
Yeoh
model: Rod Yeoh
photos: Holli
Yeoh
|
|
|
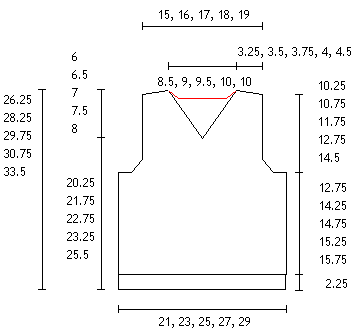
S [M, L, XL, XXL]
(To fit chest sizes 36/38[40/42, 44/46, 48/50, 52/54])
|
| |
|
Chest: 42[46, 50, 54, 58] inches
Length: 26.25[28.25, 29.75, 30.75, 33.5] inches
|
| |
| |
|
Dale of Norway Baby
Ull [100% merino wool; 183yd/165m
per 50g skein]
[MC] Color: #0090 Black; 6[7, 8, 8, 9] skeins
[CC1] Color: #5303 Lilac; 2[2, 2, 2, 3] skeins
[CC2] Color: #9013 Sprite Green; 2[2, 2, 2, 3] skeins
1 set US 1/2.5 mm straight needles
1 set US 2/3 mm straight needles
Stitch holder
1 small piece waste yarn
1 stitch marker
Tapestry needle
Pencil crayons corresponding to MC, CC1 and CC2 (optional)
Scissors
Tape
|
| |
|
30 sts/42 rows = 4 inches
in stockinette stitch
Note: You may need a smaller
needle to obtain the correct gauge when working in
the intarsia pattern. Double-check your gauge after
you have knit about 8 inches. It’s difficult
to get an accurate measurent on a smaller swatch.
|
|
[Knitty's list of standard abbreviations
can be found here]
Intarsia
This
pattern involves the Intarsia method of color work.
When working in this way, different sections of each
row are worked with different colors. Use a separate
length of yarn for each area of color. When switching
from one color to the next, drop the color you have
been knitting with, and bring the yarn for the next
color up under the yarn of the previous color before
you continue knitting. This will twist the 2 yarns
around each other. It is very important to do this;
if you do not wrap the yarns in this way, the areas
of color will not be joined, and you will have holes
in your work.
To prepare
to work the intarsia pattern, look at the chart and
determine how many separate blocks of color there
are. For each one, cut a length of yarn several meters
long, and either wind it into a small ball or butterfly,
or use a bobbin, either purchased or made from cardboard
for this purpose.
The
charts for this pattern
Both charts are provided as downloadable PDF files.
You will need the free Acrobat
reader to view these files. Chart
B, which shows the intarsia pattern for the front
of the vest, is a very large one, so get out your
scissors and tape to piece it together. It has 9 pages;
the first three form the left-hand side of the chart
(will be the right side of the vest when worn), and
are arranged in a column with page 1 on top, page
2 in the middle, and page 3 at the bottom. Pages 3-6
form the center column of the chart, and pages 7-9
form the right-hand column of the chart.
A suggestion
for preparing Chart B
After printing out the
chart, lay it out on a table in order. Find the line
which delineates the size you are making, and outline
it using a pencil crayon. Use the pencil crayons to
outline or shade in the areas of different colors.
You may wish to tape the whole
9-page chart together, but this can be cumbersome
to use; since you will only need three pages at a
time, it may be preferable to only tape each row together
(pages 3-6-9, 2-5-8, and 1-4-7).
1x1
Rib (Worked over an odd number of sts)
Row 1 [RS]: [K1, p1] to last st, k1.
Row 2 [WS]: [P1, k1] to last st, p1.
Repeat these 2 rows for 1x1 Rib.
Abbreviations
W2tog: Work
2 sts tog in patt. (If the next st is a p st, p2tog.
If it is a k st, k2tog.)
W2tog tbl: Work 2 sts
tog through back loops.
|
|
|
 Back Back
Using
smaller needles and MC, CO 159[175, 189, 205, 219]
sts.
Work in 1x1 Rib until work
measures 2.25 inches, ending with a WS row.
Next Row [RS]: Using
larger needles, k1, work Row 1 of Chart
A (beg at point indicated for your size) to
last st, k1. (Note: The end of the row will not
line up with the end of Chart
A . The different starting points are indicated
so that the texture pattern will be centered.)
Cont in patt as set, working
60 rows of Chart
A twice, then working rows 1 through 14[30,
36, 40, 46] once more. Work measures 15[16.5, 17,
17.5, 18] inches.
Shape Armholes
Next Row [RS]: BO 15[17, 18, 20, 22] sts,
work in patt as set to end.
Next
Row [WS]: BO 15[17, 18, 20, 22] sts, work in
patt as set to end.
Work 4[2, 2, 2, 2] rows in
patt as set.
[Note: Work decrease rows
in the following section as follows:
If the row begins and ends
with blocks of stockinette st:
K2, ssk, work in patt as
set to last 4 sts, k2tog, k2.
If the row begins and ends
with blocks of reverse stockinette st:
P2, p2tog tbl, work in patt
as set to last 4 sts, p2tog, p2.]
Work decrease row as described
above.
Work 5[3, 3, 3, 3] rows in
patt as set.
Repeat these 6[4, 4, 4, 4]
rows 3[1, 5, 11, 7] times more, then work decrease
row once more. 119[135, 139, 139, 157] sts rem.
Work 7[5, 5, 5, 5] rows in
patt as set.
Work decrease row as described
above.
Repeat these 8[6, 6, 6, 6]
rows 2[6, 4, 0, 6] times more. 113[121, 129, 137,
143] sts rem.
Work 53[59, 65, 71, 73] rows
in patt as set, ending with a WS row. Armhole measures
10.25[10.75, 11.75, 12.25, 14.5] inches.
Shape Shoulders and
Back Neck
Next
Row [RS]: BO 6[6, 7, 8, 9] sts, work in
patt as set until there are 35[38, 40, 42,
44] sts on right needle, place rem sts on
st holder.
Next Row [WS]: BO
6[6, 6, 7, 7] sts, work in patt to end of row.
Next Row [RS]: BO
6[7, 7, 8, 9] sts, work in patt to end of row.
Next Row [WS]: BO
5[6, 6, 6, 6] sts, work in patt to end of row.
Next Row [RS]: BO
6[7, 7, 8, 8] sts, work in patt to end of row.
Next Row [WS]: BO
5[5, 6, 6, 6] sts, work in patt to end of row.
Next Row [RS]: BO
rem 7[7, 8, 7, 8] sts.
Place held sts on needle.
With RS facing, rejoin yarn.
BO center 31[33, 35, 37,
37] sts, work in patt as set to end of row.
Next Row [WS]: BO
6[6, 7, 8, 9] sts, work in patt to end of row.
Next Row [RS]: BO
6[6, 6, 7, 7] sts, work in patt to end of row.
Next Row [WS]:
BO 6[7, 7, 8, 9] sts, work in patt to end of row.
Next Row [RS]: BO
5[6, 6, 6, 6] sts, work in patt to end of row.
Next Row [WS]: BO
6[7, 7, 8, 8] sts, work in patt to end of row.
Next Row [RS]:BO 5[5,
6, 6, 6] sts, work in patt to end of row.
Next Row [WS]: BO
rem 7[7, 8, 7, 8] sts.
Front
Using smaller needles
and MC, CO 159[175, 189, 205, 219] sts.
Row 1 [RS]:
K1, work in 1x1 Rib to last st, k1. (The extra
k st at the beg and end of the Front ribbing
will allow the 1x1 Rib patt to continue uninterrupted
at the side seams.)
Cont in 1x1 Rib as set until work measures
2.25 inches, ending with a WS row.
Switch
to larger needles.
Beg with a RS row,
work Rows 1 through 134[150, 156, 160, 166]
of Chart
B. Body to armhole measures 15[16.5,
17, 17.5, 18] inches.
[Note: Chart
B is worked entirely in stockinette st.]
Shape Armholes
Next Row [RS]:
BO 15[17, 18, 20, 22] sts, k in patt as set
to end.
Next Row [WS]:
BO 15[17, 18, 20, 22] sts, k in patt as set
to end.
Work 4[2, 2, 2, 2]
rows in patt as set.
Decrease Row
[RS]: K2, ssk, k in patt to last 4 sts, k2tog,
k2.
Work 5[3, 3, 3, 3]
rows in patt as set.
Repeat these 6[4, 4,
4, 4] rows 3[1, 5, 11, 7] times more, then
work decrease row once more. 119[135, 139,
139, 157] sts rem.
Work 7[5, 5, 5, 5]
rows in patt as set.
Work decrease row as
described above.
Repeat these 8[6, 6,
6, 6] rows 2[6, 4, 0, 6] times. 113[121, 129,
137, 143] sts rem.
Work 1 WS row. (This
is row 190[206, 216, 220, 246] of Chart
B.)
Shape Shoulders and Back Neck
Next Row [RS]:
K56[60, 64, 68, 71] sts in patt, place rem
sts on st holder.
Next Row [WS]:
P2, p2tog, p in patt to end.
Next Row [RS]:
K in patt to last 4 sts, k2tog, k2.
Repeat these 2 rows
6[5, 5, 4, 1] time more. 42[48, 52, 58, 67]
sts rem.
Next Row [WS]:
P all sts in patt.
Next Row [RS]:
K in patt to last 4 sts, k2tog, k2.
Repeat these 2 rows
16[20, 22, 26, 32] times more. 25[27, 29,
31, 34] sts rem.
Work 3[3, 5, 5, 1]
rows in patt. Armhole measures 10.25[10.75,
11.75, 12.25, 14.5] inches.
Next Row [RS]:
BO 6[6, 7, 8, 9] sts, k in patt to end.
Next Row [WS]:
P all sts in patt.
Next Row [RS]:
BO 6[7, 7, 8, 9] sts, k in patt to end.
Next Row
[WS]: P all sts in patt.
Next Row [RS]:
BO 6[7, 7, 8, 8] sts, k in patt to end.
Next Row [WS]:
P all sts in patt.
Next Row [RS]:
BO rem 7[7, 8, 7, 8] sts.
Place center st on
waste yarn.
Replace rem held sts
on needle with RS facing, rejoin yarn. K 1
row in patt.
Next row [WS]:
P in patt to last 4 sts, p2tog tbl, p2.
Next row [RS]:
K2, ssk, k to end in patt.
Repeat these 2 rows
6[5, 5, 4, 1] time more. 42[48, 52, 58, 67]
sts rem.
Next Row [WS]:
P all sts in patt.
Next Row [RS]:
K2, ssk, k to end in patt.
Repeat these 2 rows
16[20, 22, 26, 32] times more. 25[27, 29,
31, 34] sts rem.
Work 4[4, 6, 6, 2]
rows in patt. Armhole measures 10.25[10.75,
11.75, 12.25, 14.5] inches.
Next Row [WS]:
BO 6[6, 7, 8, 9] sts, p in patt to end.
Next Row [RS]:
K all sts in patt.
Next Row [WS]:
BO 6[7, 7, 8, 9] sts, p in patt to end.
Next Row [RS]:
K all sts in patt.
Next Row [WS]:
BO 6[7, 7, 8, 8] sts, p in patt to end.
Next Row [RS]:
K all sts in patt.
Next Row [WS]:
BO rem 7[7, 8, 7, 8] sts.
|
|
Weave
in ends. Block pieces. Do not stretch ribbing while
blocking.
Sew Front to Back at right
shoulder.
Neckband
Using smaller needles and MC, with WS facing
and beg at left shoulder, pick up and p 1 st
in each bound off st across back neck (including
sts bound off in steps along shaped sides of
back neck), pick up and p 1 st in each row along
right front neckline edge, p center st, place
marker, pick up and k 1 st in each row up left
front neckline edge.
Next
Row [RS]: Work in 1x1 Rib to 2 sts before
marker, w2tog tbl, k1, w2tog, work in 1x1 Rib
to end.
Next
Row [WS]: Work in 1x1 Rib to 3 sts before
marker, w2tog, p1, w2tog tbl, work in 1x1 Rib
to end.
Repeat
these 2 rows until neckband measures 0.75 inches.
BO all sts loosely in patt, continuing decreases
at center front.
Armhole Bands
Sew
Front to Back at left shoulder, seaming edges
of neckband.
Using smaller needles
and MC, with RS facing and beg at underarm,
pick up and k 1 st in each row and 1 st in each
bound off st around one armhole. Work in 1x1
Rib for 0.75 inches. BO all sts loosely in patt.
Repeat for other armhole.
Using mattress st, sew
side seams of vest. Weave in rem ends.
|
|  Holli
and her husband, Rod live in Vancouver, British
Columbia where Rod golfs year round. And of
course, Holli knits year round. Holli
and her husband, Rod live in Vancouver, British
Columbia where Rod golfs year round. And of
course, Holli knits year round.
Visit Holli's newly
launched website for more of her designs.
|
| Pattern & images
© 2005 Holli Yeoh. Contact Holli |
|