  by
Pinpilan Wangsai by
Pinpilan Wangsai

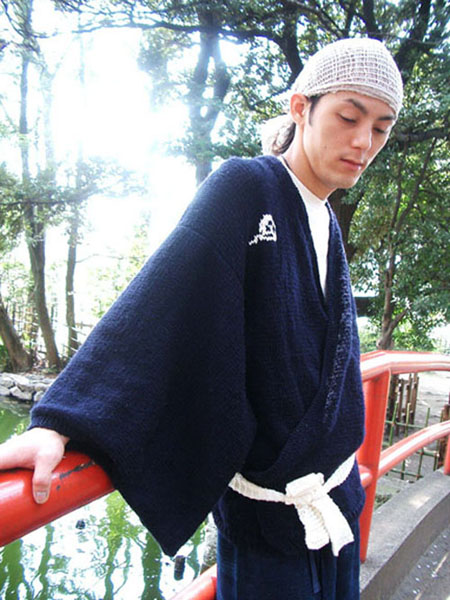
The traditional men's kimono is
a very simple yet versatile outfit. It is warm enough
to wear in cool weather, you can tuck your hands inside
the sleeve if it gets chilly, and when it gets a bit
warmer the opening under the armholes lets in enough
air so your body can 'breathe'. But my favourite part
is that you can store small stuff inside the sleeves.
In modern day Tokyo, a lot of people
have given up wearing the kimono for more trendy,
modern clothes, but I still think there is a certain
old world charm about kimonos. So with the versatile
ideals of the original in mind, I made up this pattern
as a shorter, more casual take on the old style so
you can wear it everyday over your regular clothing.
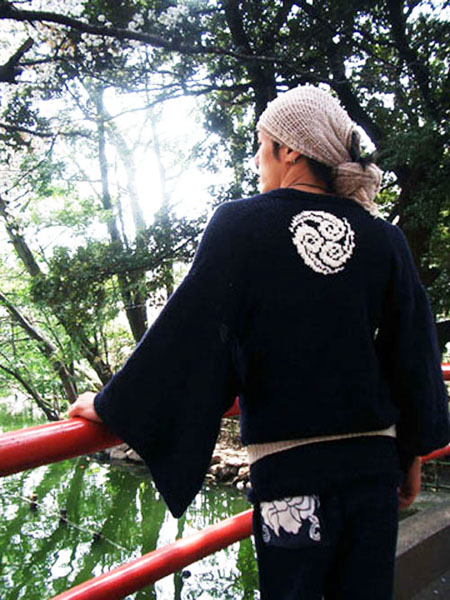
"Kumo" means clouds and
comes from the white intarsia cloud details on the
front and back. The merino makes this sweater soft
enough to wear next to your skin on warm spring days
and the opening under the arm allows it to fit easily
over any other shirt for colder climates, while the
firmer cotton sash holds the whole thing in place.
|
|
 model:Seimi Nagano
photos: Pinpilan
Wangsai
model:Seimi Nagano
photos: Pinpilan
Wangsai
|
|
| S [M, L, XL, XXL] (shown in size
M) |
| |
|
Chest: 33 [36, 39, 42, 45] inches
Length: 26 [28, 30, 32, 34] inches
|
| |
|
|
|
[MC] Munsell Merino 150 Rainbow [100% merino; 98yds/88m
per 40g ball]; color: no. 96; 19 [21, 23, 25, 27]
skeins
[CC] Rowan Handknit Cotton [100% cotton; 94yds/85m
per 50g ball]; color: Ecru; 1 skein
1 set US #7/4.5mm straight needles
1 36-inch US #7/4.5 circular needle
Stitch markers
Safety pins
4 Stitch holders
Tapestry needle
|
| |
20 sts/28 rows = 4 inches in stockinette stitch
|
|
[Knitty's list of standard abbreviations
can be found here]
The yarn I've used is quite obscure,
so if you can't find Munsell's yarn outside of Japan,
Naturally's Merino Fine [100% Pure New Zealand Washable
Super Fine Merino; 110yds/100m per 50g ball] is a
good substitute. Color #220/Navy is closest to what
I used.
|
 Back Back
Using straight needles
and MC, CO 83 [91, 99, 107, 113] sts.
Work in k1, p1 ribbing until work measures
1.5 inches, ending with a WS row.
Work in stockinette st until work measures
19 [21, 23, 25, 27] inches, ending with a
WS row.
Next Row [RS]: K29[33, 37, 41, 44],
place marker, work row 1 of Chart A, place
marker, k to end.
Work in patt as set until all rows of Chart
A have been worked. Break CC and remove markers.
Cont in stockinette st until work measures
26 [28, 30, 32, 34] inches, ending with a
WS row.
Next Row [RS]: K28 [30, 33, 35, 38],
place all sts just worked on st holder, BO
27[31, 33, 37, 37], k to end and place rem
sts on st holder.
Right Front
Using straight needles
and MC, CO 79[84, 91, 96, 103] sts.
Work in k1, p1 ribbing until work measures
1.5 inches, ending with a WS row.
Next Row [RS]: P5, k to end.
Next Row [WS]: P all sts.
Repeat these 2 rows until work measures 4[4.5,
5, 5.5, 6] inches, ending with a WS row. Place
a safety pin at end of last row.
Shape Front Edge
Row 1: K2, ssk,
k to end.
Rows 2 & 6: P all sts.
Rows 3 & 5: K all sts.
Row 4: P to last 4 sts, p2tog tbl.
Repeat these 6 rows 24[26, 28, 29, 31] times
more, then work rows 1-3 1[0, 0, 1, 1] time
more. K28 [30, 33, 35, 38] sts rem.
AT THE SAME TIME, when work
measures 20 [22, 24, 26, 28] inches and 42[44,
47, 49, 52] sts rem, work next RS row as follows:
K19[21, 21, 23, 23], place marker, work row
1 of Chart B, place marker, work to end.
Cont in patt as set, working through all rows
of Chart B. Break CC and remove markers.
After all decreases have been worked, cont
in stockinette st until front measures same
as back to shoulder. Place sts on st holder.
Left Front
Using straight needles and
MC, CO 79[84, 91, 96, 103] sts.
Work in k1, p1 ribbing until work measures 1.5 inches,
ending with a WS row.
Next Row [RS]: K to last 5 sts, p5.
Next Row [WS]: P all sts.
Repeat these 2 rows until work measures 4[4.5, 5,
5.5, 6] inches, ending with a WS row. Place a safety
pin at beg of last row.
Shape Front Edge
Row 1: K to
last 4 sts, k2tog, k2.
Rows 2 & 6: P all sts.
Rows 3 & 5: K all sts.
Row 4: P2, p2tog, p to end.
Repeat these 6 rows 24[26, 28, 29, 31] times
more, then work rows 1-3 1[0, 0, 1, 1] time
more. K28 [30, 33, 35, 38] sts rem.
AT THE SAME TIME, when work
measures 20 [22, 24, 26, 28] inches and 42[44,
47, 49, 52] sts rem, work next RS row as follows:
K12[12, 15, 15, 18], place marker, work row
1 of Chart C, place marker, work to end.
Cont in patt as set, working through all rows
of Chart C. Break CC and remove markers.
After all decreases have been worked, cont
in stockinette until front measures same as
back to shoulder. Place sts on st holder.
 Sleeves
(Make
2) Sleeves
(Make
2)
Using straight needles
and MC, CO 70[75, 80, 85, 90] sts.
Work in stockinette st until work measures
7[8, 9, 10, 11] inches, ending with a WS row.
Next Row [RS]: P5, k to end.
Next Row [WS]: P all sts.
Repeat these 2 rows until work measures 23[24,
25, 26, 27] inches.
Cont in stockinette st until work measures
30 [32, 34, 36, 38] inches. BO all sts.
Fold work in half so that it forms (approximately)
a square, and place a safety pin at the edge
of the fold, on the side that does not have
the garter st edging. Do this for both sleeves.
Sash
Using straight needles and
CC, CO 10 sts.
Work in garter st until piece is long enough to
tie around waist, or to desired length. BO all sts.
|
|
Graft Fronts to Back at shoulders.
Place a safety pin at armhole edge of shoulder seam.
Collar
Using circular needle and MC,
with RS facing and beg at safety pin on Right Front,
pick up and k approx. 125[135, 140, 155, 165] sts
along Right Front edge, 28[30, 32, 36, 36] sts along
back neck edge, and 125[135, 140, 155, 165] sts along
Left Front edge, ending at safety pin. (Pick up 4
sts for every 5 rows - it is all right if the number
does not exactly match the number given, just be certain
the same number of sts is picked up on both Fronts.)
Work back and forth in garter
st until work measures 2 inches. BO all sts.
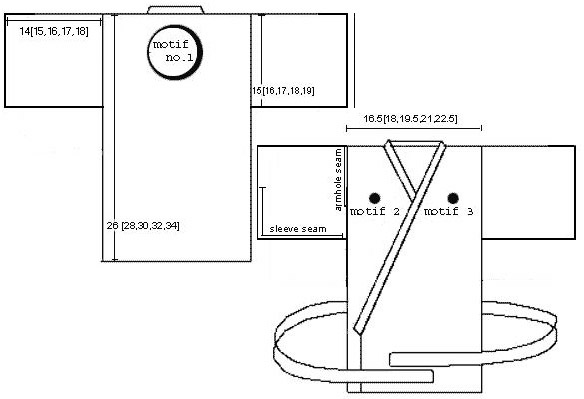
Match pin on shoulder of garment
to pin on shoulder of sleeve. Sew sleeve to body,
sewing 10[11, 12, 13, 14] inches on either side of
pin, leaving rest of sleeve unattached. (See schematic
and photos.)
Sew sleeve seams as shown in
schematic, beg at bottom of garter st cuff, and ending
about 2 inches up side of sleeve closest to body.
Sew side seams, ending 3 inches
below point where sleeve is attached to body. Weave
in ends.
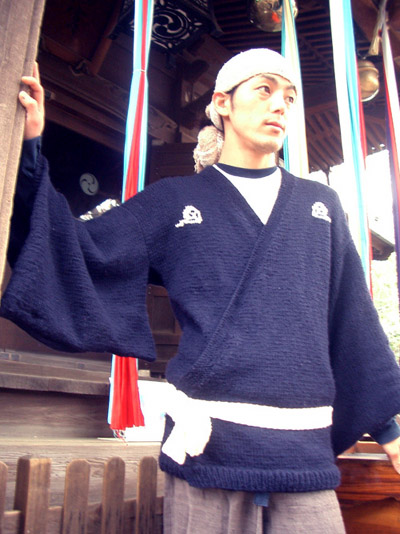
When wearing, be
sure the left front goes over the right.
The collar band should form a 'y' shape. Tie
the sash just above your hip.
|
|
 Pin
taught herself to knit from library books while living
in Bangkok. People thought she was crazy for knitting
scarves and hats in the constant heat. 3 years later,
she is living in Tokyo where she is delighted to find
that there are 4(!) seasons a year and she can now
knit and wear something bigger than a bikini without
having a heat stroke. Pin
taught herself to knit from library books while living
in Bangkok. People thought she was crazy for knitting
scarves and hats in the constant heat. 3 years later,
she is living in Tokyo where she is delighted to find
that there are 4(!) seasons a year and she can now
knit and wear something bigger than a bikini without
having a heat stroke.
Visit her home on the web at www.pinngurl.com.
|
| Pattern &
images © 2005 Pinpilan Wangsai. Contact Pinpilan |
|