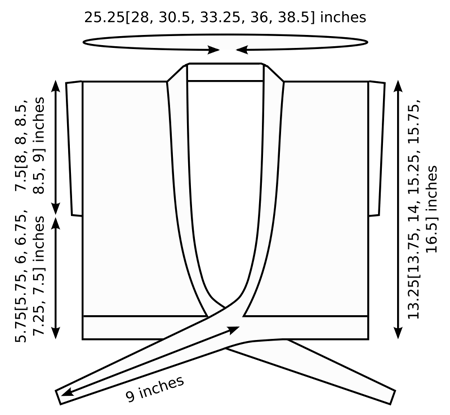
|
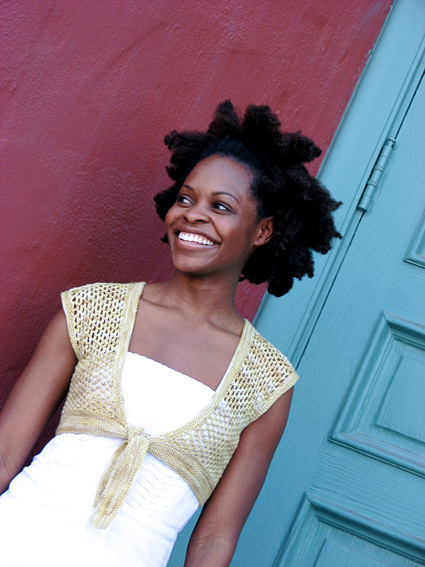
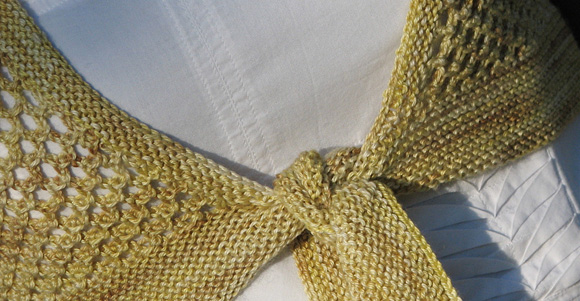
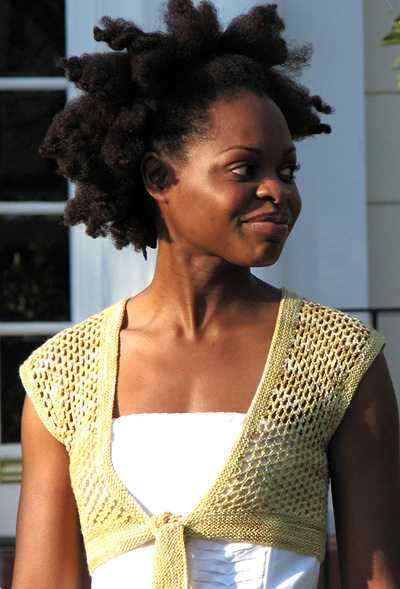
Lower Band and Ties
Using US #4/3.5mm circular needle and Long-Tail Cast On, CO 248[264, 280,
300, 316, 332] sts.
K 9 rows. The last row is a WS row; place
split ring marker or safety pin in work to
indicate RS of work.
Shape Ties:
Rows 1 and 2: K to last 10 sts, W&T.
Rows 3 and 4: K to last 20 sts, W&T.
Rows 5 and 6: K to last 30 sts, W&T.
Rows 7 and 8: K to last 40 sts, W&T.
Rows 9 and 10: K to last 50 sts, W&T.
Rows 11 and 12: K to last 60 sts, W&T.
Row 13 [RS]: K to end.
Row 14 [WS]: K all sts. Break yarn, leaving
a tail.
Place first and last 60 sts of row on st
holders or waste yarn.
Rejoin yarn to remaining 128[144, 160, 180,
196, 212] sts with WS facing.
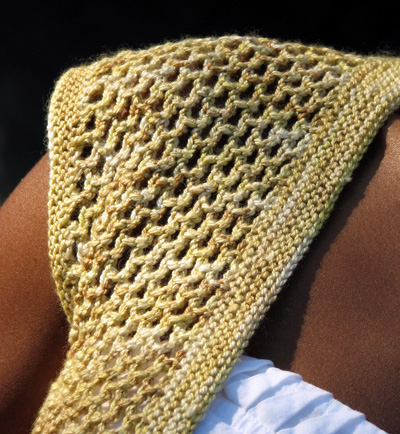
Work Rows 1-4 of Bird’s Eye Lace Pattern
3 times, then work Rows 1-2 once more; 14
rows have been worked.
  Front Edge Shaping: Front Edge Shaping:
Row 1 [WS]: K2tog, [k2tog, yo2, k2tog] to
last 2 sts, k2tog. 2 sts decreased.
Row 2 [RS]: K1, [k1, (k1, p1)
into yo2, k1] to last st, k1.
Row 3 [WS]: K1, yo, k2tog, [k2tog, yo2, k2tog]
to last 3 sts, k2tog, yo, k1.
Row 4 [RS]: K3, [k1, (k1, p1) into yo2, k1]
to last 3 sts, k3.
Row 5 [WS]: K1, [k2tog, yo2, k2tog] to last
st, k1.
Row 6 [RS]: K1, [k1, (k1, p1) into
yo2, k1] to last st, k1.
Row 7 [WS]: K2tog, k1,
[k2tog, yo2, k2tog]
to last 3 sts, k2tog, k1. 2 sts decreased.
Row 8 [RS]: K2, [k1, (k1, p1) into yo2, k1]
to last 2 sts, k2.
124[140, 156, 176, 192, 208] sts remain.
Sizes XS, S, M Only:
Work Rows 1-4 of Bird’s Eye Lace Pattern
4[4, 5, -, -, -] times.
Sizes L, 1X, 2X Only:
Work Rows 1-2 of Bird’s Eye Lace
Pattern.
Work Rows 1-8 of Front Edge Shaping once
more. -[-, -, 172, 188, 204] sts.
Work Rows 1-4 of Bird’s Eye Lace Pattern
-[-, -, 4,5, 6] times.
All Sizes:
Break yarn, leaving a tail.
Place first and last 24[28, 32, 36, 40, 44]
sts on st holders or waste yarn. 76[84, 92,
100, 108, 116] sts on needle.
Upper Back:
Rejoin yarn to remaining sts with WS facing.
Work Rows 1-4 of Bird’s Eye Lace Pattern
17[18, 18, 19, 19, 20] times (68[72, 72,
76, 76, 80] rows), using row counter to keep
track of rows.
Break yarn, leaving a tail, and place sts
on hold on long US #3/3.25mm circular needle.
Right Front:
Place held sts of right front on US #4/3.5mm
needle with WS facing and rejoin yarn.
Work Rows 1-4 of Bird’s Eye Lace Pattern
17[18, 18, 19, 19, 20] times, as for back.
Transfer sts of right front to short US #3/3.25mm
circular or double-point needle and, with
RS together, join to sts of right back shoulder
using Three-Needle Bind Off.
52[56, 60, 64, 68, 72] sts of back remain
held on needle.
 Left Front: Left Front:
Work as for Right Front. Once shoulder sts
have been joined, 28 sts of back remain
on hold for back neckline. Transfer these
sts to short US #3/3.25mm needle or double-point
needle.
Neckline and Front Edging:
Note: When picking up sts along front edges
in the next step, do not worry about picking
up exactly the right number of sts. Instead,
pick up and k 3 sts for every 4 rows, then
count your sts to see if any sts need to
be increased or decreased to obtain the correct
number. Any necessary sts can be increased
or decreased as you work the next row. You
may wish to place a marker at the base of
each front edge when picking up sts, to help
with counting sts accurately.
Place held sts of left tie on US #4/3.5mm
circular needle. In the next step, these
will be knit onto the US #3/3.25mm needle.
With RS facing, place held sts of right
tie on long US #3/3.25mm circular needle
and rejoin yarn. K all sts of right tie,
pick up and k 80[83, 86, 93, 96, 101] sts
along right front edge, place marker (right
shoulder marker), k held sts of back neckline,
place marker (left shoulder marker), pick
up and k 80[83, 86, 93, 96, 101] sts along
left front edge, k all sts of left tie. 308[314,
320, 334, 340, 350] sts.
K 2 rows, increasing or decreasing if necessary
to achieve the correct number of sts. If
you have placed extra markers at base of
front edges, remove these markers.
Shape Neckline:
Row 1 [WS]: K to right shoulder marker (second
marker), k20[20, 21, 23, 24, 25], W&T.
Row 2 [RS]: K to left shoulder marker, k20[20,
21, 23, 24, 25], W&T.
Row 3 [WS]: K to right shoulder
marker (second marker), k40[40, 42, 46, 48,
50], W&T.
Row 4 [RS]: K to left shoulder marker, k40[40,
42, 46, 48, 50], W&T.
Row 5 [WS]: K to right shoulder marker (second
marker), k60[60, 63, 69, 72, 75], W&T.
Row 6 [RS]: K to left shoulder marker, k60[60, 63, 69, 72, 75], W&T.
Row 7 [WS]: K to right shoulder marker (second marker), k80[83, 86, 93,
96, 101], W&T.
Row 8 [RS]: K to left shoulder marker, k80[83, 86, 93, 96, 101], W&T.
Row 9 [WS]: K to end.
Loosely BO all sts using US #4/3.5mm needle.
Armhole Edging:
See Note under Neckline and Front Edging
re. picking up sts.
Using short US #3/3.25mm circular needle
or double-point needles, with RS facing and
beginning at center of underarm, pick up
and k 51[54, 54, 57, 57, 60] sts along armhole
edge to shoulder, place marker, pick up and
k 51[54, 54, 57, 57, 60] sts along
armhole edge to underarm. Do not join; armhole
edging is worked back and forth in rows.
K 2 rows, increasing or decreasing if necessary
to achieve the correct number of sts.
Shape Armhole Edging:
Row 1 [WS]: K to marker, k12[13, 13, 14,
14, 15], W&T.
Row 2 [RS]: Work as for Row 1.
Row 3 [WS]: K to marker, k24[26, 26, 28,
28, 30], W&T.
Row 4 [RS]: Work as for Row 3.
Row 5 [WS]: K to marker, k36[39, 39, 42,
42, 45], W&T.
Row 6 [RS]: Work as for Row 5.
Row 7 [WS]: K to end.
Loosely BO all sts using US #4/3.5mm needle.
Work edging around second armhole in the same
way. |