


Feature: Our Knitting Roots: a study of the contributions immigrants have made to North American knitting, by Donna Druchunas
INTRODUCTION
Our Knitting Roots
by Donna Druchunas
It may be difficult to look at a sock or mitten that you've made with your own hands and feel a connection to a group of people who seem strange or foreign to you. But as knitters and as humans, we owe it to ourselves and to each other to forge these unlikely connections. Making things by hand, after all, is an intimate human endeavor and we should use it not only to knit strings into socks or sweaters or shawls, but also to knit person to person, strangers into friends.
In Harry Potter and the Sorcerer's Stone, J.K. Rowling wrote, "There are some things you can't share without ending up liking each other, and knocking out a twelve-foot mountain troll is one of them."
Knitting is another.
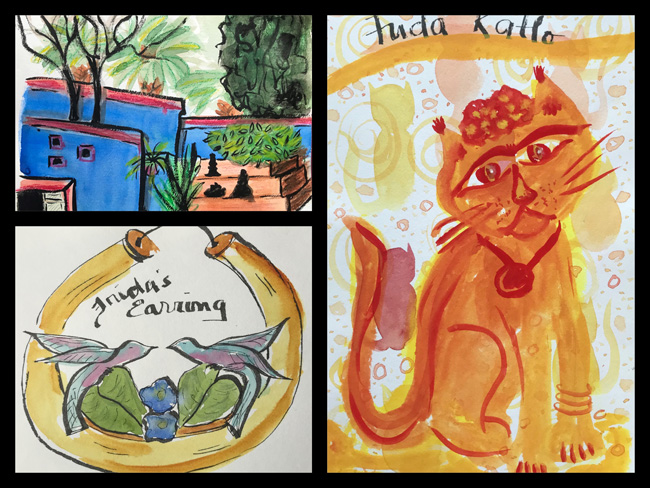
What Would Frida Wear?
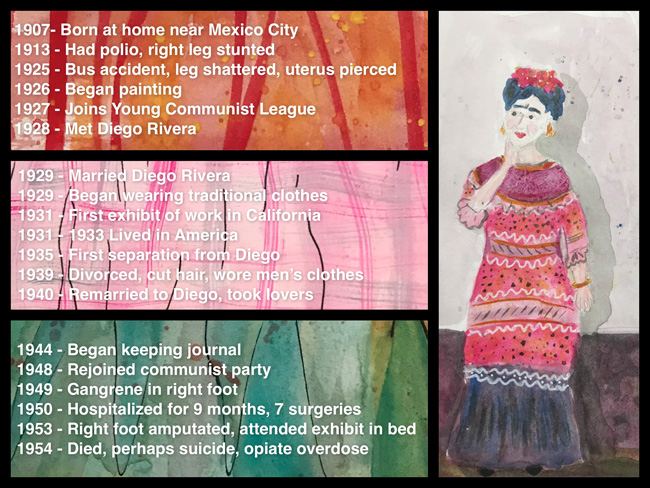
Frida Kahlo found her roots in her family, in communism, and in her love/hate relationship with Diego Rivera. But her strongest roots were in the country of Mexico, where she was born, lived most of her life, and died. She changed her birth year to 1910 because she saw herself as a child of the Mexican Revolution. And she chose her clothes to display her Mexican identity and to be a representation of traditional Mexican culture—Mexicanidad.
Frida’s life was riddled with illness and pain. When she was eighteen, the trolley she was riding was hit by a bus. She broke her spine and pelvis, fractured her right leg in eleven places, dislocated her right foot and shoulder, and had her uterus pierced through by an iron handrail. It was after this accident, when she was bedridden for months, that Frida Kahlo started painting. She had a mirror above her and and she painted what she could see best: herself.
Through her painting, Frida met the famous Mexican muralist, Diego Rivera. She was destined to have a tumultuous life with him. They married when Frida was 20 and Diego was 41. Diego was a womanizer, and had affairs regularly. After deciding she couldn’t live without Diego, Frida also began taking many lovers, both men and women. Frida once told a friend, “I have suffered two great accidents in my life. One was the trolley, and the other was Diego. Diego was by far the worst.”
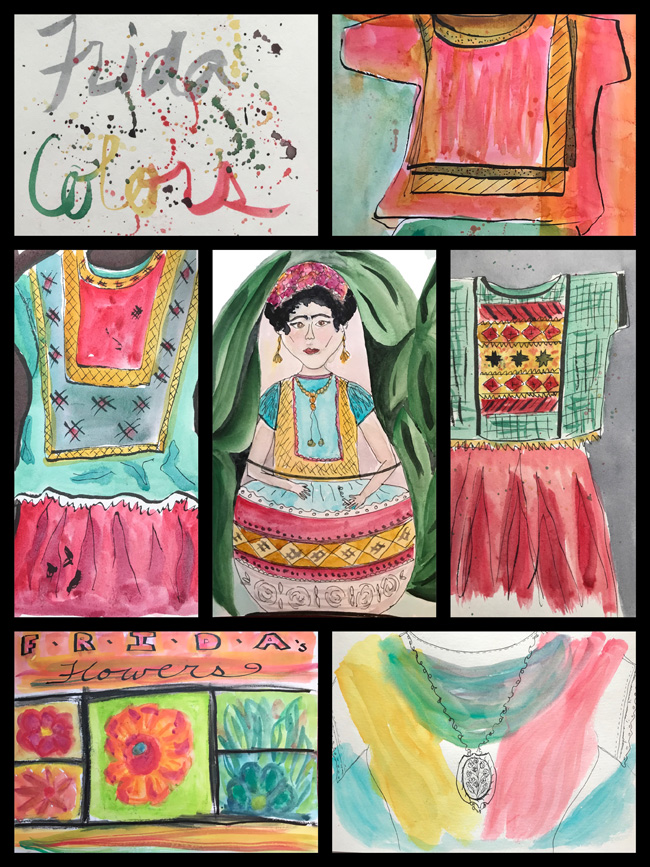
Both of these accidents led Frida to her recognizable style of dress.
It took Frida a while to develop her personal style. When she was younger, she wore the same fashionable clothing as the other teens around her, although she did favor longer skirts to hide her disabled leg. She sometimes wore men’s clothing as well, and was photographed wearing trousers and shirts, and even a full three-piece suit, when she was a teenager. (She also cut her hair and went back to wearing men’s clothing during the time she was temporarily divorced from Diego.)
Frida adopted the traditional clothing of women from Mexico's matriarchal Tehuantepec culture—combined with some pieces from Europe and others from China—to create her unique style. She began wearing the traditional clothing on her wedding day, when she borrowed a full-length dress and shawl from her maid. Rebozo Shawls were sometimes worn instead of wedding rings in Mexico at the time, and while Frida piled on bold jewelry to accent her clothing, she never wore a wedding ring.
Her signature ensemble included a shawl worn over a traditional huipil blouse and a long, full skirt.
Huipil: [\ wēˈpēl\] noun. A straight slipover one-piece garment that is made by folding a rectangle of material end to end, sewing up the straight sides but leaving openings near the folded top for the arms, and cutting a slit or a square in the center of the fold to furnish an opening for the head. Often decorated with embroidery, and is worn as a blouse or dress by women chiefly in Mexico and Central America.
—Merriam Webster Online Dictionary
Frida chose her clothes carefully and her style served many different purposes:
1) They were loose and comfortably covered her medically required corsets, braces, and shoes.
2) Diego liked them.
3) They gave her a recognizable style that helped her stand out against her famous husband.
4) They represented the traditional culture and history of Mexico.
5) Her jewelry, hairstyle, and brightly colored blouses drew the eye away from her lower body and her injuries.
Like her body and her life, Frida’s clothes were often damaged. Worn as everyday garb, and not only for special occasions or photo opportunities, Frida’s garments are littered with visible mending and darning, cigarette burns, and stains from her paints.
Frida Kahlo, the woman, can be seen through her clothing. She was woman with joy and tragedy in her life. A woman who had many pets, many friends, and many challenges. A woman who made many difficult decisions. A woman who was complicated.
Disabled, bisexual, atheist, communist, and Latina, Frida Kahlo was above all else an artist—one of the most important Mexican artists of all time, and one of the most important women artists in the entire world.
This sweater is for Frida, for Mexico, and for marginalized people and women artists everywhere.
“Meanwhile, some of the gringa-women are imitating me and trying to dress a la Mexicana, but the poor souls only look like cabbages and, to tell you the truth, they look absolutely impossible. That doesn’t mean that I look good in them either.” Frida Kahlo (Herrera 1983, 173.)
Learn more:
- Frida Kahlo: Making Herself Up, Claire Wilcox and Circe Henestrosa
- The Diary of Frida Kahlo: An Intimate Self-Portrait, Frida Kahlo and Carlos Fuentes
- Frida: A Biography of Frida Kahlo by Hayden Herrera
- Frida, a film staring Selma Hayek
- The Life and Times of Frida Kahlo, a film by Amy Stechler
- The Blue House Frida Kahlo Museum
- Frida Kahlo: Appearances Can Be Deceiving exhibit at the Brooklyn Museum, Feb 8 – May 12, 2019
Frida's Huipil, a free knitting pattern from Knitty.com. Free knitting pattern for Tehuantepec-style short-sleeved pullover sweater inspired by Frida Kahlo.
A note from Donna: Writing has been very difficult for me lately, even writing about knitting. The whole world is on fire and it's hard to know what to throw on it to put out the flames. Will water only make things worse, as it would on a grease fire on the stove? Will my words make the world a better place? Or cause harm or pain to some of my readers? I worry about these things.
I've been writing about knitting techniques and styles from around the world for at least fifteen years now. I've worked very hard to be inclusive in my work, to avoid cultural appropriation, and to give back a portion of my royalties and profits to those I've written about.
Frida Kahlo was of mixed European and Indigenous American heritage. Her mother was Spanish and Oaxacan, and her father was Hungarian-Jewish. In several of Frida's paintings including The Two Fridas, she explored her mixed heritage, paining herself in both European and traditional Mexican dress.
In Self Portrait Along the Border Line of Mexico and the United States, Frida explores her relationship with the two countries and her discomfort, as an avowed communist, with capitalism. What would Frida think about building a wall between our two countries? I don't know. She was very committed to Mexican nationalism. Did she know about the famine and terror caused by her idol, Joseph Stalin? She seemed to care about the little people, but she hung out with the rich and famous in the USA when she was there.
It turns out that writing, whether about Frida Kahlo or knitting, is fraught with dangers. Is my model for this sweater white? I don't know. I didn't ask and I can't tell what her heritage is by looking at her. But I'm listening to the discussion about race that's happening online right now with open ears.
![]()
INTRODUCTION

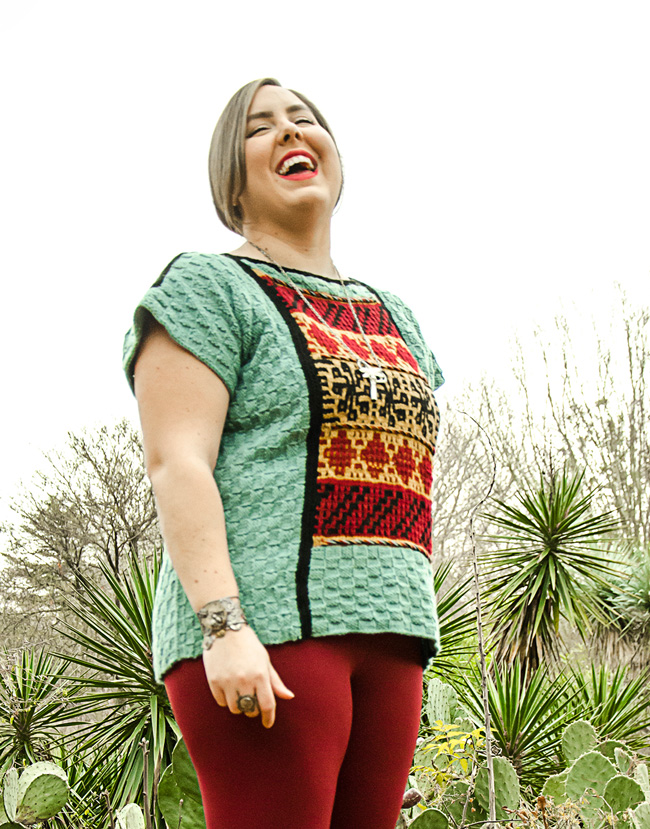
What Would Frida Wear
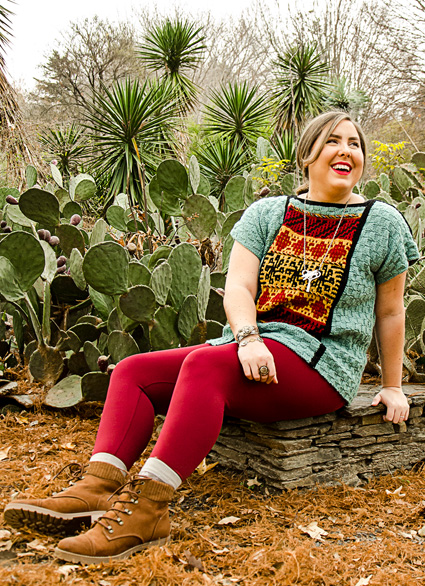

This tunic is my knitted version of one of Frida Kahlo’s traditional Tehuantepec-style Mexican tops, which could traditionally be as short as a cropped t-shirt or as long as a dress. The sweater is made in a modular style. The front and back are the same. First a center panel is knit, then stitches are picked up on the side of the panel and worked outward to the side edge. The shoulder seams and side seams are joined with Russian grafting, then the cap sleeves are knit out from the armhole. Finally the neck is finished off with a few rows of garter stitch.
If you don’t have a full, ruffled, floor-length skirt like Frida wore, you can also wear this with jeans, leggings, or a straight black skirt. Add a turtleneck underneath the sweater for extra warmth.
Editor's note: On January 25th, 2019, Donna will participate in the Night of 1000 Fridas event at Sheep to Shawl Studio in Barton, VT. She will display her original watercolor paintings and sketches inspired by Frida Kahlo, as well as the sweater featured here.
 model: Sarah Spence
photos: Harrison Stone Photography


SIZE
Women’s XS [S, M, L, XL, 2X, 3X]
shown in size 2X with 4 inches / 10 cm of positive ease
FINISHED MEASUREMENTS
Bust circumference: 36.25[39.25, 44.25, 46.25, 49.25, 54.25, 57.25] inches / 92[99.5, 112.5, 117.5, 125, 138, 145.5] cm
Length: 24[24, 25, 25.75, 26.75, 26.75, 26.75] inches / 61[61, 63.5, 65.5, 68, 68, 68] cm
MATERIALS
Yarn
Valley Yarns Amherst [100% merino wool; 109yd/100m per 1.76oz/50g ball];
![]() [MC] Lake; 5[6, 6, 7, 7, 7, 8] balls
[MC] Lake; 5[6, 6, 7, 7, 7, 8] balls
![]() [CC1] Harvest Gold; 2 balls
[CC1] Harvest Gold; 2 balls
![]() [CC2] Burgandy; 2 balls
[CC2] Burgandy; 2 balls
![]() [CC3] Black; 2 balls
[CC3] Black; 2 balls
Recommended needle size
[always use a needle size that gives you the gauge listed below - every knitter's gauge is unique]
![]() US #7/4.5m circular needle, 24 inches/60cm or longer
US #7/4.5m circular needle, 24 inches/60cm or longer
![]() US #7/4.5m for working small circumference in the round: 16"/40cm long circular, 1 long or 2 short circulars
US #7/4.5m for working small circumference in the round: 16"/40cm long circular, 1 long or 2 short circulars
Notions
![]() 2 stitch markers
2 stitch markers
![]() 8 removable stitch markers
8 removable stitch markers
![]() scrap yarn or spare needles/cables
scrap yarn or spare needles/cables
![]() crochet hook (optional) for Russian grafting
crochet hook (optional) for Russian grafting
![]() yarn needle
yarn needle
GAUGE
18 sts/24 rows = 4 inches/10cm over Checker Stitch
PATTERN NOTES
[Knitty's list of standard abbreviations and techniques can be found here.]
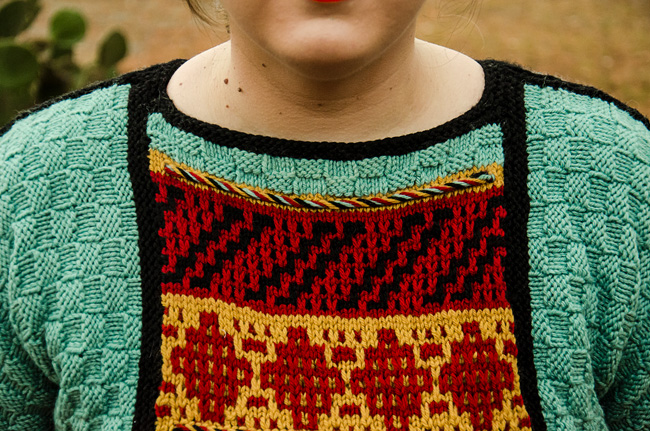
Three- and Four-Color Braid
Also called a Latvian braid, this clever technique twists yarns together in order to create a rope-like horizontal twist on the RS of the work. All yarn colors are carried on the RS of the work. When bringing up a new stitch in a new yarn color, carry the working yarn under the held strands counterclockwise, making sure not to pull the strands too tight. You may need to stop and untwist your yarn every so often.
This video shows the technique using two strands.
Four-Color Braid
Next row [RS]: K1, sl m, k2. Join MC, CC2, and CC3. Carrying unused yarn along front of work (see note above), *P1 with CC1, p1 with CC2, p1 with MC, p1 with CC3; rep from to last 3 sts, pass all yarn to back of work, k3 with CC1.
Cut all colors except CC1.
Next row [WS]: K1, sl m, purl to m, sl m, k1.
Three-Color Braid
Next row [RS]: K1, sl m, k2. Join CC2 and CC3. Carrying unused yarn along front of work (see note above), *P1 with CC1, p1 with CC2, p1 with CC3; rep from to last 3 sts, pass all yarn to back of work, k3 with CC1.
Cut all colors except CC1.
Next row [WS]: K1, sl m, purl to m, sl m, k1.
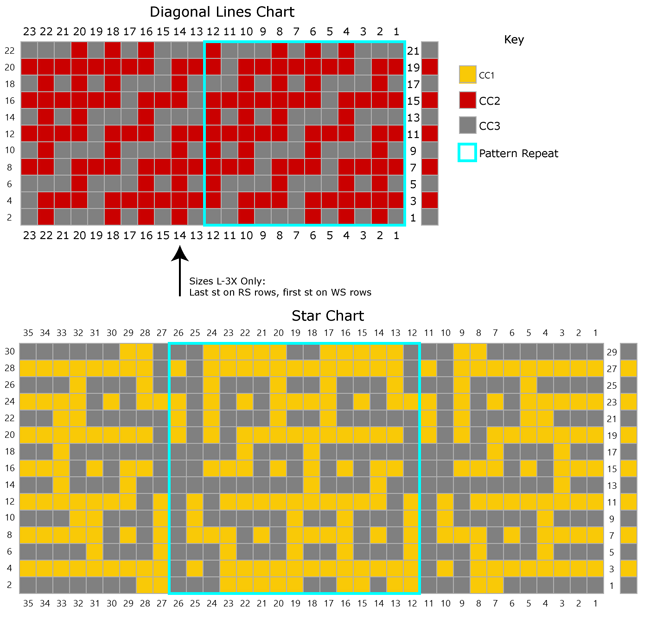
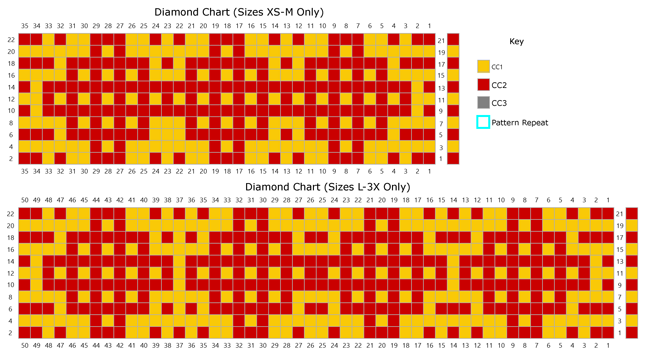
Mosaic Knitting
Mosaic knitting is a type of colorwork that only uses one color of yarn per row. The color of the working yarn changes every 2 rows, working 2 rows with the main color followed by 2 rows with the contrasting color. Each chart row is actually 2 rows, and is labelled on the right and left sides of the chart. The color worked in each row is shown in the column to the right of the chart; stitches not in this color are slipped.
On RS rows, knit the sts of the working color and slip the sts of the unused color purlwise with the yarn in back.
On WS rows, purl the sts of the working color, and slip the sts of the unused color purlwise with the yarn in front.
Russian Grafting
The seams are joined with Russian grafting, which can be worked with three knitting needles or two needles and a crochet hook. If you prefer, you can join the side and shoulder seams with Kitchener stitch or 3-needle bind off.
Checker Stitch (worked in the rnd over multiple of 8 sts)
Rnds 1-4: (K4, p4) around.
Rnds 5-8: (P4, k4) around.
Rep these 8 rnds for patt.
Checker Stitch (worked flat over multiple of 8 sts)
Rows 1-4: (K4, p4) to end.
Rows 5-8: (P4, k4) to end.
Rep these 8 rows for patt.
Checker Stitch (worked flat over multiple of 8 sts + 4)
Row 1 [RS]: (K4, p4) to last 4 sts, k4.
Row 2 [WS]: (P4, k4) to last 4 sts, p4.
Rows 3-4: Rep Rows 1-2.
Row 5: (P4, k4) to last 4 sts, p4.
Row 6: (K4, p4) to last 4 sts, k4.
Rows 7-8: Rep Rows 5-6.
Rep these 8 rows for patt.
Garter Stitch (worked in the round)
Rnd 1: Knit.
Rnd 2: Purl.
Rep Rnds 1-2 for patt.
CHARTS
DIRECTIONS

CENTER PANEL (make 2)
With MC, CO 38[38, 38, 50, 50, 50, 50] sts.
Row 1 [WS]: Purl.
Row 2 [RS]: K1, pm, work in Checker Stitch to last st, pm, k1.
Cont in Checker Stitch patt, working 1 st at each end of every row in garter st, for 10[10, 14, 18, 22, 22, 22] rows more.
Sizes XS-M only:
Next row [WS]: K1, sl m, k2tog, patt to m, sl m, k1. 37 sts.
Sizes L-3X only:
Next row [WS]: K1, sl m, m1, patt to m, m1, sl m, k1. 52 sts.
All sizes:
Cut MC.
Begin charts:
Note: See Pattern Notes on Mosaic Knitting before beginning charts. Cont to work 1 st at each end of every row in garter st.
Change to CC1 and work 2 rows in St st.
Work Four-Color Braid. Cut CC1.
Work 2 rows in St st with CC2.
Join CC3 and work Rows 1-22 of Diagonal Line Chart. Cut CC3.
Work 2 rows in St st with CC2.
Work 2 rows in St st with CC1.
Work Rows 1-22 of Diamond Chart.
Work Three-Color Braid.
Work 2 rows in St st with CC1.
Join CC3 and work Rows 1-30 of Star Chart. Cut CC3.
Work Three-Color Braid.
Work 2 rows in St st with CC1.
Work Rows 1-22 of Diamond Chart.
Work 2 rows in St st with CC1.
Work 2 rows in St st with CC2.
Join CC3 and work Rows 1-22 of Diagonal Line Chart. Cut CC3.
Work 2 rows in St st with CC2.
Work Four-Color Braid. Cut all colors except MC.
Top checker border:
Sizes XS-M only:
Next row [WS]: K1, sl m, m1, k to m, sl m, k1. 38 sts.
Sizes L-3X only:
Next row [WS]: K1, sl m, k2tog, k to 2 sts before m, k2tog, sl m, k1. 50 sts.
All sizes:
Cont to work 1 st at each end in garter st, work Rows 2-7 of Checker Stitch patt.
Break yarn and place sts on holder.
SIDE PANEL 1
Note: Side Panel 1 is worked along the right side edge of each Center Panel. It will be the Left Front of one Center Panel and the Right Back of the second Center Panel.
With CC3 and longer circ, CO 1 st, then with RS of Center Panel facing, pick up and knit 102[102, 106, 110, 114, 114, 114] sts along right side edge from CO to BO edge. CO 6 sts using backward loop method. 109[109, 113, 117, 121, 121, 121] sts.
Row 1 [WS]: K1 (shoulder edge st), pm, knit to end.
Work 4 rows in garter st. Cut CC3.
Join MC and knit 1 row.
Next row [WS]: K1, sl m, work Row 2 of Checker Stitch patt to end.
Cont in Checker Stitch patt, working 1 st at shoulder edge in garter st, for 26[30, 38, 34, 38, 46, 50] rows more. Place removable marker in shoulder edge st on last row. Cut yarn and place sts on holder.
Repeat on second Center Panel.
SIDE PANEL 2
Note: Side Panel 2 is worked along the left side edge of each Center Panel. It will be the Right Front of one Center Panel and the Left Back of the second Center Panel.
With CC3 and longer circ, CO 6 sts, then starting at top edge of Center Panel with RS facing, pick up and knit 102[102, 106, 110, 114, 114, 114] sts along left side from BO to CO edge. CO 1 st using backward loop method. 109[109, 113, 117, 121, 121, 121] sts.
Row 1 [WS]: Knit to last st, pm, k1 (neck edge st).
Work 4 rows in garter st. Cut CC3.
Join MC and knit 1 row.
Next row [WS]: Work Row 2 of Checker Stitch patt to last st, sl m, k1.
Cont in Checker Stitch patt, working 1 st at shoulder edge in garter st, for 26[30, 38, 34, 38, 46, 50] rows more. Place removable marker in shoulder edge st on last row. Cut yarn and place sts on holder.
Repeat on second Center Panel.
SHOULDER AND SIDE SEAMS
You will now have two identical pieces for the Back and Front with removable markers at the outside corners of each shoulder. Lay both pieces flat with bottom edge toward you. Measure 5.25[6.25, 7.5, 6.75, 7.5, 9, 9.75] inches/ 13.5[16, 19, 17, 19, 23, 25] cm in from each corner marker along shoulder edge and place another removable marker. You will pick up sts for each shoulder between each set of two markers (4 sets in total).
Work front shoulders:
Choose your preferred Front. With RS facing, join CC3 to left front shoulder corner marker on Side Panel 1 and pick up and knit 24[28, 34, 30, 34, 40, 44] sts to next marker. Turn.
Knit 4 rows. Break yarn and place sts on holder.
With RS facing, join CC3 to first marker on Side Panel 2 and pick up and knit 24[28, 34, 30, 34, 40, 44] sts to right front shoulder corner marker. Turn.
Knit 4 rows. Break yarn and place sts on holder.
Work back shoulders:
With RS of Back facing, join CC3 to right back shoulder corner marker on Side Panel 1 and pick up and knit 24[28, 34, 30, 34, 40, 44] sts to next marker. Turn. Knit 1 row. Break yarn.
With RS facing, join CC3 to first marker on Side Panel 2 and pick up and knit 24[28, 34, 30, 34, 40, 44] sts to left back shoulder corner marker. Turn. Knit 1 row. Break yarn.
Join Front and Back shoulders using the Russian Grafting method (see Pattern Notes). Remove all removable markers.
Join sides:
Place a removable marker 37[37, 43, 43, 47, 47, 51] sts below Shoulder Seam sections on Front and Back to mark underarm.
With RS of Front facing, place all sts between bottom edge and underarm marker on one Side Panel on needle. Repeat for Back sts on same side. Starting at bottom edge, join side seams using the Russian Grafting method, placing final resulting st at underarm on holder.
Repeat for other side, once more working Russian Grafting from bottom edge to underarm and leaving resulting st at underarm on holder.
RIGHT SLEEVE
With RS of Front facing, MC, and needles for working small circumference in the round, place rem side seam st on needle and k1, patt across first 36[36, 42, 42, 46, 46, 50] held sleeve sts, pm, k1, pick up and knit 3 sts to shoulder seam, across next set of held sts: k1, pm, patt 36[36, 42, 42, 46, 46, 50] sts to end. Pm for beg of rnd and join to work in the rnd. 78[78, 90, 90, 98, 98, 106] sts.
Rnd 1: K1, sl m, work Checker Stitch patt as est to next m, sl m, work 5 sts in garter st, sl m, work Checker Stitch patt as est to end of rnd.
Cont in patt as est until a total of 12[12, 12, 16, 16, 16, 16] rnds have been completed or sleeves measure desired length.
BO loosely knitwise.
LEFT SLEEVE
With RS of Back facing, MC, and needles for working small circumference in the round, place rem side seam st on needle and k1, patt across first 36[36, 42, 42, 46, 46, 50] held sleeve sts, pm, k1, pick up and knit 3 sts to next set of held sts, across held sts: k1, pm, patt 36[36, 42, 42, 46, 46, 50] sts to end. Pm for beg of rnd and join to work in the rnd. 78[78, 90, 90, 98, 98, 106] sts.
Rnd 1: K1, sl m, work Checker Stitch patt as est to next m, sl m, work 5 sts in garter st, sl m, work Checker Stitch patt as est to end of rnd.
Cont in patt as est until a total of 12[12, 12, 16, 16, 16, 16] rnds have been completed or sleeves measure desired length.
BO loosely knitwise.
FINISHING
Attach CC3 at left shoulder seam with RS facing. *Pick up and knit 1 st in each st in CC3 band across shoulder to 38[38, 38, 50, 50, 50, 50] sts on holder, k1 and place removable marker in this st, knit across holder to last st, k1 and place removable marker in this st; rep from * once more, pick up and knit 1 st in each st in CC3 band to beg of rnd.
Rnd 1: *P to 1 st before marked st, p3tog; rep from * 3 times more, p to end.
Rnd 2: Knit
Rep Rnd 1 once more.
BO knitwise.
Weave in ends. Wash and dry flat to block to measurements.
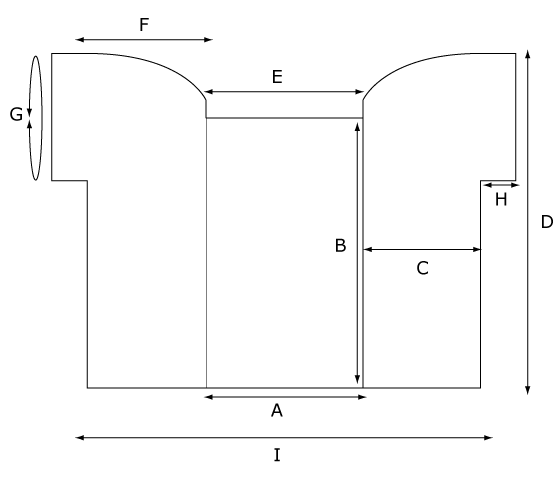
A: Center Panel Width: 8.5[8.5, 8.5, 11, 11, 11, 11] inches / 21.5[21.5, 21.5, 28, 28, 28, 28] cm
B: Center Panel Length: 17.5[17.5, 18.25, 18.75, 19.5, 19.5, 19.5] inches / 44.5[44.5, 46.5, 47.5, 49.5, 49.5, 49.5] cm
C: Side Panel Width: 5[5.75, 7, 6.25, 7, 8.25, 9] inches / 12.5[14.5, 18, 16, 18, 21, 23] cm
D: Side Panel Length (at longest point): 24[24, 25, 25.75, 26.75, 26.75, 26.75] inches / 61[61, 63.5, 65.5, 68, 68, 68] cm
E: Back Neck Width: 8[7.5, 7.5, 10, 10, 9.5, 9.5] inches / 20.5[19, 19, 25.5, 25.5, 24, 24] cm
F: Shoulder Width: 5.25[6.25, 7.5, 6.75, 7.5, 9, 9.75] inches / 13.5[16, 19, 17, 19, 23, 25] cm
G: Sleeve Circumference: 17.25[17.25, 20, 20, 21.75, 21.75, 23.5] inches / 44[44, 51, 51, 55, 55, 59.5] cm
H: Sleeve Length: 2[2, 2, 2.75, 2.75, 2.75, 2.75] inches / 5[5, 5, 7, 7, 7, 7] cm
I: Bust Width: 18.5[20, 22.5, 23.5, 25, 27.5, 29] inches / 47[51, 57, 59.5, 63.5, 70, 73.5] cm
ABOUT THE DESIGNER
 Donna Druchunas is obsessed with her family history and the history of knitting. In combination with this column, Our Knitting Roots, she is also running a book club for knitters who appreciate the people, places, and cultures behind the stitches of their knitting projects.
Donna’s newest project is opening a small local yarn shop in rural Vermont. Visit her online store to order kits for her Knitty projects as well as other yarns, books, and notions. She is the author of many knitting books including her newest title: The Art of Lithuanian Knitting. Donna has taught knitting workshops in the United States, Canada, and Europe and she holds annual retreats in Vermont.
You'll also find her on Ravelry.
Pattern & images © 2018 Donna Druchunas