

 by
Cristina Bernardi Shiffman and by
Cristina Bernardi Shiffman and
Kay Gardiner

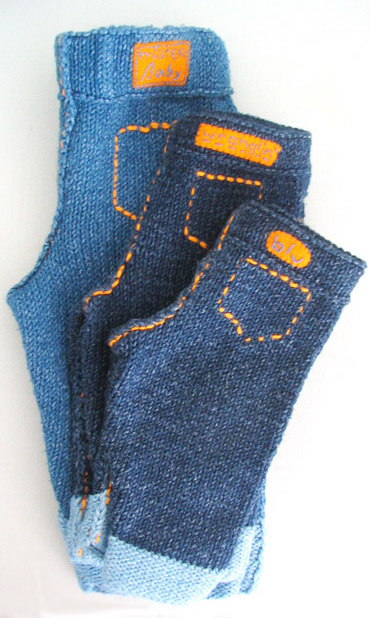
These unisex baby jeans knit
up quickly. They are comfy as PJs, and get more
faded and jean-like with every trip through
the washer and dryer. An added benefit is that
the baby wearing them will look like James Dean
(or Marilyn Monroe) in the movie 'Giant'.
The fun here is in the knitterly
details. The jeans are constructed of two mirror-image
pieces, one for each leg, joined in the center.
The cuffs are knitted in a lighter shade of
true denim yarn to mimic the wrong side of denim
twill fabric. The inseams, sewn in orange cotton
yarn, use a flat, overlapping seam for a realistic
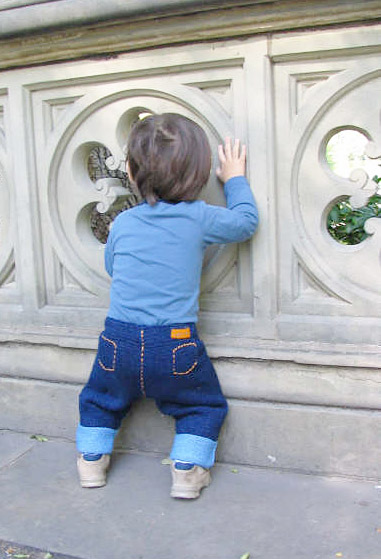
look. The seat shaping lends authentic cowpoke
chic (and makes room for the cowpoke's diaper).
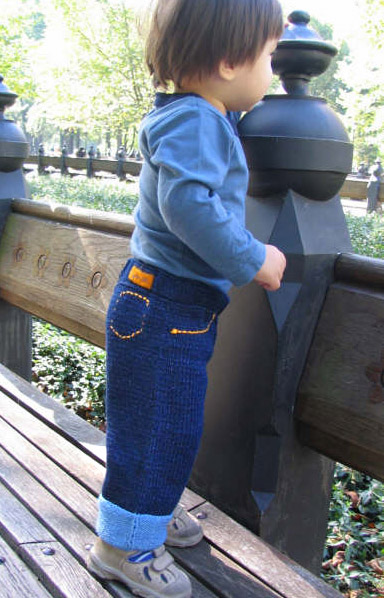
Faux side seams give you a chance to try Elizabeth
Zimmerman's ingenious 'phony seam' technique,
which prevents the legs from twisting with wear.
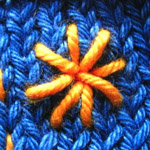
Easy embroidery recalls riveted pockets.
The final touch is an optional
handmade label. Too crafty for ya? No worries:
you can still rock the baby shower by recycling
a label from an old pair of jeans, or snagging
the one that comes in a pack of Rowan Denim.
|
|
 model: Taro Higashi
Zimmerman
photos: Kay Gardiner
& Cristina Shiffman
model: Taro Higashi
Zimmerman
photos: Kay Gardiner
& Cristina Shiffman
|
|
| 0[3-6, 6-12, 12-18, 18-24]
months |
| |
|
(Before shrinking)
Waist: 13[15, 17, 20, 22] inches
Inseam Length: 7[8, 9, 10, 11] inches
Side Length: 12[13, 14.5, 16, 18]inches
|
| |
| |
|
 Rowan
Denim [100% cotton; 103yd/93m
per 50g skein] Rowan
Denim [100% cotton; 103yd/93m
per 50g skein]
[MC] Nashville #225 (dark indigo): 2[2, 3, 3,
3] skeins
[CC] Tennessee #231 (light blue) 1[1, 1, 1,
1] skein
Small amount of Rowan Handknit Cotton [100%
cotton; 93 yd/85m per 50g skein]; color: Mango
Fool #319 (orange) for embroidery
(Cotton embroidery floss will also work)
1 set US #6/4mm straight needles
Smooth cotton waste yarn
18 inch length of three-quarter inch wide elastic
Sewing needle
Dark blue sewing thread
Optional:
Small piece of wool felt for label
Small amount of blue embroidery floss for label
Button
|
| |
| 20 sts/28 rows
= 4 inches in stockinette stitch |
|
|
| [Knitty's
list of standard abbreviations can be found
here] |
If you haven't used denim
yarn before, you're in for a treat, and perhaps
a new yarn addiction.
After knitting, denim yarn will shrink approximately
5-15%, in length only, on the first washing
in hot water. The pattern takes this shrinkage
into account. The jeans will also fade gently
with washing and wear, showing white flecks
just like woven denim fabric.
The dark shade will turn your fingers blue
as you knit, but it washes off easily. |
 Right
Leg Right
Leg
Because the selvedges will be visible,
slip the first stitch of every row purlwise
throughout the pattern.
*Using CC, CO 35[41, 47, 53, 59] sts.
Work 10[12, 14, 16, 18] rows in reverse
stockinette st, ending with a WS row; break
yarn.
Using MC, work 2 rows in stockinette st.
Next Row [RS]: Sl 1, k1, m1, k
to last 2 sts, m1, k2.
Work 3[3, 3, 5, 5] rows in stockinette st,
Repeat these 4[4, 4, 6, 6] rows 7 times more.
51[57, 63, 69, 75] sts.*
Cont in stockinette st until work measures
7[8, 9, 10, 11] inches (including cuff), ending
with a WS row.
Shape Seat and Crotch:
Next Row [RS]: BO 3 sts, k to end.
Next Row [WS]: BO 5 sts, p to end.
Next Row [RS]: Sl 1, k2tog, k to
end.
Next Row [WS]: BO 3 sts, p to end.
Next Row [RS]: Sl 1, k2tog, k to
end.
Next Row [WS]: Sl 1, p2tog, p to
end.
Repeat these 2 rows once more. 35[41,
47, 53, 59] sts rem.
**Cont in stockinette st until work measures
10[11.5, 13, 14.5, 16] inches, ending with
a WS row.
Phony Seam:
Next Row [RS]: K17[20, 23, 26, 29]
sts; drop next st from left needle and unravel
down to first row. Using a spare knitting
needle, pick the 'ladders' of the dropped
stitch up again, but instead of picking up
each ladder individually as you normally would
to repair a dropped stitch, pick up 1 ladder,
then 2 ladders together, repeating this sequence
until you have picked up all the ladders.
IMPORTANT: PICK UP AS IF TO KNIT, even
on the rev st st of the cuff portion (this
creates the illusion of an inside-out seam,
as on a real jean cuff). When you have picked
up all the way back to the top, place the
stitch back on the left needle and knit to
the end of the row.
 Waistband Waistband
Next Row [WS]: K all sts.
Work 9[9, 9, 11, 11, 11] rows in stockinette
st.
Repeat these 10[10, 10, 12, 12, 12] rows once
more. The first garter ridge marks the lower
edge of the waistband, the second garter ridge
forms a turning ridge, for folding the waistband
over to make an elastic casing.
Place all sts on a length of waste yarn
that is long enough to hold the sts without
bunching. Tie the waste yarn into a firm double
knot and trim the ends to 2 inches.**
Left Leg
Work as for Right Leg from * to *.
Cont in stockinette st until work measures
7[8, 9, 10, 11] inches (including cuff), ending
with a RS row.
Shape Seat and Crotch:
Next Row [WS]: BO 3 sts, p to end.
Next Row [RS]: BO 5 sts, k to end.
Next Row [WS]: P1, p2tog, p to
end.
Next Row [RS]: BO 3 sts, k to end.
Next Row [WS]: P1, p2tog, p to
end.
Next Row [RS]: K1, k2tog, k to end.
Repeat these 2 rows once more. 35[41,
47, 53, 59] sts rem.
Cont as for Right Leg from ** to **.
|
| |
step 1^ |
 step 2^
 |
step 3^ |
step 4^ |
Sew
in all ends and machine wash pieces in hot water.
Tumble dry on cotton setting. Lightly press
to facilitate sewing, blocking pieces to same
dimensions by laying one on top of the other with
wrong sides facing.
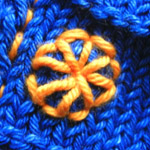
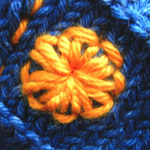
Embroidered jean details:
It is easier to do the embroidery before seaming
the jeans. Use orange yarn throughout.
Referring to the photo
as a guide, embroider the fly and the front
slash pockets, using running stitch. At the
beginning and end of the lines describing the
pockets, layer 3 backstitches for the rivets.
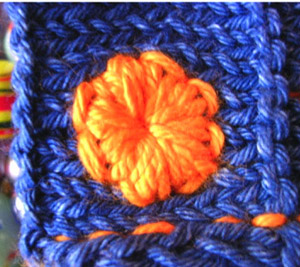
Sew on button, or embroider
a faux button, at the top of the fly as shown
in the photograph.
Referring to the photo
as a guide, embroider the back pockets with
a running stitch.
Felt Label
(optional)
Cut out and embroider the felt label as desired.
Use sewing thread to attach the felt label,
or other label of your choice, to the back waistband.
Small whip stitches or blanket stitches do the
job nicely.
Sew rise and
inner legs as follows:
Start
by joining the rise (the center front and back
seams). To orient the edges, lay the left and
right pieces flat, right sides facing, with
both crotch edges meeting in the center. Slightly
overlap the left side over the right side at
the rise. With a piece of orange DK cotton,
sew a backstitch seam, starting at the turning
ridge of the waistband and working down to the
crotch in the front. Now turn the piece over,
with the front seam facing down, and seam the
back of the rise, working in backstitch, from
the turning ridge of the waistband down to the
seat. (At this point, the crotch is still open.)
Next, join the inside
portion of the waistband seam. To reduce bulk
in the waistband, use regular sewing thread
to join the remaining section of the waistband
(the short section above the turning ridge,
which later will be folded to the inside to
form an elastic casing).
Next, join the inner
leg seams. With the front of the jeans facing,
slightly overlap the front leg edges over the
back leg edges, and sew the inner seam with
backstitch in a single seam from the bottom
edge of one leg to the bottom edge of the other
leg. This will make a flat, visible inner leg
seam that looks like a classic blue jeans seam.
Elastic Waist:
Create
a loop with the elastic by laying the ends over
one another and running a few rows of hand or
machine stitches through the overlap to secure.
(If possible, try the elastic on the baby to
check the fit; it should be secure and flat,
but not tight, around the baby's waist. If you
can't try it on the baby, make sure the loop
of elastic will fit inside the waist of the
jeans without either gathering the waist in
or stretching it out.) Turn the pants inside
out and position the elastic inside the waist
band. Remove the waste yarn from the live
stitches and use blue sewing thread to sew the
live stitches down to the inverted ridge of
stitches that marks the bottom of the waist
band.
You're done! Put jeans
on baby and take baby out in public immediately.
Collect oohs, aahs, and requests to knit jeans
for other babies.
|
 |
Cristina
Bernardi Shiffman is an eclectic handcrafter
who knits to her own drummer while bringing
up two boys in Philadelphia. Alas, only
one of them is still small enough for
baby jeans.
Kay Gardiner, a New
Yorker, is half a blogger. With Ann Shayne,
she is co-author of masondixonknitting.com,
and of an upcoming book,
Mason-Dixon Knitting: The Curious Knitter's
Guide, which will appear in March
2006. You will find Kay driving down I-95
to use Cristina's sewing machine, or updating
the Blu baby jeans gallery at the blog.
Send us a picture of
your jeans at the e-mail address below!
|
 |
|
| Pattern &
images © 2005 Cristina Bernardi Shiffman
and Kay Gardiner. Contact Kay |
|


