Knitty: little purls of wisdom
Title

For almost as long as I've been a knitter, I've been fascinated by the history of knitting. I've especially enjoyed the mind-twisting process of working with the often obtuse and obfuscatory language of antique patterns. There's a thrill, I find, in watching a project emerge row by row and knowing that other knitters, long gone, followed the same path.

The process of decoding, testing and correcting isn't for everyone, though; and so in this column I hope to share the excitement of the journey by removing as many of the roadblocks as possible. You don't need to be a historian to come along -- just a knitter with a curious mind.

pink needle


title
beauty shotblank

by Franklin Habit, translated and adapted from Weldon's Practical Knitter, Tenth Series (c. 1888)

Tangy


spacer photos: Franklin Habit  

SIZE
Child Size 2
Note: See essay above about fit.

FINISHED MEASUREMENTS
Chest: 20 inches (measured with fabric relaxed)
Length: 10 inches from shoulder to hem

spacer

MATERIALS
Yarn

spacer Mrs Crosby Steamer Trunk [100% Superwash merino wool; 164 yd per 100g skein]; color: Peacock; 3 skeins

Recommended needle size
[always use a needle size that gives you the gauge listed below -- every knitter's gauge is unique]
spacer 1 16-inch US #3/3.25mm circular needle (DPNs or a longer circular for magic loop will also work)
spacer 1 set US #4/3.5mm straight needles

Notions
spacer 4 locking ring stitch markers or safety pins
spacer yarn needle
spacer 1 yard 1/2-inch fabric ribbon (optional, see Pattern Notes)

spacer

GAUGE

24 sts/28 rows = 4 inches in relaxed (k2, p2) ribbing before blocking
20 sts/28 rows = 4 inches in stockinette stitch
 

PATTERN NOTES
[Knitty's list of standard abbreviations and techniques can be found here.]

YO at beg of row. Bring the working yarn over the tip of the right ndl from front to back. 1 st increased.
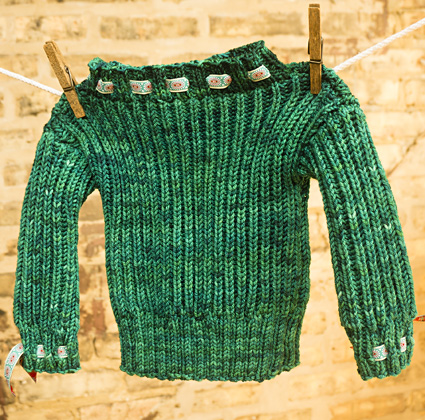
Slipped sts. Always slip as if to purl.

Optional Eyelets. The original pattern calls for eyelets in the cuffs and neck bands for the insertion of ribbon trim, and I worked it this way in the sample. If this is not to your taste, substitute rows or rounds of [k2,p2] rib.

Back Stitch. The shoulder and sleeve cap seams are sewn with back stitch.

Mattress Stitch. The underarm and side seams are sewn with mattress stitch.

Jeny's Surprisingly Stretchy Bind Off.
The BO of the neck band must allow the band to stretch fully, as any constriction may make it impossible to fit the garment over the child's head. The original pattern (and the sample) simply take care to BO loosely in the usual fashion; but should you have hesitations at all, considering using this method.


DIRECTIONS
BACK and FRONT
With larger ndls, CO 64.

Rows 1-16: [K2, p2] across.

Row 17, Establish Brioche: [Yo, sl 1, k2tog] across.

Row 18, Brioche pattern: [Yo, sl 1, k tog next st and yo from prev row] across.

Repeat Row 18 98 times, for 100 rows total in brioche.

BO.

Repeat for second piece.

Note: The pieces will be identical, and (in theory) reversible. But upon completion, you will find that each has one side that pleases you more. Mark these as your official "right sides" by placing a locking ring stitch marker or safety pin in each.

SLEEVES
With larger ndls, CO 44.

Rows 1-5: [K2, p2] across.

Row 6, eyelet row (optional, see Pattern Notes): [K2, yo, p2tog] across.

Rows 7-10: [K2, p2] across.
Note:
In row 7, the second k in each k2 will be into a yo from the prev row.
Row 11, establish Brioche: [Yo, sl 1, k2tog] to last 2 sts, yo, sl1, k1.

Row 12, Brioche pattern: [Yo, sl 1, k tog next st and yo from prev row] across.

Repeat Row 12 78 times, for 80 rows total in brioche.

BO.
Repeat for second sleeve.

As with body pieces, decide which will be your office "right sides" and mark them.

Body Assembly
Weave in ends and gently block pieces, taking care to dry flat with ribbing compressed.

With WS of front and back pieces tog, use backstitch to sew right and left shoulder seams, on each side working in about 2.25 inches from shoulder edge. Resulting neck opening should measure about 7 inches wide.

On a clear work surface, spread out sewn-together front and back pieces with RS facing. With WS of sleeve piece facing, align center of BO edge of sleeve piece with shoulder seam of body pieces (sleeve will lie across the neck opening). Pin sleeve in place.

Use backstitch to sew BO edge of sleeve to selvedge of body.

Repeat for second sleeve.

Use mattress stitch to sew underarm and side seams.

NECK BAND
With smaller circular ndl, pick up and k 84 sts around neck. Place marker and join for working in the round.

Rnds 1-4: [K2, p2] around.

Rnd 5, Eyelet round (optional, see Pattern Notes): [K2, p2tog, yo] around.

Rnds 6-9: [K2, p2] around.

BO loosely. If your normal BO refuses to allow the neck band full stretch, consider using Jeny's Surprisingly Stretchy Bind Off.

FINISHING
Weave in remaining ends. Gently block, taking care to dry flat with ribbing compressed.

If using ribbon trim, run lengths of ribbon through eyelets in cuffs and neck bands and tie in bows.

schematic
ABOUT THE DESIGNER
Franklin Habit (@franklinhabit on Twitter, franklin.habit on Instagram) is the proprietor of the popular knitting blog The Panopticon and author of It Itches: A Stash of Knitting Cartoons. His work appears regularly in major fiber arts publications, and he travels extensively to teach and speak on knitting-related topics.

He has no children of his own, but enjoys the occasional company of small persons who are able to opine fluently upon the latest episodes of Arthur and Shaun the Sheep.

spacer