Yamadori, a free knitting pattern from Knitty.com. Free knitting pattern for a DETAILS HERE.
INTRODUCTION
Yamadori

![]()
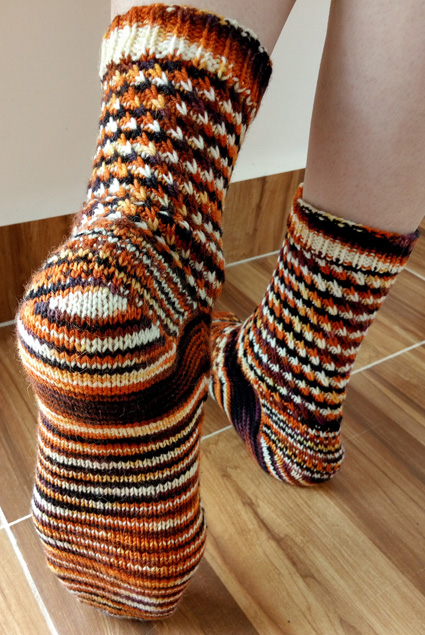
The Yamadori socks were born from my finally embracing variegated yarn. Not that variegated yarn isn't awesome - especially if handdyed! I've just been very shy about colors and how I use them. These beautiful, rich colors captured my heart though, and the colorway name, Violet Backed Starling, inspired the choice of the upward spiraling stitch pattern, like a bird soaring into the sky. The socks are worked toe-up and the heel flap and gusset ensure a great fit. The simple travelling stitches worked on the instep and leg create a fun texture that will keep you entertained from start to finish. Sock length is adaptable to your needs, just use the handy formula provided in the pattern.
To achieve a similar effect to that of the socks shown in the photos, use variegated yarn with short color changes. You could, of course, also go with semisolids or solids which will emphasize the texture of the stitch pattern.
 photos: Ema Marinescu
SIZE
Adult S[M, L]
FINISHED MEASUREMENTS
Foot circumference: 8[8.75, 9.5] inches/ 20[22, 24 cm]
Leg length: adjustable
Total foot length: adjustable
Choose a size with approximately 0.5-.75 inches / 1.5 cm negative ease.
MATERIALS
Yarn
![]() Round Mountain Fibers Merino Fingering [100% superwash merino; 400yd/366m per 3.53 oz/100 g skein]; color: Violet Backed Starling #1; 1[1, 2] skeins
Round Mountain Fibers Merino Fingering [100% superwash merino; 400yd/366m per 3.53 oz/100 g skein]; color: Violet Backed Starling #1; 1[1, 2] skeins
Recommended needle size
[always use a needle size that gives you the gauge listed below - every knitter's gauge is unique]
![]() US #0/2mm needles for small circumference in the round: DPNs, 1 long or 2 short circulars
US #0/2mm needles for small circumference in the round: DPNs, 1 long or 2 short circulars
Notions
![]() 2 stitch markers
2 stitch markers
![]() yarn needle
yarn needle
GAUGE
34 sts/46 rounds = 4 inches/10 cm in stockinette stitch
PATTERN NOTES
[Knitty's list of standard abbreviations and techniques can be found here.]
Stitch Pattern
Note: when working the stitch pattern over the instep, work Round 6. When working it on the leg, work Round 6* instead of Round 6.
Round 1: [Sl1, k2].
Round 2: [LLC, k1].
Round 3: K1, sl1, [k2, sl1] to last st, k1.
Round 4: [K1, LLC].
Round 5: [K2, sl1].
Round 6 – for instep: LS, k1, [LLC, k1] to last st, k1.
Round 6* - for leg: Slip the last stitch you worked on the previous round back to the left hand needle and, work an LLC - placing any start of round marker back between the 2 stitches, or returning the resulting first st back to the end of the round; k1, [LLC, k1] to last st, sl1.
Length to work to start of gusset:
For calculating the length of sock from toe to gusset, use the formula below. Make sure to use only inches or only cm in the formula to avoid miscalculations.
Length to work to start of gusset = TL - (GR/VG) - E
TL: desired length of sock from toe to heel (in inches OR cm)
GR: 44[49, 52] . This is the number of rows you will work for the gusset increases and heel flap.
VG: your row gauge per 1 inch OR 1 cm of stockinette stitch.
E: 0.25 inches OR 0.5 cm
Binding Off
Use your preferred method for toe-up socks. Because the leg has more stitches than the foot, you might find a standard BO worked with a larger needle is sufficient. You can also use a Lace Bind off, or if you need even more stretch, Jeny's Surprisingly Stretchy method.
Abbreviations:
- LS: knit the next stitch, wrapping yarn around the right hand needle twice
- LLC (left leaning cable): go behind the first stitch on the left hand needle and insert tip of right hand needle into next stitch. Pull loop through the second stitch without slipping it off, then knit the first stitch on the left hand needle wrapping the yarn around the right hand needle twice. Finally slip both stitches off the needle.
- Sl 1: All sts are slipped purlwise, with yarn held to WS of work.
Techniques:
DIRECTIONS
Toe
Using Judy's Magic method, CO 20 sts.
Set up round: K around, placing a marker or dividing your stitches so that you can identify the halfway point (the middle) of the round, the break between the sole and the instep.
Increase round: [K1, M1R, k to 1 st before halfway point, M1L, k1] twice. 4 sts increased.
Repeat Increase round 5[6, 7] more times. 44[48, 52] sts.
Work an even round followed by the Increase round 3[4, 5] times. 56[64, 72] sts.
Size small only:
Work 2 even rounds followed by an Increase round. 60[-, -] sts.
Size M only:
Work 2 even rounds.
Final increase round: K1, M1R, k to 1 st before halfway point, M1L, k to end of round. 66 sts.
Work 2 even rounds.
Size L only: Work 2 even rounds.
Foot
The first 30[33, 36] sts of the round form the instep, the rem 30[33, 36] sts form the sole. Rearrange sts or place markers as required.
Set-up round: [LS, k2] across instep, k to end of round.
Foot round: Work Stitch Pattern (Instep version) across instep, k to end of round.
Continue as established until you have reached the desired length to gusset start, ending with Stitch Pattern (Foot) round 2, 4 or 6. See Pattern Notes for details on how to calculate that distance.
Gusset
Round 1: Work Stitch Pattern (instep version) across instep, k1, M1R, k to last st, M1L, k1. 2 sts increased.
Round 2: Work even in pattern as set.
Repeat Rounds 1-2 13[14, 17] more times, 90[96, 108] sts.
Size S and L only:
Continue even as required to ensure you end on Stitch Pattern round 2, 4 or 6.
Size M only:
Continue even as required to ensure you end on Stitch Pattern round 1, 3 or 5. Next round: K to last st, M1L, k1. 64 sts.
Heel – All sizes
Heel Setup: Work across instep in pattern.
At this point, it is important to make a note of which Stitch Pattern row you just worked as you will continue with the next round once you reach the leg section.
For the remainder of the heel, you will work back and forth only along the 60[64, 72] sts of the sole and gussets:
Row 1 [RS]: K 44[47, 53] , w&t.
Row 2 [WS]: P 28[30, 34] , w&t.
Row 3: K 26[28, 32] , w&t.
Row 4: P 24[26, 30] , w&t.
Row 5: K 22[24, 28] , w&t.
Row 6: P 20[22, 26] , w&t.
Row 7: K 18[20, 24] , w&t.
Row 8: P 16[18, 22] , w&t.
Row 9: K 14[16, 20] , w&t.
Row 10: P 12[14, 18] , w&t.
Row 11: K 10[12, 16] , w&t.
Row 12: P 8[10, 14] , w&t.
Row 13: K 6[8, 12] , w&t.
Row 14: P 4[6, 10] , w&t.
Size S and M, stop here.
Row 15: K -[-, 8] , w&t.
Row 16: P -[-, 6] , w&t.
All sizes continue:
Setup row 1 [RS]: Sl 1, knit across, working wrapped sts together with their wraps, until 1 wrapped st rems, then knit, lifting the wraps and knitting them together with their corresponding sts as you come to them, until you reach the last wrapped st. Lift wrap and knit the st, its wrap and the next st from the left hand needle together.1 st decreased. Turn work.
Setup row 2 [WS]: Slip first st purlwise, then purl, lifting the wraps and purling them together with their corresponding sts as you come to them until you reach the last wrapped st. Lift wrap and purl the st, its wrap and the next st from the left hand needle together (p3tog). 1 st decreased. Turn work.
Row 1 [RS]: Sl 1,[k1, sl 1] 14[15, 17] times, ssk, turn. 1 gusset st decreased.
Row 2 [WS]: Sl 1, p 28[30, 34] , p2tog, turn. 1 gusset st decreased.
Repeat Rows 1–2 until 66[72, 78] sts remain in total.
Next row [RS]: Sl 1, [k1, sl 1] to 1 st before gap, k3 to end of round.
Leg and Cuff
At this point you resume working in the round. How you set up the leg depends on which pattern you last worked on the instep.
Set up round: Work the next row of Stitch Pattern across instep sts (now the front of the leg); on back of leg work as required:
- if working Round 2 on front of leg: [k1, LS, k1] to end of round.
- if working Round 4 on front of leg: [k2, LS] to end of round.
- if working Round 6 on front of leg: [LS, k2] to last st, k1.
Continue working from Stitch Pattern until you finish a Round 5. For the remainder of the leg, work Round 6* instead of Round 6 of the Stitch Pattern.
Work Stitch Pattern until leg measures approx. 4.75 inches/12 cm or 1 inch/2.5cm less than your desired length, ending with Round 3.
Ribbing round: P1, [k1, p2] to last 2 sts, k1, p1.
Work Ribbing round 10 more times.
BO using your preferred method for toe-up socks. See Pattern Notes.
FINISHING
Weave in all ends. Block as desired.
ABOUT THE DESIGNER
 Between working on her BA in Japanese and teaching to make a living (and fuel her yarn addiction), Ema enjoys long walks in the pine forests near her house, gardening, baking bread and making sure that everyone around her has all the hand-knit socks they will ever need during their lifetime.
You can find her as itoishi on ravelry.
Pattern & images © 2018 Ema Marinescu (Itoishi).