Personal Space Invaders, a free knitting pattern from Knitty.com.
INTRODUCTION
Personal Space Invaders
 by Maytina Shank

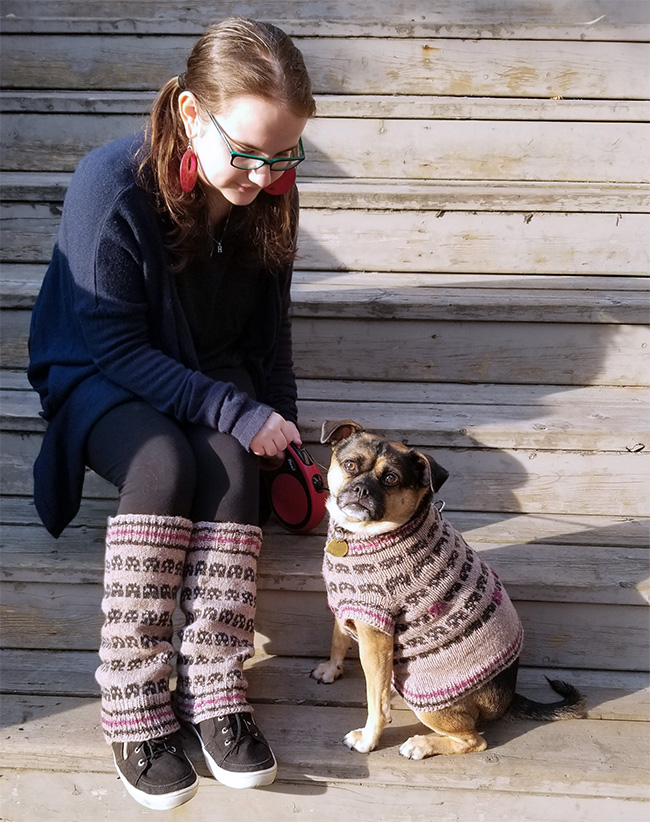
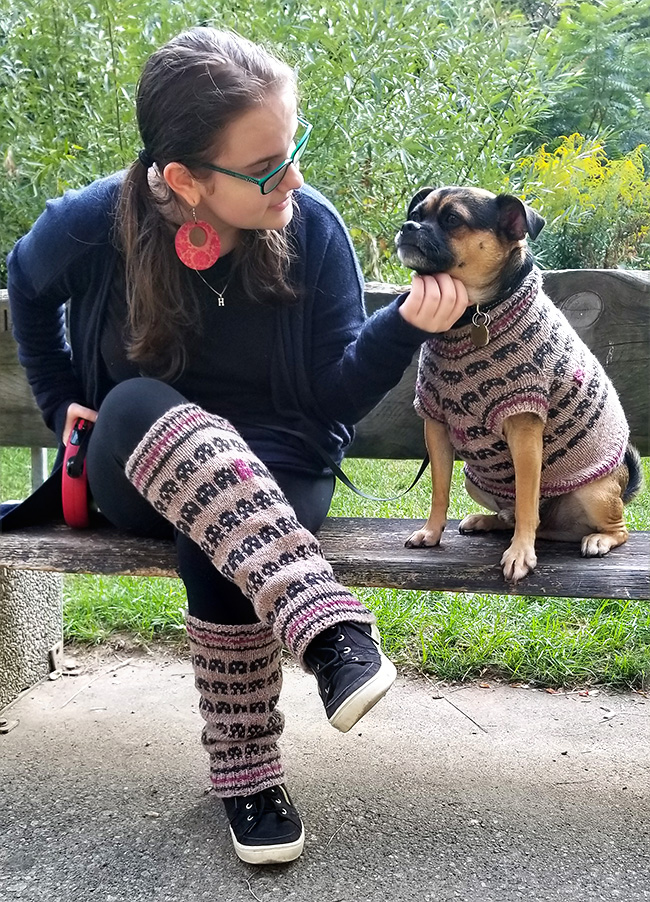
Inspired by the classic bmp socks in Knitty's Spring 2007 issue, this dog sweater combines the fun of a favorite old school video game with our best friends! Are they our personal space invaders, or are we their personal space invaders? Maybe a little bit of both, and matching with our pups is so much fun. The simple construction makes it easy to knit this retro sweater as a pair of leg warmers to match your dog on chilly fall walks or cuddled up at home.
The sweater and the legwarmers are meant to be oversized for a cozy feel. Both versions are knit seamlessly in the round, beginning and ending with striped ribbing, and two color stranded colorwork throughout. The color combinations are endless, and you can add a pop of other colors wherever you'd like with duplicate stitch after you finish knitting.
The dog sweater has increases on the chest between the rows of colorwork, an optional leash hole and tummy shaping. The front sleeves are created by binding off for the armholes and then later picking up the stitches around them, and then knitting the sleeves. Instructions are included for knitting a short sleeve with a ribbed cuff, and of course they can be as long as you'd like.
The legwarmers are a simplified version of the sweater, with minimal shaping for a slouchy, relaxed fit. Note the tension of your colorwork can make these fit more snug than intended, so keep that in mind when choosing your size. Instructions are included for three sizes of leg warmers.
The combination of retro video games with the old fashioned feeling of a tweedy 100% wool in muted colors is part of the fun of this pattern. The BC Garn Loch Lomond Bio is GOTS certified, blooms beautifully once blocked, and increases inches in size, making it very nice for this kind of colorwork. The warmth and softness of the finished items are nice against the skin (and fur), and also work well for layering leg warmers over leggings.
The simple joy of matching an accessory to my dog, Nacho's, sweaters makes me immeasurably happy, and brings a smile to everyone we see on our walks.
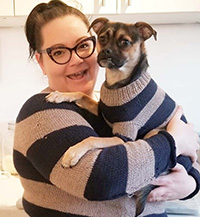
 models: Helena Shank, Nacho Cheese
photos: Maytina Shank
SIZE
XS[S, M, L, XL]
shown in size M with 2 inches/5 cm of ease, measured around the widest part of the chest
FINISHED MEASUREMENTS
Chest: 13[16, 20, 24, 28] inches/ 33[41, 51, 61, 71] cm
Length: Adjustable to fit
MATERIALS
Yarn
BC Garn Loch Lomond Bio GOTS [100% wool; 164 yds/150 m per 50g skein];
![]() [MC] Sand; 1[1, 1, 1, 2] skeins
[MC] Sand; 1[1, 1, 1, 2] skeins
![]() [CC1] Black; 1[1, 1, 1, 1] skeins
[CC1] Black; 1[1, 1, 1, 1] skeins
![]() [CC2] Heather; 1[1, 1, 1, 1] skeins
[CC2] Heather; 1[1, 1, 1, 1] skeins
Yarn Characteristics
![]() The samples shown use a 100% wool DK weight yarn that blooms beautifully when blocked. Look for a plied, non-superwash 100% wool yarn in a DK weight with a tweed coloring. Alternatively you can also use a DK acrylic yarn, which will be easier to care for.
The samples shown use a 100% wool DK weight yarn that blooms beautifully when blocked. Look for a plied, non-superwash 100% wool yarn in a DK weight with a tweed coloring. Alternatively you can also use a DK acrylic yarn, which will be easier to care for.
Recommended needle size
[always use a needle size that gives you the gauge listed below - every knitter's gauge is unique]
![]() 1 US #4/3.5mm circular needle, 12-inch/30cm to 24-inch/60cm, depending on size; choose a needle at least a couple of inches/5 cm or so shorter than the finished chest measurement to accommodate the stitches
1 US #4/3.5mm circular needle, 12-inch/30cm to 24-inch/60cm, depending on size; choose a needle at least a couple of inches/5 cm or so shorter than the finished chest measurement to accommodate the stitches
![]() 1 US #2.5/3mm circular needle, 12-inch/30cm to 24-inch/60cm, depending on size; choose a needle at least a couple of inches/5 cm or so shorter than the finished chest measurement to accommodate the stitches
1 US #2.5/3mm circular needle, 12-inch/30cm to 24-inch/60cm, depending on size; choose a needle at least a couple of inches/5 cm or so shorter than the finished chest measurement to accommodate the stitches
![]() US #2.5/3mm needles for small circumference in the round
US #2.5/3mm needles for small circumference in the round
Notions
![]() stitch markers
stitch markers
![]() darning needle
darning needle
![]() waste yarn
waste yarn
GAUGE
24 sts/31 rounds = 4 inches/10 cm in colourwork.
23 sts / 31 rounds = 4 inches/10 cm in stockinette stitch.
PATTERN NOTES
[Knitty's list of standard abbreviations and techniques can be found here.]
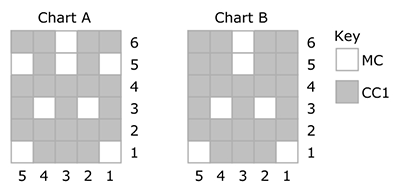
Charts show MC with CC1 colourwork motifs. I have added several individual motifs in CC2 in the samples shown, which I worked after the knitting was complete, by working duplicate stitch. Feel free to add them randomly throughout the pattern.
Techniques:
CHARTS
DIRECTIONS
Dog Sweater
Using US #2.5/3mm circular needle, and MC, with the long tail method CO 36[48, 68, 84, 104] sts. Place marker and join for working in the round.
Ribbing round: [K2, p2] around.
Work 3 rounds ribbing as set with MC.
Join CC1, leave MC attached and work 2 rounds ribbing as set with CC1.
With MC, work 3 rounds ribbing as set.
Join CC2 leaving other colors attached and work 2 rounds ribbing as set with CC2.
Cut CC2.
With MC, work 3 rounds ribbing as set.
With CC1, work 2 rounds ribbing as set.
Cut CC1.
Change to larger needles.
Next round: With MC, k 18[24, 34, 42, 52] , pm, k to end of round. This marker indicates the center of the chest, the belly side.
Increase round: K to 1 st before marker, M1R, k1, sm, k1, M1L, k to end of round. 2 sts increased.
Repeat the Increase round 5[5, 4, 5, 4] more times. 48[60, 78, 96, 114] sts.
Join CC1.
Next round: Work Chart A across.
Work as set until Chart A is complete.
Cut CC1.
Work the Increase round twice more. 52[64, 82, 100, 118] sts.
For a Leash hole, optional:
Next round, start leash hole: K to 1 st before marker, M1R, k1, sm, k1, M1L, k to 5 sts before end of round. BO 5 sts, removing start of round marker. Continue, binding off 5 more stitches. 1 st rems on right hand needle.
Next round: K to 1 st before marker, M1R, k1, sm, k1, M1L, k to leash hole. Using the cable cast on method, CO 10 sts, replacing start of round marker in the middle of them.
Work Increase round twice more.
60[72, 90, 108, 126] sts.
For a version without a Leash hole:
Work the Increase round four more times. 60[72, 90, 108, 126] sts.
Both Versions, resume:
Join CC1.
Next round: Work Chart B across.
Work as set until Chart B is complete.
Cut CC1.
Work the Increase round twice more. 64[76, 94, 112, 130] sts.
Next round: K 18[21, 25, 30, 35] ; BO the next 11[13, 16, 18, 21] sts; k to 1 st before
the marker, M1R, k1, sm, k1, M1L, k 13[16, 21, 25, 29] . Turn work. You are now
working flat.
Next row [WS]: BO the next 11[13, 16, 18, 21] sts purlwise, p to next BO gap. 8[10, 14, 18, 20] sts active, between the BO sections. The rem sts will be held for the chest; you can slip them to a holder if you wish, or leave them on the needles. Turn work.
Increase row [RS]: K to 1 st before the marker, M1R, k1, sm, k1, M1L, k to end of row. 2 sts increased.
Next row: Purl.
Work the Increase row once more. 12[14, 18, 22, 24] sts.
Cut yarn and transfer these sts to waste yarn.
With RS facing, rejoin MC to start of the 36[42, 50, 60, 70] previously held sts of the back. Work in stockinette for 3 rows.
Next row [RS]: Knit across; at end of sts, turn work and use the cable method to CO 11[13, 16, 18, 21] sts, turn again and knit across the 12[14, 18, 22, 24] chest sts; turn work and use the cable method to CO 11[13, 16, 18, 21] over the second gap, turn again and rejoin for working in the round. 70[82, 100, 118, 136] sts
Work the Increase round once more. 72[84, 102, 120, 138] sts.
Join CC1.
Next round: Work Chart A across.
Work as set until Chart A is complete.
Cut CC1.
K 6 rounds.
Continue working alternating charts in CC1 with 6 rounds of MC between them until sweater measures 1.5 inches/4 cm short of desired length on the belly side. End on any MC round.
Next round: K 29[33, 41, 48, 56] . Place the next 14[18, 20, 23, 26] sts on a spare needle or scrap yarn, k to end of round.
Turn work. This section is knit flat, back and forth over the previous start of round. 58[66, 82, 97, 112] sts.
Row 1 [WS]: P2tog, purl to end of row, turn work. 1 st decreased.
Row 2: K2tog, k to end of row, turn work. 1 st decreased.
Row 3: Purl.
Row 4: Knit.
Repeat Rows 1-4 3 more times. 50[58, 74, 89, 104] sts.
Work even in stockinette stitch in rows until piece measures 1 inch/2.5 cm from your desired length, ending with a RS row.
Starting at the end of the RS row, working along the adjacent side edge, pick up and knit stitches at the rate of 2 sts every 3 rows, until you reach the held stitches; return the 14[18, 20, 23, 26] previously held sts to an emtpy needle, and knit across them, then pick up and knit stitches at the rate of 2 sts every 3 rows down the second size. The actual stitch count doesn't matter, but you do need a multiple of 4 stitches.
At this point you will resume working in the round.
Change to smaller circular needles, placing a marker for the start of the round as required.
Ribbing round: [K2, p2] around.
Work ribbing as set for 1 inch/2.5 cm.
Using Jeny's Surprisingly Stretchy method, BO all stitches.
First Sleeve
It doesn't matter which is which, it's your choice which side you start with.
Return the sts to US #2.5/3mm needles for small circumference in the round. Rejoin MC and pick up and knit 3 sts in the first gap, knit across the first 11[13, 16, 18, 21] sts; pick up and knit 3 sts in the second gap and knit across the second 11[13, 16, 18, 21] sts. 28[32, 38, 42, 48] sts. Join for working in the round.
For sizes M, L only:
Increase round: (K 10 sts, kfb) twice, k to end. -[-, 40, 44, -] sts.
Knit 9 rounds.
All other sizes:
K 10 rounds.
All sizes continue:
Join CC1.
Next round: [K2, p2] around.
Work 2 rounds ribbing as set.
Change to MC, work 3 rounds ribbing as set.
Join CC2, work 2 rounds ribbing as set.
Cut CC2.
Change to MC, work 3 rounds ribbing as set.
Change to CC1, work 2 rounds ribbing as set.
Cut CC1.
Change to MC, work 3 rounds ribbing as set.
Using Jeny's Surprisingly Stretchy method, BO all stitches.
Second Sleeve
Work pickup and MC rounds as for first.
Join CC2.
Next round: [K2, p2] around.
Work 2 rounds ribbing as set.
Work 3 rounds ribbing as set with MC.
Join CC1, work 2 rounds ribbing as set. Cut CC1.
Change to MC, work 3 rounds ribbing as set.
Change to CC2, work 2 rounds ribbing as set.
Cut CC2.
Change to MC, work 3 rounds ribbing as set.
Using Jeny's Surprisingly Stretchy method, BO all stitches.
FINISHING
Weave in all ends.
Block as follows: fill a sink or small basin with water and gentle soap, ideally a wool wash. Submerge your sweater, gently squeezing to ensure it is evenly wet. Rest for 10-20 minutes. Rinse carefully, without much squeezing. Remove from water and carefully lay on a towel. Roll the damp sweater into the towel and apply gentle pressure to release as much water as possible. Lay flat to dry.
Leg Warmers
SIZE
Adult S[M, L]
shown in size L worn with 2 inches/5 cm of positive ease relative to the largest circumference of the calf
FINISHED MEASUREMENTS
Calf: 16[17, 19] inches/ 41[43, 48] cm
Length: 14 inches / 35cm, adjustable if required
Note: See Pattern Notes for information on choosing a size.
MATERIALS
Yarn
BC Garn Loch Lomond Bio GOTS [100% wool; 164 yds / 150 m per 50g skein];
![]() [MC] Sand; 1[1, 1] skeins
[MC] Sand; 1[1, 1] skeins
![]() [CC1] Black; 1[1, 1] skeins
[CC1] Black; 1[1, 1] skeins
![]() [CC2] Heather; 1[1, 1] skeins
[CC2] Heather; 1[1, 1] skeins
Yarn Characteristics
![]() The samples shown use a 100% wool DK weight yarn that blooms beautifully when blocked. The samples shown use a 100% wool DK weight yarn that blooms beautifully when blocked. Look for a plied, non-superwash 100% wool yarn in a DK weight with a tweed coloring. Alternatively you can also use a DK acrylic yarn, which will be easier to care for
The samples shown use a 100% wool DK weight yarn that blooms beautifully when blocked. The samples shown use a 100% wool DK weight yarn that blooms beautifully when blocked. Look for a plied, non-superwash 100% wool yarn in a DK weight with a tweed coloring. Alternatively you can also use a DK acrylic yarn, which will be easier to care for
Recommended needle size
[always use a needle size that gives you the gauge listed below - every knitter's gauge is unique]
![]() 1 US #4/3.5mm circular needle, 12-16 inches/30-40 cm long.
1 US #4/3.5mm circular needle, 12-16 inches/30-40 cm long.
![]() 1 US #2.5/3mm circular needle, 12-16 inches/30-40 cm long
1 US #2.5/3mm circular needle, 12-16 inches/30-40 cm long
Notions
![]() stitch markers
stitch markers
![]() darning needle
darning needle
GAUGE
24 sts/31 rounds = 4 inches/10 cm in colourwork.
23 sts / 31 rounds = 4 inches/10 cm in stockinette stitch.
PATTERN NOTES
[Knitty's list of standard abbreviations and techniques can be found here.]
The fit is fairly flexible: The model is wearing them loose, the size that is approximately 2 inches/5 cm larger around than the largest part of their calf. If you prefer a closer fit, choose the size that corresponds to your actual calf measurement. The legwarmers are straight; if you prefer snugger cuffs, you can also work the ribbed portions on a needle a couple of sizes smaller.
Charts show MC with CC1 colourwork motifs. I have added several individual motifs in CC2 in the sample shown. Feel free to add them randomly throughout the pattern.
CHARTS
DIRECTIONS
Using US #2.5/3mm circular needle and MC, with the long-tail method CO 56[62, 68] sts.
Place marker and join for working in the round.
Ribbing round: [K2, p2] around.
Work 3 rounds ribbing as set with MC.
Join CC1, leave MC attached and work 2 rounds ribbing as set with CC1.
With MC, work 3 rounds ribbing as set.
Join CC2 leaving other colors attached and work 2 rounds ribbing as set with CC2.
Cut CC2.
With MC, work 3 rounds ribbing as set.
With CC1, work 2 rounds ribbing as set.
Cut CC1.
Change to larger circular needle.
Knit in MC for 6 rounds
Next round: Kfb, k to end of round. 1 st increased.
Repeat the last round 4 more times. 66[72, 78] sts.
Join CC1.
Next round: Work Chart A across.
Work as set until Chart A is complete.
Cut CC1.
K 6 rounds.
Continue working alternating charts in CC1 with 6 rounds of MC between them for a total of 6 sets of colourwork motifs, or longer if desired, ending with 6 rounds of MC.
K 3 rounds.
Change to smaller circular needle.
Ribbing round: [K2, p2] around.
Work 3 rounds ribbing as set with MC.
Join CC1, leave MC attached and work 2 rounds ribbing as set with CC1.
Next round: With MC, work 3 rounds ribbing as set.
Join CC2 leaving other colors attached and work 2 rounds ribbing as set with CC2.
Cut CC2.
Next round: With MC, work 3 rounds ribbing as set.
With CC1, work 2 rounds ribbing as set.
Cut CC1.
Next round: With MC, work 3 rounds ribbing as set.
Using Jeny's Surprisingly Stretchy Bind Off, BO all stitches.
FINISHING
Weave in all ends.
Repeat for second legwarmer.
Soak and block. To do this, fill a sink or small basin with water and gentle soap, ideally a wool wash. Submerge your legwarmers, gently squeezing to ensure they are evenly wet. Let them rest for 10-20 minutes. Rinse carefully, without much squeezing. Remove from water and carefully lay on a towel. Roll the damp legwarmers into the towel and apply gentle pressure to release as much water as possible. Lay flat to dry.
ABOUT THE DESIGNER
 May has been knitting since 2003, and started designing shortly after adopting her dog Nacho in 2019 (so they could match). She loves knitting and designing dog sweaters and socks more than anything else.
Nacho is a spoiled urban pup in Toronto. He's a chihuahua/pug/miniature pinscher mix; he loves wearing sweaters, sleeping in, and roasted lamb.
You can find detailed tutorials and videos for all of May's patterns on her website.
Pattern & images © 2022 Maytina Shank