
|
|
 |
|
|
My boyfriend’s mother was not a Hamilton by birth or marriage. Nor was her mother, nor indeed were any of her relations. As it happened, nobody in the family could remember who Mrs. Hamilton was. All that was left of her, so far as they were concerned, was a yellowing recipe card covered in loopy Palmer script, stained with seventy years of homemade macaroon crumbs and whipped cream.*
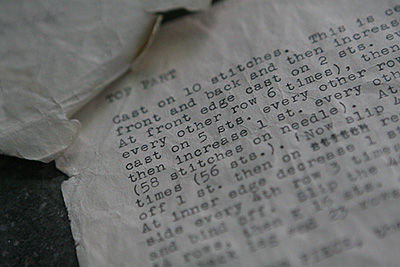
But no, I’m getting ahead of myself. And I want Sue to help tell the story. FH: I suppose if we’re going to record the full history of the knitted elephant, we ought to know something about how it is you started knitting. SR: Well, it would have been in 1948 or 1949 – I purchased a beautiful wool sweater for my boyfriend, which had a gray and turquoise design at the neck. And I thought he should have argyle socks to match. FH: Ah. Handmade argyle knee socks were the pinnacle of boyfriend gifts at the time, correct? SR: Correct. Now, the Jewish community in my hometown – Mattoon, Illinois – had helped two German-Jewish refugee families relocate to Mattoon from Germany around 1940. The head of one of the families was a doctor, and fairly well-to-do. But the husband in the other family was too old and too sick to work. So his wife, Mrs. Uland, opened a little knitting shop above one of the retail stores in town to support them both. I went to her with the sweater, and told her what I wanted to do, and she helped me choose the wool. She was patient and a very good teacher. I can see her yet…she was a sweet lady. FH: Wait a minute–your first knitting project was a pair of argyle socks? SR: That’s right. FH: And how did they turn out? SR: Well, when I was finished I had one anklet and one knee-high. FH: Oh. SR: But he wore them! FH: That was good of him. SR: Yes, he was sweet. But he always rolled up his pant legs to show people what had happened. FH: Oh. Was this the man you went on to marry? SR: No. And that was it with the knitting for a little while. [But it wasn’t the end of her work with fiber. In 1948, Sue won a scholarship to attend the University of Illinois at Urbana-Champaign. And though she had intended to study business, a presentation by the female chair of the Home Economics department persuaded her to change her focus to textiles. After earning Bachelor and Master of Science degrees, she went on to teaching posts at both Illinois Wesleyan University in Bloomington, Illinois and Indiana University in Bloomington, Indiana. Marriage in 1955 didn’t interrupt her career, but impending motherhood did. In 1960, after finishing the semester in a series of looser and looser outfits, she resigned due to a university policy that forbid pregnant women to stand in front of a class.] FH: So how long after the socks until you picked up the needles? SR: Well, a friend of my mother’s – Ida Cantwell – had made this elephant. This would have been around 1950. I’m not sure where she got the pattern from. The original I think maybe came from a newspaper, and her mother had sent away for it; but she had typed out a copy for herself and didn’t want it any more. So she gave it to me. And I couldn’t work from it. I had only made socks, remember, so I was knitting on one side and purling across the back. FH: I can understand that. The original is rather...sketchy.
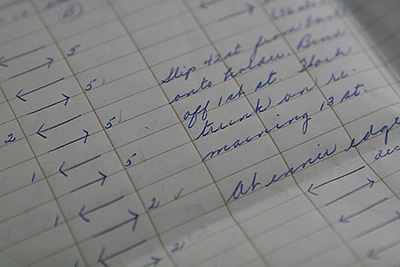
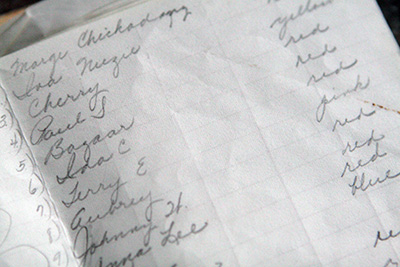
[Sue’s version (at right) is a testament to the determination of a lone knitter to rise above and finish. Using sheets of ledger paper, she systematically created a hybrid half-charted, half-written version that’s unlike any pattern I’ve ever seen in print. That did the trick. Over the years Sue knit a score of elephants, recorded in a list kept tucked in with the patterns. The recipients included her own sons, nieces and nephews, the children of her husband’s co-workers, and – in a nice touch of poetic justice – a descendant of the family that had help the Ulands escape from Germany. When she gave the list to me, her sewing-up needle was still stuck through it, ready for use on the next project .]
SR: Oh my, yes. I think so much so that they tended to be used as decorations instead of as toys to drag around. They were a labor of love. FH: I have to ask – since you don’t crochet, how did you deal with the crocheted feet? I’m going to include a knitted alternative. What did you do? SR: My grandmother, Ethel Hedges, always made the feet for me. She didn’t knit, but she was a professional seamstress, and she could crochet and tat. She could turn them out in no time. FH: And I know that the charted instructions weren’t your only innovation with this pattern. I’m going to have to ask you about stuffing the legs. SR (laughing): Oh, my. Do you really think we ought to include that? FH: Yes, I do. Please tell me about your ingenious solution. SR: It’s a good elephant but I never liked stuffing them. And when Ida Cantwell made her elephants, they never stood up straight. So I was looking at the leg opening one day, and realized it was the perfect size for one tightly-rolled sanitary napkin. After that, I always used them and they always worked perfectly. FH: And did anybody ever know? SR: No. But they will now, won’t they? *These being the only ingredients I ever managed to pry out of the boyfriend, who (like his mother) regarded Mrs. Hamilton’s Cake as a cherished family secret and refused in spite of much pleading to give me the recipe. But that’s not the reason I broke up with him. Not the only reason. |
 |
Translated by Franklin Habit from "Nursery
Elephant of Wool," anonymously published c. 1930-1949,
with revisions c. 1950 by Sue Rothschild.
|
 |
|
FINISHED MEASUREMENTS |
Length: approx. 10 inches |
|
MATERIALS Notions |
|
GAUGE |
24 sts/32 rows = 4" in stockinette
stitch |
|
PATTERN NOTES |
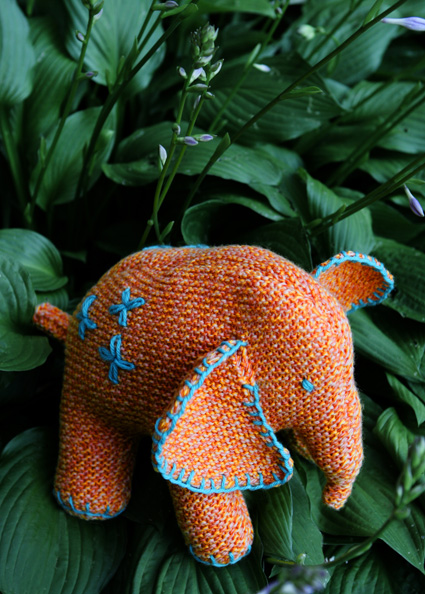
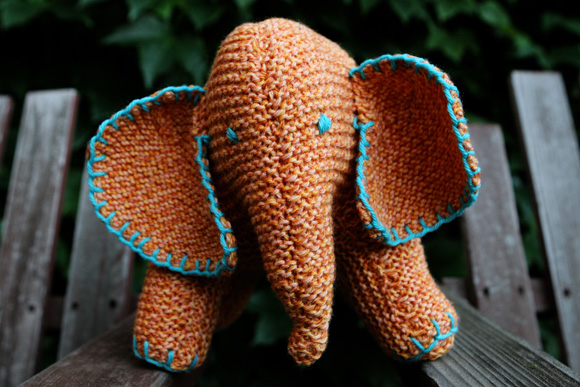
Flo is worked entirely in garter stitch (knit all stitches) on two needles. Because the fabric is reversible, no RS or WS is noted. For the Sides and Ears, both right and left sides are worked in the same way; the RS of one piece will be the same as the WS of the other piece. The original pattern called for feet worked in crochet; instructions for these are included below, along with a knitted alternative (shown). inc1: The increase used for this pattern is the backward loop increase. It is the first increase shown here, referred to as m1. This increase is different from the m1 increase used in most Knitty patterns. Instructions for the Cable Cast On can be found here. Instructions for Blanket Stitch can be found here. Instructions for Mattress
Stitch can be found here. Instructions for Lazy Daisy Stitch can be
found here. |
|
DIRECTIONS |
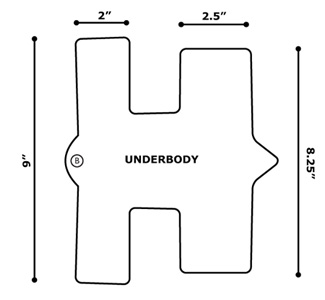
 Using MC, CO 10 sts. Row 1: [K1, kfb] twice, k to end. 12 sts. Row 2: [K1, kfb] five times, k to end. 17 sts. Rows 3-6: Work as for Rows 1-2. 31 sts. Row 7: K1, kfb, k to end. 32 sts. Row 8: [K1, kfb] five times, k to end. 37 sts. Row 9: K1, kfb, k to end. 38 sts. Row 10: [K1, kfb] twice, k to end. 40 sts. Rows 11-18: Work as for Rows 9-10. 52 sts. Row 19: K all sts. Row 20: [K1, kfb] twice, k to end. 54 sts. Row 21: K all sts. Row 22: K1, kfb, k to end. 55 sts. Rows 23-28: Work as for Rows 21-22. 58 sts. Rows 29-40: K all sts. Row 41: K to last 3 st, k2tog, k1. 57 sts. Rows 42-44: K all sts. Row 45: K to last 3 sts, k2tog, k1. 56 sts. Row 46: K42, place all sts just worked on st holder; BO 1 st, k to end. Trunk will be worked over remaining 13 sts. Trunk: Lower Body and Legs: K 13 rows, ending with yarn at tail end. Front Leg: Back Leg: UNDERBODY Lower Neck: Front Legs: Belly: Back Legs: Join yarn to remaining 9 sts. Use safety pin or split ring marker to mark CO end of work; this point is designated Point B in schematic. EAR (Make 2) Row 9: K1, inc1, k to end. 29 sts. Row 16: [K1, k2tog] twice, k to end. 28 sts. Row 22: K1, k2tog, k to end. 23 sts. Row 29: BO 8 sts, k to end. 12 sts. FEET (Make 4 of either knitted or crocheted version): Knitted Version: Crocheted Version: TAIL
|
|
FINISHING Assembly Pin Side pieces together along top edges. Beginning at Point A (see schematic) and working toward head, sew pieces together using mattress stitch. Continue seam over head and down top of trunk, around tip of trunk (leave yarn tail at tip of trunk hanging on RS of work), and up underside of trunk, ending at third garter st ridge below upper inside edge of trunk (Point B on Side schematic). Firmly stuff head and trunk. Join Point B of Underbody to Point
B of Sides. Sew side and leg seams, leaving bottoms of legs
open. Finish stuffing body through leg openings. Note that stuffing
must be firm enough for toy to hold its shape after squeezing.
(Give it a test hug – it should bounce back.)
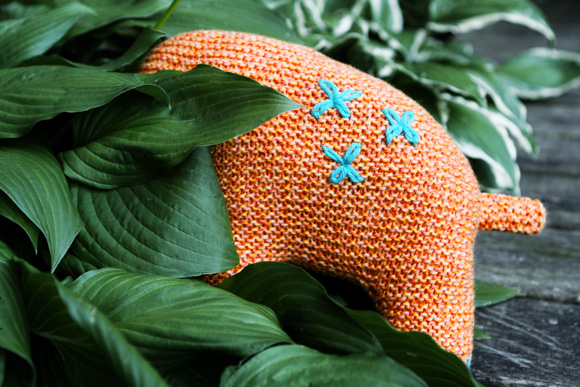
Sew ears securely to sides of head from Points C (3 inches from front seam and 2 inches from top seam) to D, indicated on Side schematic. Thread the yarn end at the tip of the trunk onto yarn needle and run it into and up along inside of trunk, causing trunk to curl upwards. Bring end of yarn to outside of piece and fasten securely, just about where Flo’s chin would be if she had one. Using CC, embroider eyes as shown. If desired, use CC to edge
feet and ears with blanket stitch. |
| ABOUT THE DESIGNER |
 He lives in Chicago, near the zoo, which has no elephants. |
| Pattern & images © 2010. Franklin Habit. |
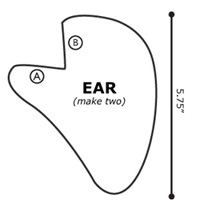 Finish ears by sewing edges A and B together
(see schematic).
Finish ears by sewing edges A and B together
(see schematic).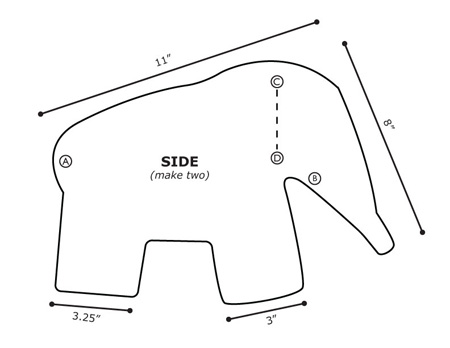
 Beginning at BO end, roll tail piece tightly, so that it forms
a small, firm log shape, with CO edge at outside of roll. Sew
CO edge in place, sew one end of roll to secure, then sew other
end to rump of elephant.
Beginning at BO end, roll tail piece tightly, so that it forms
a small, firm log shape, with CO edge at outside of roll. Sew
CO edge in place, sew one end of roll to secure, then sew other
end to rump of elephant.