  A
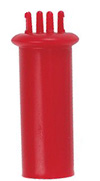
small spool knitter was my first introduction
to the knitting world. I was young and rambunctious
and the only way for my Grandma to keep me
out of trouble was to sit me down and give
me some yarn. I
remember sitting by her side knitting away,
she knitting away on a pretty sweater while
I knitted a cord long enough to wrap around
the world! A few decades later, I can say that
I have graduated from my small four-prong spool
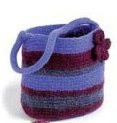
knitter to a bigger spool knitter. Instead
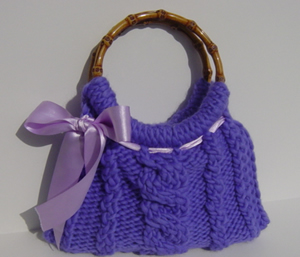
of miles of cord, I am now creating accessories
and knitwear items. A
small spool knitter was my first introduction
to the knitting world. I was young and rambunctious
and the only way for my Grandma to keep me
out of trouble was to sit me down and give
me some yarn. I
remember sitting by her side knitting away,
she knitting away on a pretty sweater while
I knitted a cord long enough to wrap around
the world! A few decades later, I can say that
I have graduated from my small four-prong spool
knitter to a bigger spool knitter. Instead
of miles of cord, I am now creating accessories
and knitwear items.
 You
have probably seen them at the stores, colorful
circles with pegs poking out of one of the
sides. They come in circular and rectangular
shapes in vivid colors that attract your eye.
These are modern knitting looms, although
historically they have been known by many names: knitting
wheels, knitting frames, rake knitters, French
Knitters, corkers, and spools. You
have probably seen them at the stores, colorful
circles with pegs poking out of one of the
sides. They come in circular and rectangular
shapes in vivid colors that attract your eye.
These are modern knitting looms, although
historically they have been known by many names: knitting
wheels, knitting frames, rake knitters, French
Knitters, corkers, and spools.
Loom knitting traces
its existence as far back as the 16th century.
Mary Thomas’ Knitting
Book, tells us that frame-knitting’s
noble origins began as finger knitting, followed
soon after by the spool knitter. Small
spool knitters were once used to make long
pieces of cord that were later turned into
household items such as rope, rugs and even
blankets.
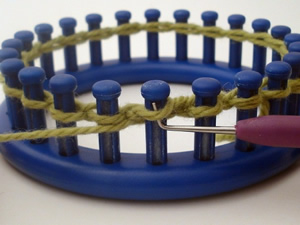
Just like in needle
knitting, the stitches on a knitting loom
are formed by interconnecting loops that
become a piece of fabric. The pegs function
as needles; each peg holds one loop that
becomes a stitch. The yarn sits around the
pegs. The knitter comes and wraps each
of the pegs, then lifts the bottom loop over
and off, letting the loop drop to the inside
of the loom. Each time the knitter lifts
a loop over and off, a stitch is created.
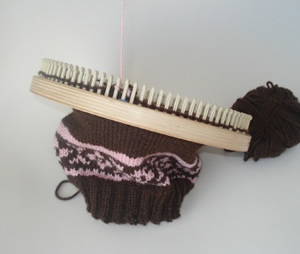
 Usually,
you will see chunky stockinette knit hats demonstrated
alongside the knitting looms in craft shops.
But we can create much more than just simple
stockinette. Usually,
you will see chunky stockinette knit hats demonstrated
alongside the knitting looms in craft shops.
But we can create much more than just simple
stockinette.
Like needle knitting, loom
knitters have at their disposal the purl stitch
and, combined with the knit stitch, an arsenal
of hundreds of stitch patterns. At one point,
the designs were limited to only knit and purl
combinations but recently, loom knitting has
seen a tremendous breakthrough. Now we can
knit simple lace patterns, cable designs, and
even stranded colour knitting.
 Just
like needles come in different sizes, knitting
looms come in different sizes too. The knitting
loom standards are still being established
by the industry but you will be able to find
some popular sizes. These are commonly known
in the industry as “loom
gauge”, not
to be confused with knitting gauge or knitting
tension. In loom knitting, gauge is influenced
by three factors: knitting loom gauge, yarn
used, and knitting tension. The gauge of the
knitting loom is determined by the measurement
from center of one peg to the center of the
next peg. The diameter of the peg shaft
also influences the gauge achieved—if
the peg is too thin and the spacing from center
to center of peg is too large, the stitches
formed will have a pronounced running ladder
from one stitch to the next. Typically,
the closer the pegs, the smaller the knit gauge. To
achieve a certain gauge, the knitter must change
any of the above factors—knitting loom,
yarn, or the tension with which you hold the
yarn. Just
like needles come in different sizes, knitting
looms come in different sizes too. The knitting
loom standards are still being established
by the industry but you will be able to find
some popular sizes. These are commonly known
in the industry as “loom
gauge”, not
to be confused with knitting gauge or knitting
tension. In loom knitting, gauge is influenced
by three factors: knitting loom gauge, yarn
used, and knitting tension. The gauge of the
knitting loom is determined by the measurement
from center of one peg to the center of the
next peg. The diameter of the peg shaft
also influences the gauge achieved—if
the peg is too thin and the spacing from center
to center of peg is too large, the stitches
formed will have a pronounced running ladder
from one stitch to the next. Typically,
the closer the pegs, the smaller the knit gauge. To
achieve a certain gauge, the knitter must change
any of the above factors—knitting loom,
yarn, or the tension with which you hold the
yarn.
Loomy
Tools
 |
The term “knitting
loom” is a broad name that covers
the three types of looms available: rounds,
single-sided rakes, and knitting boards.
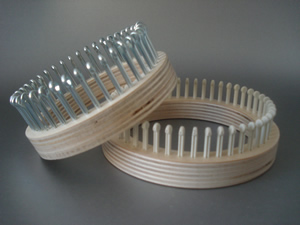
Round knitting looms
are commonly known as hat looms. They
are the most widely known looms and they
are come in different sizes and shapes—from
small circles that create small tubes
for baby socks, to large circles that
can make larger tubes for things like
adult-size hats.
Items made on a round
knitting loom provide a fabric with a
right and reverse side. The stitches
produced resemble those in needle knitting. |
 |
Although
a round loom can produce a tube by knitting
continuously around, if you were to use
it from point X to point Y and then back
from point Y to point X as in a letter
C, you can create a flat panel that can
be used to make sweaters. When a knitting
loom is used in this form, it is being
used as a single sided rake.
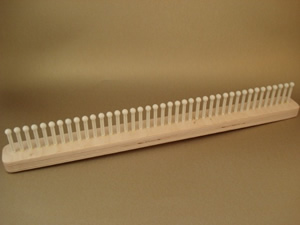
However, you will also
find Single Sided Rakes as part of a
the loom knitting world: It is a single
bed of pegs, used specifically to make
flat panels. |
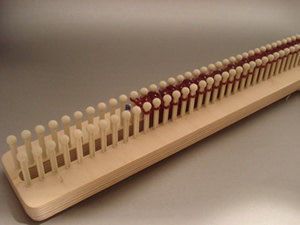 |
The
Knitting Board is part of the family
but it creates a fascinating fabric.
This loom has a double bed of pegs facing
each other, picture two Single Sided
Rakes in front of each other with a small
center gap that allows the knitting to
pass through. Knitting boards are known
by different names: double sided rakes,
knitting frames or just frames. They
produce a fabric that is double sided:
no wrong side. Stitches are made
by weaving the yarn from one side of
the board to the other.
Knitting Tool: a knitting tool is used
to lift off the loops off the pegs to create
stitches. It is a long piece of metal
with an angled tip similar to a crochet
hook. |
The loom knitting instruction
presented in this article is intended for use
with a round loom for knitting in the round
or as a single-sided rake.
Once you have mastered the
basics, you will be on your way to creating
knitted items without needles! Enjoy your journey!
The Basics of Loom Knitting for Rounds and
Single Sided Rakes
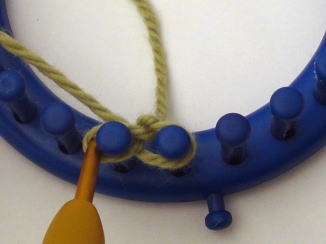
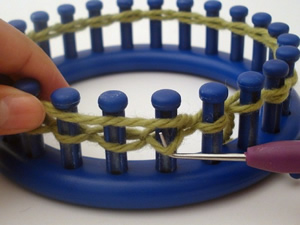
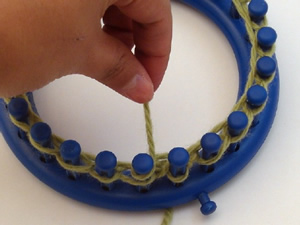
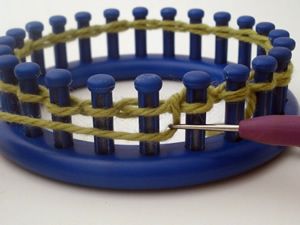
Cast on
Prepare: Obtain a crochet hook that
works well with the yarn weight you will
be using. Form a slip knot. Place slip knot
on one of the pegs, if the loom has an anchor
peg, place the slip knot on the peg to the
left of the anchor peg.
With crochet hook on your right hand and working
yarn on the left hand, move around the knitting
loom in a clockwise direction
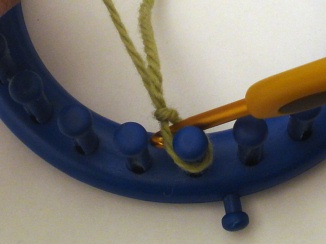 |
Step 1: Insert
the crochet hook through the slip knot. |
 |
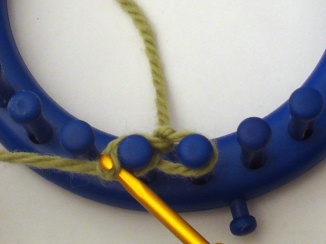
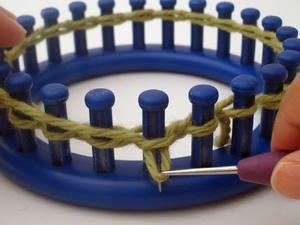
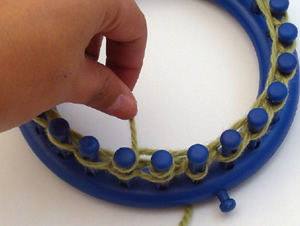
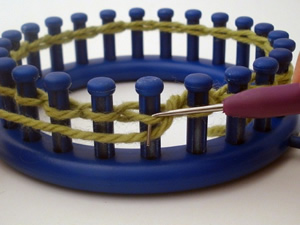
Step 2: Hook
the working yarn and form a chain, place
the chain on the next empty peg to the
left. |
 |
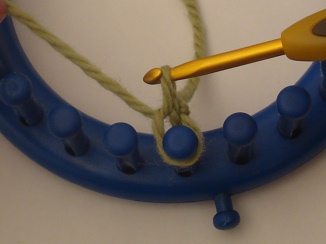
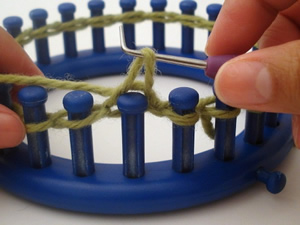
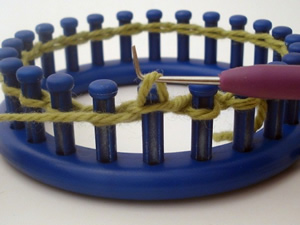
Step 3: Insert
hook, through the loop made on Step 2.
Hook the working yarn, and form a chain.
Place the chain in next empty peg to
the left. |
 |
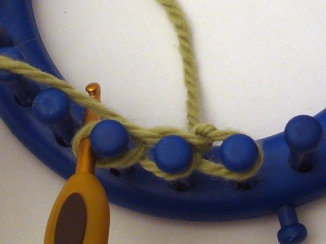
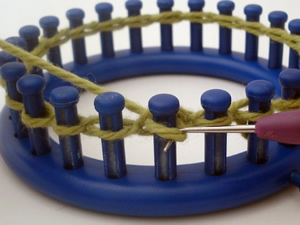
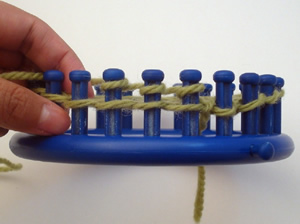
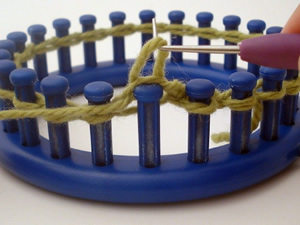
Step 4: Repeat
Step 3 until you have the desired number
of stitches on the loom. |
 |
|
To knit a circular item, you will place the
last chain formed on the first peg. The first
peg will have 2 loops on it.
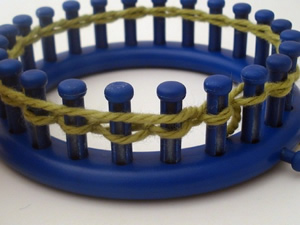
Your knitting loom is threaded
and ready to be worked. Try out one of the
basic stitches below. When you have mastered
the basic stitches, combine them to make different
stitch patterns.
The Basic Stitches
The knit stitch, twisted
knit stitch and purl stitch are the building
blocks of loom knitting. With
these three stitches, the creative possibilities
are endless.
The Knit Stitch
 |
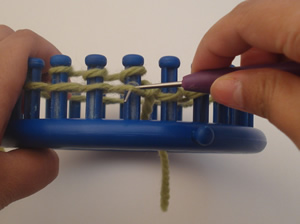
Step
1: Place working yarn in front
of the peg and above the
loop on the peg. |
 |
Step
2: Insert knitting tool through
the loop on the peg (from bottom up).
Hook the working yarn. |
 |
|
 |
Step
3: Pull the working yarn through
forming a loop. Hold the loop
securely with the knitting tool. |
 |
Step
4: Take the loop that is on
the peg off the peg. Place the loop
made in Step 3 on the peg. Tug on the
working yarn gently to tighten the
stitch.
Repeat Steps 1-4 with
each stitch. |
The Twisted Knit Stitch (single stitch)
The twisted knit stitch is
more commonly known as the single stitch, it
involves wrapping the peg in the e-wrap method.
It is the most well-known stitch in loom knitting
as it is the only stitch instruction that comes
with the mass-produced knitting looms.
 |
Step
1: Bring working yarn towards
the center of the knitting loom. |
 |
Step
2: Wrap around the next empty
peg in a counterclockwise direction.
Bring the working yarn back towards
the center of the knitting loom. |
 |
|
 |
|
 |
Repeat
Steps 1-2 with each stitch. When the
pegs are wrapped, knit by lifting the
bottommost loop off the peg. |
Loom knitters have
different variations of the Twisted Knit
Stitch. There is also
the double, the chunky, and the half stitch.
They all involve wrapping the pegs in the same
manner, except in the double you wrap the pegs
one extra time, so each peg has 3 loops. In
the Chunky stitch, you need 4 loops on each
peg and in the half you need 4 loops but instead
of lifting the bottommost loop, you knit by
lifting the bottommost two loops. The
different variations provide the knitter with
a tighter stitch.
The Purl Stitch
The purl stitch is achieved similarly to the
knit stitch except instead of placing the working
yarn above the loop on the peg, you place it
below.
 |
Step
1: Place the working yarn
in front of the peg and below the
loop on the peg. |
 |
Step
2: Insert knitting tool through
the loop on the peg (from top down). |
 |
Step
3: Hook the working yarn with
knitting tool. Bring knitting tool
back up. Knitting tool has a loop on
it. Hold this loop securely. |
 |
Step
4: Take the original loop
off the peg and place the newly formed
loop on the peg. Tug on the working
yarn gently to tighten the stitch. |
 |
|
Although loom knitters use
the same stitches as needle knitters, loom
knitters face a few barriers as there is a
limited quantity of patterns available or for
that matter, instructions. We
can translate a few patterns from needle knitting
to loom knitting but most of the time we have
problems matching gauge, or manipulating stitches
to create fanciful designs.
 However,
adversity has not deterred the loom knitting
community; we strive forth writing up instructions
and taking needle knitting techniques and applying
them to our knitting looms whenever possible. A
sea of undiscovered treasures lays ahead
of us and we are ready with knitting looms
and yarn at hand. However,
adversity has not deterred the loom knitting
community; we strive forth writing up instructions
and taking needle knitting techniques and applying
them to our knitting looms whenever possible. A
sea of undiscovered treasures lays ahead
of us and we are ready with knitting looms
and yarn at hand.
As a needle knitter,
you may ask yourself why in the world you
would ever trade your needles for a loom?
If you come from a world of needles and pick
up a loom, your first reaction would be that
it is too slow-going and more cumbersome.
At first, like every other hobby, it takes
time and dedication to learn the craft, it
is not something that you just sit down and
half-an-hour later you have a finished sock. Crafters
of all ages have come to love loom knitting
for very simple reasons:
- It is easier on the hands than working
with two needles. The movements are not as
repetitive and thus produce less wrist pain.
- Hand coordination does not need to be so
acute. Children can pick up a loom and with
a couple of tries, they can be knitting away.
- Older adults that have lost hand dexterity
can continue crafting as a loom is easy to
handle.
- A new knitter will be able to clearly see
how a knitted fabric is made up of interlocking
loops.
- Less prone to drop stitches or add stitches
as you can visibly see when a peg has a missing
loop or an extra loop.
To join us in our journey, here is a short
list of knitting loom vendors sites, or next
time you stop by your local craft store pick
up a set and give them a whirl.
Authentic Knitting Board: www.knittingboard.com
Cindy Woods Crafts: www.cindwoodcrafts.com
Décor Accents Looms: www.decoraccentsinc.com
In the Attic: www.knittinglooms.com
The Knitting Loom Company: www.knittinglooms.bigstep.com
References: Mary
Thomas’s
Knittting Book
|