Sea Witch's Bags, a free knitting pattern from Knitty.com.
INTRODUCTION
Seawitch
 by Stephanie Shiman

When Amy suggested beach bags for this issue of Knitty, I knew I wanted to design them with Sari Ribbon yarn. Made from strips of fabrics sewn end to end, the frayed edges of sari ribbon are raw and unrefined. It's got this summery feel and the unkempt texture echoes the wildness of crashing waves, swirling seaweed, and salty sea air.
Both bags are pretty simple to knit. The cast-on becomes the bottom of the bag, and the two shape options are created by either increasing or decreasing.
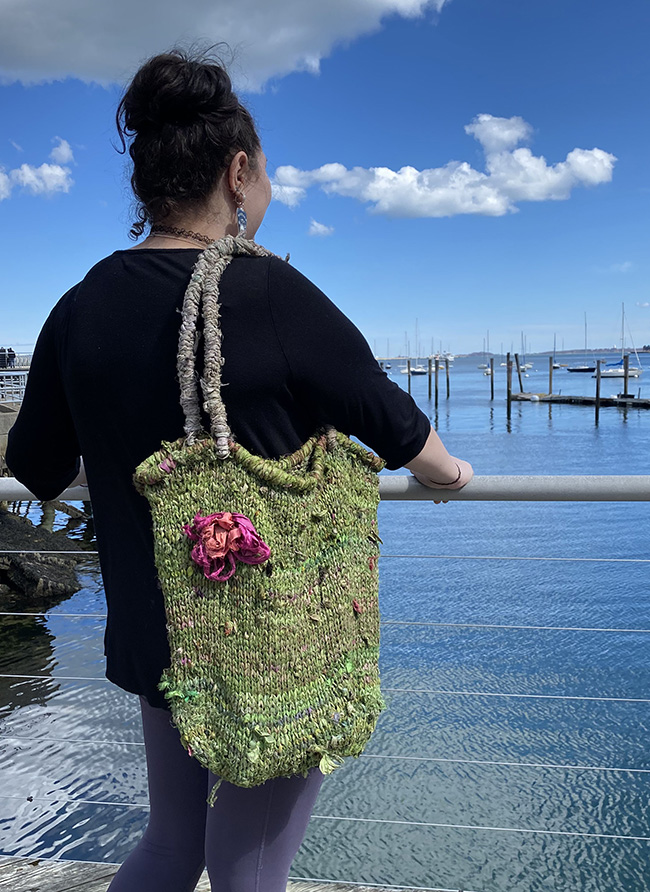
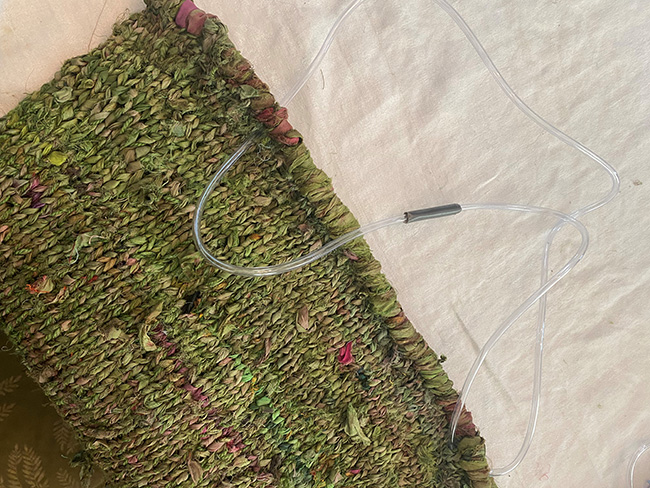
The Increase version (shown in green below) uses aquarium tubing for stability around the top opening and in the straps. I expected this to be a bit fiddly—like one of those projects that takes waaaay too long to be fun. However, I finished the opening and made the straps in about 2 and half hours—and that was making it up as I went along, taking photos, etc. So don't let the strange materials intimidate you. It's easier than you'd think and makes sturdy straps and non-floppy bag.
 model: Adaylia Shiman
photos: David Power, Annika Shiman
SIZE
One
FINISHED MEASUREMENTS
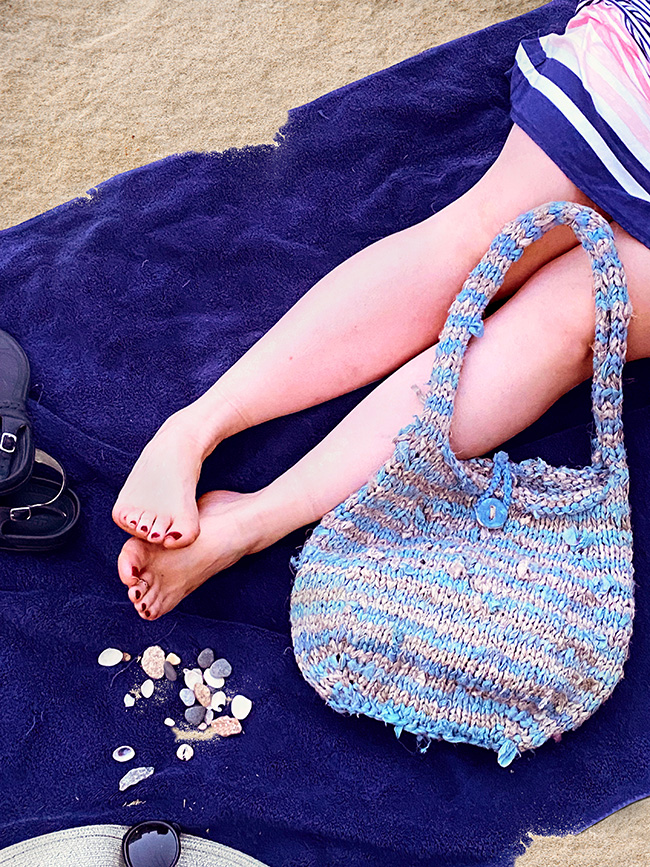
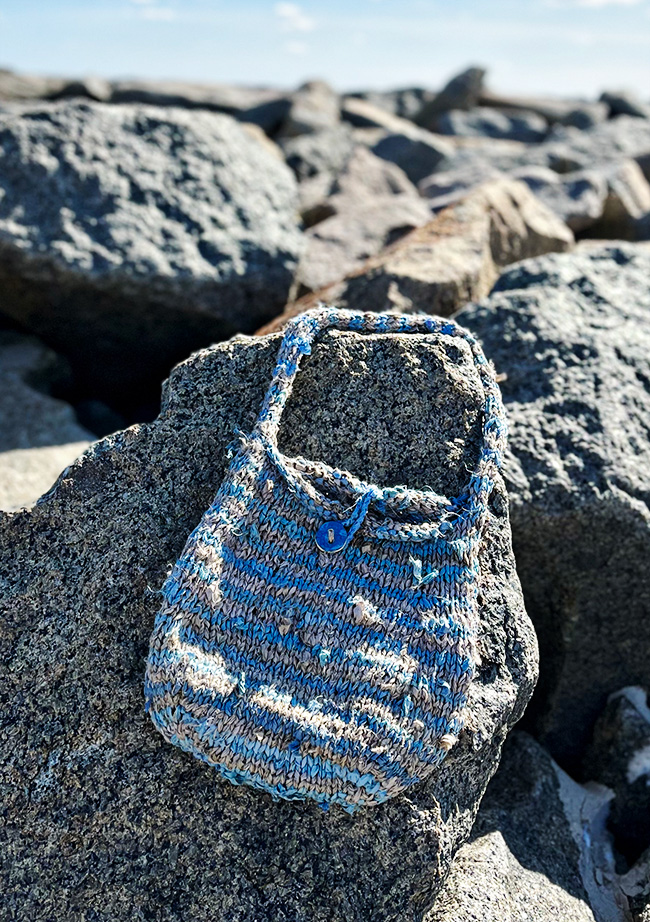
Decrease version (shown in blue/cream):
Width: at widest point, 14.5 inches/37 cm
Height: not including strap, 14 inches/35.5 cm
Strap: customizable, sample is 28 inches/71 cm
Increase version (shown in green):
Width: at top opening, 20 inches/51 cm
Height: not including strap, 15.5 inches/39.5 cm
Strap: customizable, sample is 57 inches/145 cm
MATERIALS
Yarn
Decrease version (shown in blue/cream above):
frabjous fibers "Sari Ribbon" [mostly silk; approximately 25yd/22.75m per 50g skein];
![]() [MC] Sky; 5 skeins
[MC] Sky; 5 skeins
![]() [CC] Sand; 4 skeins
[CC] Sand; 4 skeins
![]() Carry-along: frabjous fibers "Nettle" [100% nettle; approximately 250yd/228.5m per 100g skein];
Carry-along: frabjous fibers "Nettle" [100% nettle; approximately 250yd/228.5m per 100g skein];
Increase version (shown in green):
frabjous fibers "Sari Ribbon" [mostly silk; approximately 25yd/22.75m per 50g skein];
![]() [MC] Olive; 8 skeins
[MC] Olive; 8 skeins
![]() [MC] Sand; 2-3 skeins, depending on the length of strap desired
[MC] Sand; 2-3 skeins, depending on the length of strap desired
![]() Carry-along: stash yarn in similar color. Sample used
"Mary Ann" [85% superwash merino, 15% nylon; 475yd/434.5m per 113g skein];
Carry-along: stash yarn in similar color. Sample used
"Mary Ann" [85% superwash merino, 15% nylon; 475yd/434.5m per 113g skein];
Note: Longer straps and other changes may require more yarn than indicated.
Flower, if desired (shown on Increase version):
![]() frabjous fibers "Sari Ribbon" [mostly silk; approximately 25yd/22.75m per 50g skein]; Orchid; 1 skein
frabjous fibers "Sari Ribbon" [mostly silk; approximately 25yd/22.75m per 50g skein]; Orchid; 1 skein
![]() frabjous fibers "Sari Ribbon" [mostly silk; approximately 25yd/22.75m per 50g skein]; Salmon; 1 skein
frabjous fibers "Sari Ribbon" [mostly silk; approximately 25yd/22.75m per 50g skein]; Salmon; 1 skein
Yarn Characteristics
Sari Ribbon is created by sewing strips of silk fabrics end to end. The result is a ribbon yarn that is widely textured and varies in width. This is not a perfect yarn—it's a quirky, wild thing. I find that the strips themselves are quite strong, but the seams aren't always. For that reason, I recommend using a carry-along yarn for added stability. For the Decrease Version, I used a handspun nettle, and for the IncreaseVersion, I used stash yarn in the same color.
Keep in mind that the yardage varies from skein to skein. I built in a bit of a cushion in the yarn requirements.
I used scraps from a previous project for the flowers. Fabric strips with frayed edges would be a good option, or maybe something completely the opposite, like a vintage jeweled broach.
Recommended needle size
[always use a needle size that gives you the gauge listed below - every knitter's gauge is unique]
![]() US #13/9mm circular needle, 16-inch/40cm and 24-inch/60cm
US #13/9mm circular needle, 16-inch/40cm and 24-inch/60cm
![]() 1 US J-10 (6mm) crochet hook (or size close to this)
1 US J-10 (6mm) crochet hook (or size close to this)
Notions
![]() 5 stitch markers, one unique for start of round
5 stitch markers, one unique for start of round
![]() tapestry needle
tapestry needle
![]() yarn holder or scrap yarn (for Decrease Version only)
yarn holder or scrap yarn (for Decrease Version only)
![]() sewing needle and thread (optional, for flowers)
sewing needle and thread (optional, for flowers)
![]() large button; the sample button is about 1.25 inches/3 cm (optional, for Decrease Version);
large button; the sample button is about 1.25 inches/3 cm (optional, for Decrease Version);
![]() a few inches of duct tape
a few inches of duct tape
![]() approximately 14 feet/4.25 meters of 3/16 inch aquarium airline tubing, (2 packages)
approximately 14 feet/4.25 meters of 3/16 inch aquarium airline tubing, (2 packages)
GAUGE
10 sts/14 rounds, approximately = 4 inches/10 cm in stockinette stitch with Sari Ribbon and carry-along yarn held together
Note: fabric is unwashed. The bag is not intended to be washed – spot-clean with water and a mild soap when necessary.
PATTERN NOTES
[Knitty's list of standard abbreviations and techniques can be found here.]
Bags are knit from the bottom up. Both start the same, and as the names imply, one decreases, one increases. For the Decrease version, the entire bag is worked in two-round stripes of alternating colors. You may wish to use a jogless-jog for more seamless stripes.
DIRECTIONS
Decrease Version
Bag Body
With MC and carry-along yarn held together, and shorter needle, CO 36 sts, place unique marker, join in the round with care not to twist.
Setup round: K2, pm, k14, pm, k4, pm, k14, pm, k2.
Join CC, and hold it together with Carry-along for Rounds 1-2. Leave both colors attached throughout. Carry-along is used with both MC and CC.
Round 1: Knit.
Round 2: K to 1 st before m, kfb, sm, kfb, *k to 1 st before m, kfb, sm, kfb; repeat from * 2 more times, knit to end of round. 8 sts increased.
Rounds 3-4: Switch to MC and repeat these two rounds.
Repeat Rounds 1-4, alternating between CC and MC, one more time, and work Rounds 1-2 again. 76 sts. As you're working the increases, change to larger needle when you find it more comfortable.
Knit 10 rounds in stripe pattern, beginning and ending with 2 rounds of MC.
Next round, decrease: K2, *k to 2 sts before m, ssk, sm, k2tog; repeat from * 3 more times, k to end of round. 8 sts decreased.
Continue in stripe pattern and knit 11 rounds. Work decrease round. 60 sts.
Continue in stripe pattern and knit 11 rounds. Work decrease round. 52 sts.
Next round, divide for straps: Removing markers as you come to them, k1, ssk, k1, place these 3 sts on scrap yarn, BO 18 (1 st rems on right needle), ssk, k2, k2tog, k1, BO 18 (1 st rems on right needle), k2tog, k1. Slip the first and last 3 sts of the round together onto a spare needle. Cut all yarns.
Reattach yarn to the 6 sts from the middle of the round, and with WS facing work in stripe pattern in stockinette stitch, changing colors on the RS. Continue until you have the desired strap length (sample shows 25 inches/64 cm), ending with 1 RS row of the opposite color of the live sts. With right sides of the strap facing each other, use a 3-needle bind off to attach 6 sts from opposite side.

Increase Version
Bag Body
With MC and carry-along yarn held together, and shorter needles, CO 44 sts. Join in the round with care not to twist. Place unique marker to indicate start of round.
Setup round: K6, pm, k16, pm, k6, pm, k16.
Round 1: Kfb, *k to 1 st before m, kfb, sm, kfb; repeat from * 2 more times, k to last st, kfb. 8 sts increased.
Round 2: Knit.
Repeat Rounds 1-2, 4 more times. 84 sts.
Knit 10 rounds.
Next round, increase: K to first m, sm, kfb, k to 1 st before second m, kfb, sm, k to third m, sm, kfb, k to 1 st before final m, kfb. 4 sts increased.
Repeat the last 11 rounds once more. 92 sts.
Knit 6 rounds.
Work the Increase round again. 96 sts.
Knit 4 rounds.
Repeat the last 5 rounds two more times. 104 sts.
Work the Increase round again. 108 sts.
Knit one round.
Bind off all stitches.
FINISHING
Decrease version:
Bag Bottom
Turn bag inside out and use carry-along yarn or sewing thread to close bottom opening.
Button, if desired:
Decide where you would like your button to go, and on the opposite side of the bag opening, pick-up a st with Sari Ribbon and work a crochet chain until you have enough length to go around the button. Secure end of loop to bag.
Increase version:
Reinforce Opening
Cut a piece of airline tubing several inches longer than the opening.
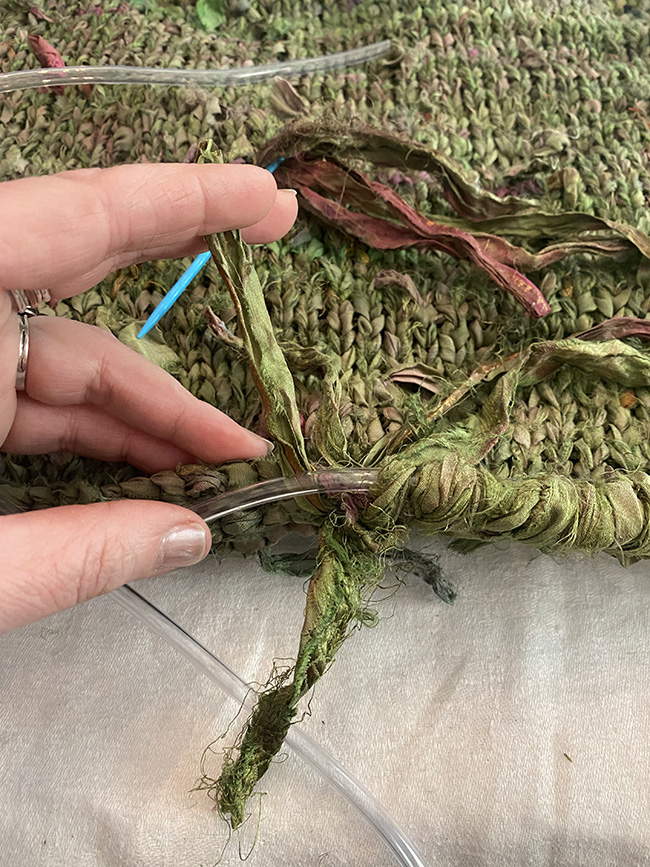
Thread the tapestry needle with 2 strands of Sari Ribbon—alternately thread with one long strand and pull ends together to double.
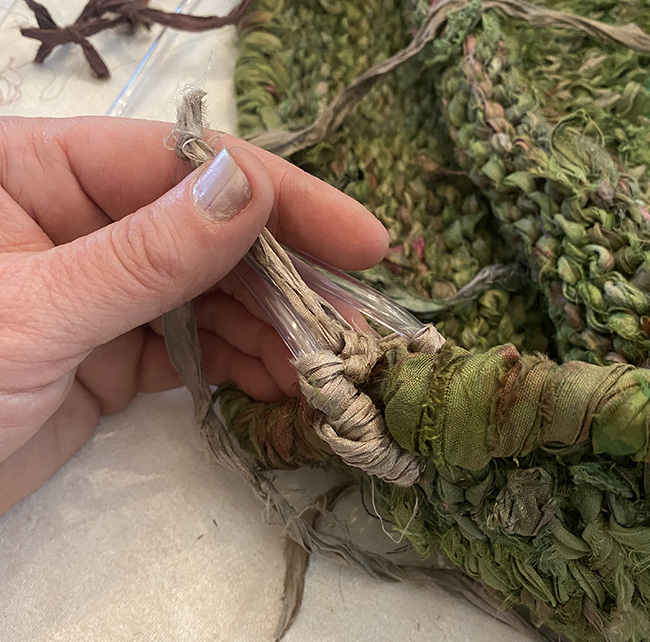
With bag opening facing you, starting a few inches down the tube, sew Sari Ribbon around tube and into each column of stitches, right below the bound-off edge. The tubing will sit right atop the BO edge. Be sure to work between stitches, instead of trying to sew through the yarn. Continue to sew around the tubing and into the bag. When you need to switch to a new piece of Sari Ribbon, simply sew around the tail of the last piece. Keep the ribbon relatively flat against the tubing as you work. If the thickness of the ribbon varies, pull slightly tighter or leave a bit looser and embrace imperfection.
Once you get back to the start, cut the tubing in half-length wise and insert one end into the other. Remember, you can always cut off more, so take care not to cut the tubing too short. Stuff the end in at least an inch, or more if possible. Keep your thumb on the join to support it and wrap it like you did the rest of the tubing. Weave in ends.
Bag Bottom
Turn bag inside out and use carry-along yarn or sewing thread to close bottom opening—making sure to sew the front side of the cast-on to the back side of the cast-on.
Bag Straps
Note: I prefer really long straps for a bag like this. I like to stuff it full and still have space to throw it over my shoulder, so I cut my strap pieces to 57 inches/145 cm for 27 total inches/68.5 cm of a strap. I suggest holding the bag up to your side and deciding what length is best for you, or the intended carrier.
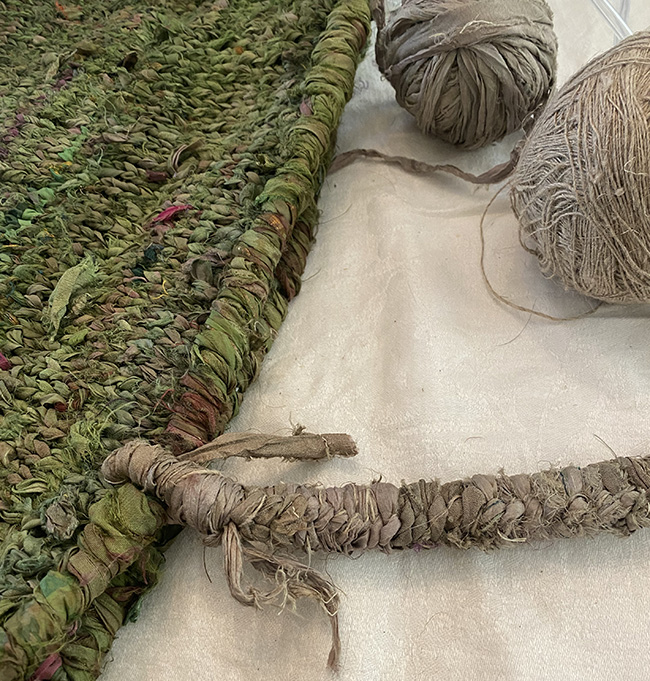
Cut two lengths of airline tubing approximately double the length you'd prefer your straps to be. Choose where you'd like your straps to be, and poke the airline tubing between stitches and around the finished edge. I placed my straps 4.5 inches/11.5 cm from each side. Repeat for second side. Cut the one end of the tube lengthwise as before and push it as far as you can into the opposite side. Reinforce the join with duct tape or something similar. One wrap or so around the join is good. Turn your loop so that the tape/join is at the top of the strap.
With double-stranded Sari Ribbon, and starting right above the finished edge, wrap the loop of tubing. Continue to wrap your way down to you reach the bag, pass yarn through alongside the strap loop and wrap second side. You'll want to wrap back up to the just above the finished edge. Do this on only one side for now.
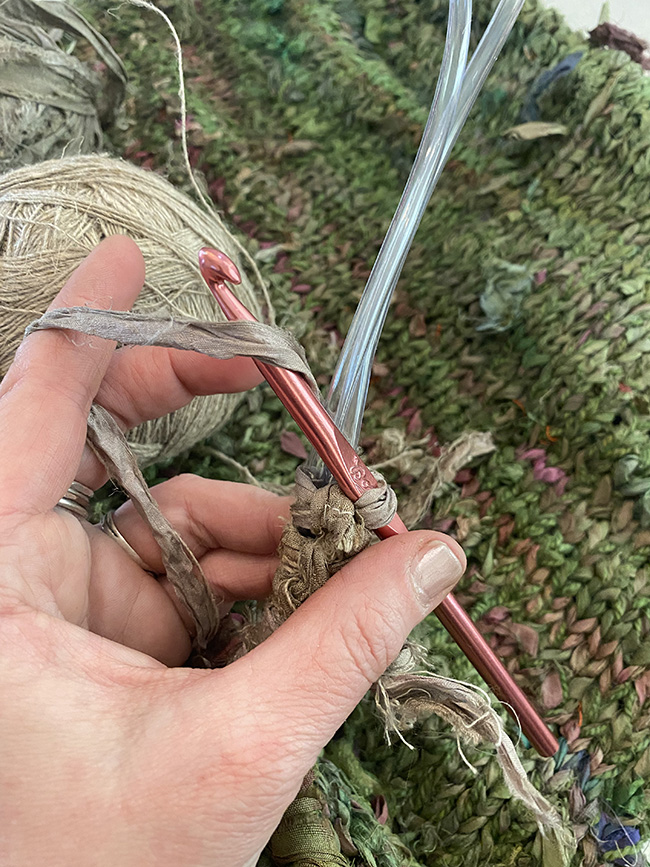
Once both sides of the tubing loop (inside and outside the bag, but only on one side of the bag) are sufficiently covered, bring the two sides of tubing together. Starting at the top opening, with Sari Ribbon double-stranded for a substantial strap, or single-stranded for a narrower strap, use your crochet hook and crochet around the strap. This is like working a chain around the tubing—around one side, chain made, then the second side. I left the "braid" bit of my stitches on the outside top of the strap. You can put it wherever you like, just be sure to be consistent. Continue in this manner until you reach the other side, cut the working yarn and pull it through the loop to bind-off, leaving a tail long enough to wrap the second side as you did the first.
Repeat for second strap.
ABOUT THE DESIGNER
 Stephanie is the owner of frabjous fibers and Wonderland Yarns. When she's not up to her elbows in dye, she enjoys foolishness with her daughters, junk shops, making pottery, and all manner of fiber crafts.
She lives with her daughter, darling, and dogs in southern Vermont.
Pattern & images © 2022 Stephanie Shiman