Skylark, a free knitting pattern from Knitty.com.
INTRODUCTION
Skylark
by Laura Zukaite

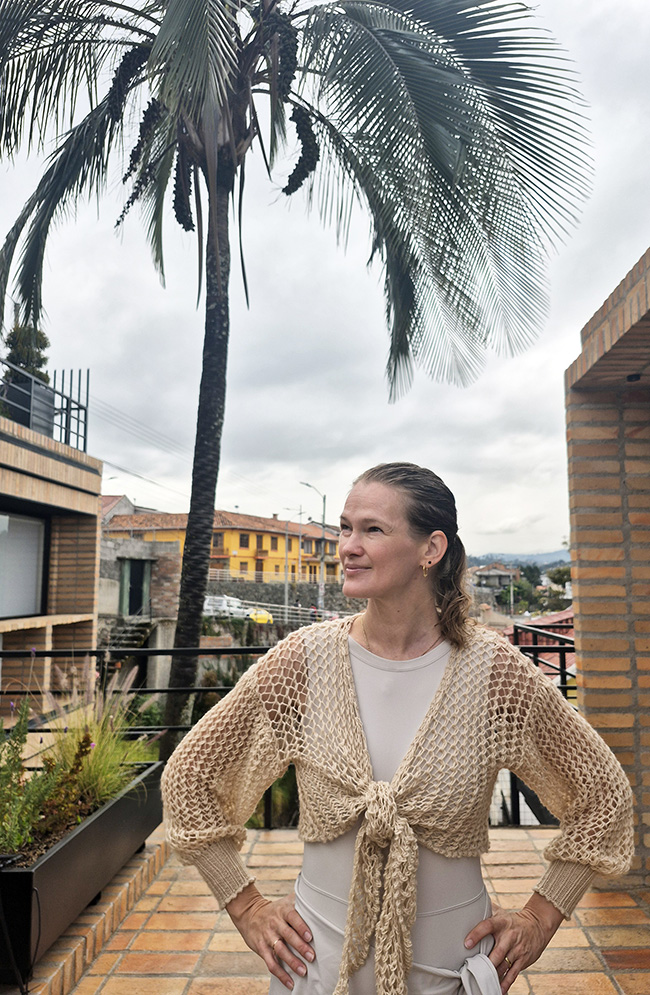
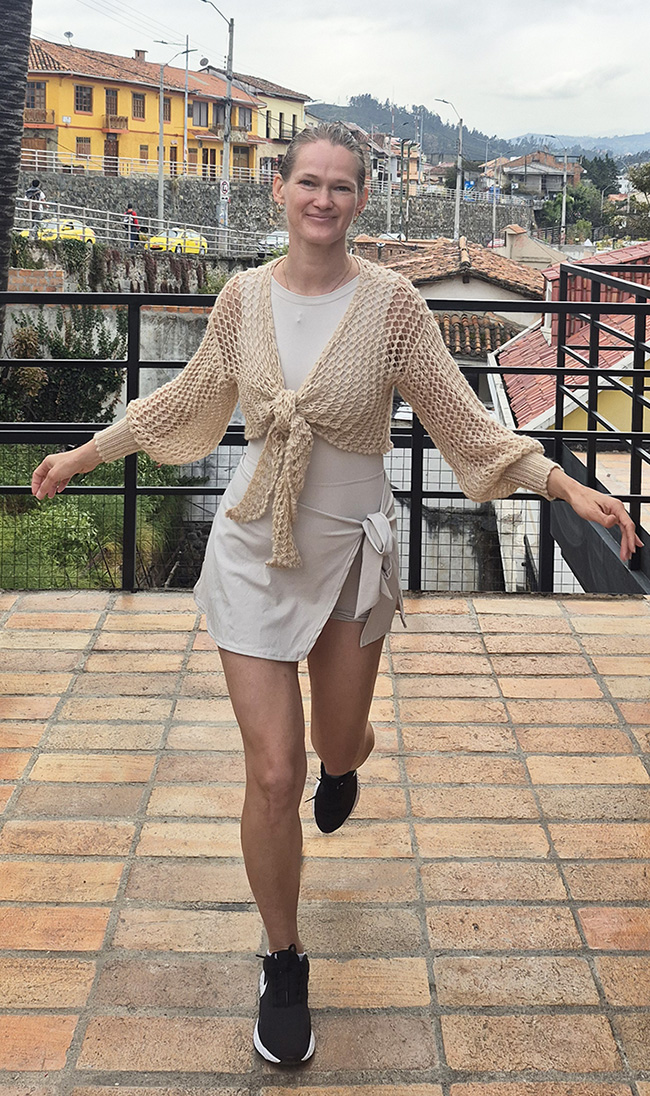
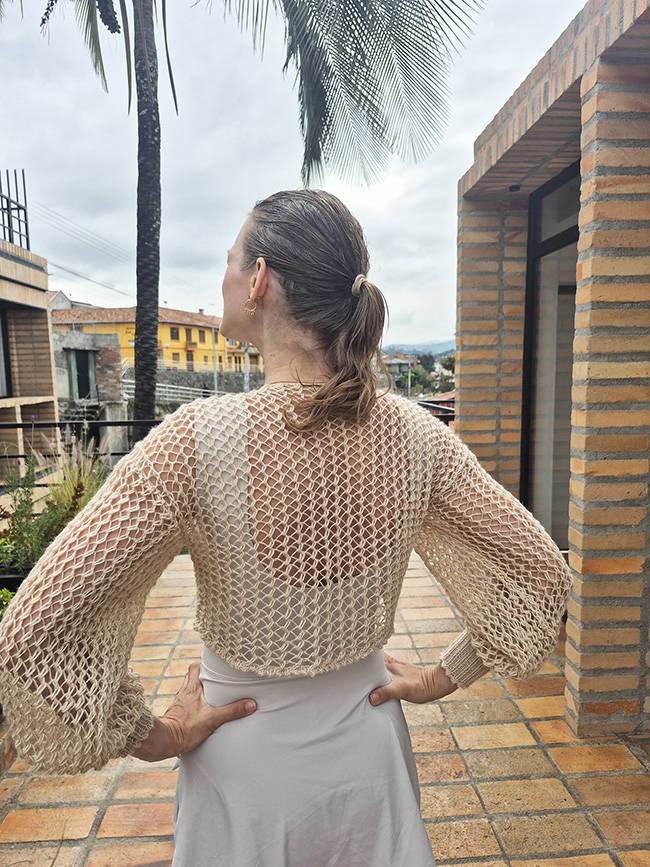
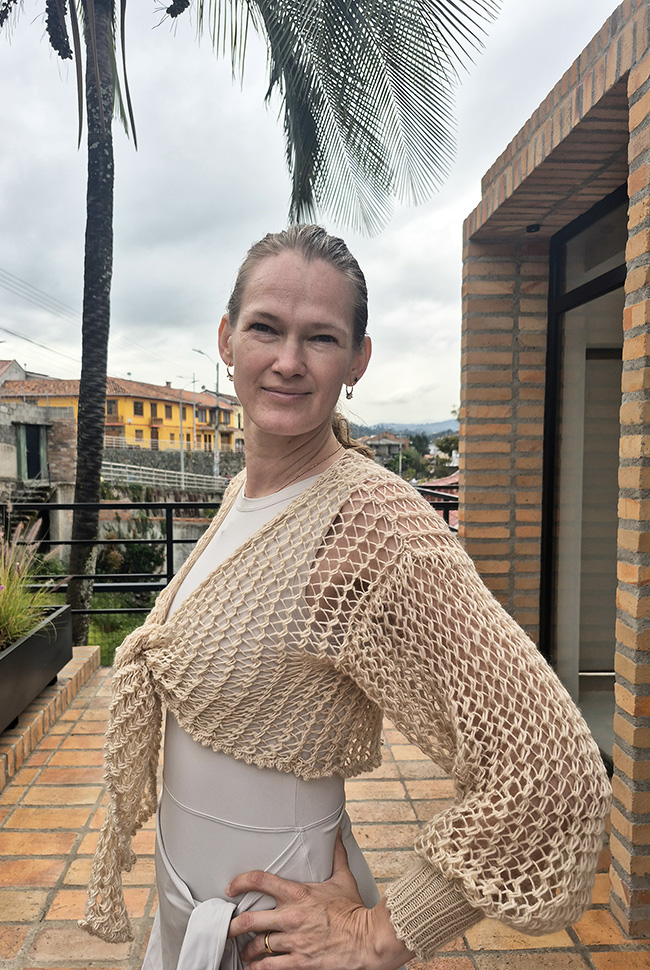
Skylark was been dreamed up out of necessity: a need for a versatile, tie-front cardigan that is light and can be worn over a dress. Using an open mesh stitch makes this cardigan super light, which is perfect for just throwing it on on a cool summer evening.
Worked flat, the front panels are decreased diagonally to create ties, which can be adjusted at the front. The sleeves have very tight cuffs, and, along with a drop shoulder construction, ensure a blousy, oversized fit. This cardigan uses a fingering weight 100% superwash wool, which is a perfect weight to achieve tight rib cuffs and an open mesh pattern. And the best thing about it: this pattern uses only 2-3 (typical-size) balls or skeins of fingering-weight yarn!
The mesh fabric has a lot of stretch. Since this design is meant to fit the bust without ease, choose a size that is the same measurement as your high bust.
 model: Laura Zukaite
photos: David Alvarado
SIZE
Women's XS[S, M, L, 1X, 2X, 3X, 4X, 5X]
Shown in size S with no ease at largest part of chest.
FINISHED MEASUREMENTS
Chest/Bust Circumference: 32[36, 40, 44, 48, 52, 56, 60, 64] inches / 81[91.5, 101.5, 112, 122, 132, 142, 152.5, 162.5] cm
Length: 14.5[15, 15.5, 16, 16.5, 17, 17.5, 18, 18.5] inches / 37[38, 39.5, 40.5, 42, 43, 44.5, 45.5, 47] cm
MATERIALS
Yarn
![]() Yarnalia Skylark [100% superwash wool; 350yd/320m per 3.5 oz/100g ball]; color: Buttermilk 2[2, 2, 2, 3, 3, 3, 3, 3] balls
Yarnalia Skylark [100% superwash wool; 350yd/320m per 3.5 oz/100g ball]; color: Buttermilk 2[2, 2, 2, 3, 3, 3, 3, 3] balls
Yarn Characteristics
![]() The sample shown uses a fingering-weight single-ply superwash wool yarn. The yarn is lightly spun ensuring that it does not create any torquing when being knit, which is especially important for open stitch work. This sweater is very versatile to knit and could take multiple yarn weights (depending on how open or closed you would like the pattern to be). Linen/cotton blend would make the design a little bit more crisp. And using a silk blend (or 100% silk) would make it very drapey.
The sample shown uses a fingering-weight single-ply superwash wool yarn. The yarn is lightly spun ensuring that it does not create any torquing when being knit, which is especially important for open stitch work. This sweater is very versatile to knit and could take multiple yarn weights (depending on how open or closed you would like the pattern to be). Linen/cotton blend would make the design a little bit more crisp. And using a silk blend (or 100% silk) would make it very drapey.
Recommended needle size
[always use a needle size that gives you the gauge listed below - every knitter's gauge is unique]
![]() 1 set US #6/4mm needles for working flat
1 set US #6/4mm needles for working flat
![]() 1 set US #10.5/6.5mm needles for working flat
1 set US #10.5/6.5mm needles for working flat
Notions
![]() stitch holder
stitch holder
![]() yarn needle
yarn needle
GAUGE
12 sts/14 rows= 4 inches/10 cm in Mesh Stitch on US #10.5/6.5mm needles
28 sts/32 rows= 4 inches/10 cm in K1, P1 rib on US #6 /4mm needles
Note: gauge is always taken after blocking.
PATTERN NOTES
[Knitty's list of standard abbreviations and techniques can be found here.]
Construction method:
The garment is worked flat in 5 panels: back, right front, left front and 2 sleeves. They are then seamed together.
Knitting tip: Work the front decrease edges loosely to make sure they have the same elasticity as the Mesh Stitch body. The front ties will not fit correctly if the edges are too tight.
TECHNIQUES
- SSSK: Slip next 3 stitches one at a time as if to knit, insert the left-hand needle into the fronts of those three stitches, and knit them together. 2 sts decreased.
- P3tog: Purl 3 sts together. 2 sts decreased.
- 3-Needle Bind Off
Picot Hem (multiple of 2 sts)
Row 1 [WS]: Sl1, purl to last st, k1.
Row 2: Sl1, *k2tog, yo; repeat from * to last st, k1.
Row 3: Sl1, purl to last st, k1.
Row 4 [RS]: Fold the work at the yarnover ridge formed by Row 2 with WS together. *Knit 1 together with 1 st from cast-on edge; rep from * to end.
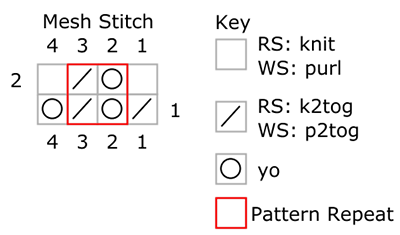
Mesh Stitch Pattern (multiple of 2 sts + 2)
Row 1 [RS]: *K2tog, yo; repeat from * to end.
Row 2 [WS]: P1, *P2tog, yo; repeat from * to last st, p1.
Rep these 2 rows for patt.
CHARTS
DIRECTIONS
BACK
Using smaller needles, CO 98[110, 122, 134, 146, 158, 170, 182, 194] sts.
Work Rows 1-4 of Picot Hem.
Change to larger needles.
Note: Continue to slip the first stitch and knit the last stitch of every row.
Next row [WS]: Sl1, *p2tog; repeat from * to last st, k1. 50[56, 62, 68, 74, 80, 86, 92, 98] sts.
Begin Mesh Stitch pattern:
Row 1 [RS]: Sl1, work in Mesh Stitch pattern to last st, k1.
Cont in Mesh Stitch patt, slipping the first st and knitting the last st of every row, until work measures 14.5[15, 15.5, 16, 16.5, 17, 17.5, 18, 18.5] inches/ 37[38, 39.5, 40.5, 42, 43, 44.5, 45.5, 47] cm from cast-on edge, ending after a WS row.
Next row [RS]: Patt 18[20, 22, 24, 26, 28, 30, 32, 34] sts, BO 14[16, 18, 20, 22, 24, 26, 28, 30] sts (very loosely), patt to end.
Break yarn (leaving long tail for 3-needle bind off) and place each set of 18[20, 22, 24, 26, 28, 30, 32, 34] sts on separate holders.
RIGHT FRONT
Using smaller needles, CO 114[122, 130, 138, 146, 154, 162, 170, 178] sts.
Work Rows 1-4 of Picot Hem.
Change to larger needles.
Note: Continue to slip the first stitch and knit the last stitch of every row.
Next row [WS]: Sl1, *p2tog; repeat from * to last st, k1. 58[62, 66, 70, 74, 78, 82, 86, 90] sts.
Note: The SSSK decrease eliminates 1 pattern repeat each time, so you should start and end your Mesh Stitch following the pattern as written/charted on each row. Continue working the 3 sts at beg of RS rows and at end of WS rows very loosely.
Row 1 [RS]: K2, sssk, work in Mesh Stitch patt to last st, k1. 2 sts decreased.
Row 2 [WS]: Sl1, work in Mesh Stitch patt to last 3 sts, k3.
Repeat last 2 rows 16[17, 18, 19, 20, 21, 22, 23, 24] more times. 24[26, 28, 30, 32, 34, 36, 38, 40] sts.
Row 3 [RS] Sl1, work in Mesh Stitch patt to last st, k1.
Row 4 [WS] Sl1, work in Mesh Stitch patt to last 3 sts, k3.
Row 5: K2, sssk, work in Mesh Stitch patt to last st, k1. 2 sts decreased.
Row 6: Sl1, work in Mesh Stitch patt to last 3 sts, k3.
Repeat last 4 rows 2 more times. 18[20, 22, 24, 26, 28, 30, 32, 34] sts.
Work even in Mesh Stitch pattern, slipping the first st and knitting the last st of every row, until piece measures 14.5[15, 15.5, 16, 16.5, 17, 17.5, 18, 18.5] inches / 37[38, 39.5, 40.5, 42, 43, 44.5, 45.5, 47] cm, ending after a WS row.
Break yarn and place sts on holder.
LEFT FRONT
Using smaller needles, CO 114[122, 130, 138, 146, 154, 162, 170, 178] sts.
Work Rows 1-4 of Picot Hem.
Change to larger needles.
Note: Continue to slip the first stitch and knit the last stitch of every row.
Next row [WS]: Sl1, *p2tog; repeat from * to last st, k1. 58[62, 66, 70, 74, 78, 82, 86, 90] sts.
Note: The P3tog decrease eliminates 1 pattern repeat each time, so you should start and end your Mesh stitch pattern following the pattern as written/charted on each row. Continue working the 3 sts at beg of RS rows and at end of WS rows very loosely.
Row 1 [RS]: Sl1, work in Mesh Stitch patt to last 3 sts, k3.
Row 2 [WS]: K2, p3tog, work in Mesh stitch patt to last st, k1. 2 sts decreased.
Repeat last 2 rows 16[17, 18, 19, 20, 21, 22, 23, 24] more times. 24[26, 28, 30, 32, 34, 36, 38, 40] sts.
Row 3 [RS]: Sl1, work in Mesh Stitch patt to last 3 sts, k3.
Row 4 [WS]: K3, work in Mesh Stitch patt to last st, k1.
Row 5: Sl1, work in Mesh Stitch patt to the last 3 sts, k3.
Row 6: K2, p3tog, work in Mesh Stitch patt to last st, k1. 2 sts decreased[, , , , , , , ] .
Repeat last 4 rows 2 more times. 18[20, 22, 24, 26, 28, 30, 32, 34] sts.
Work even in Mesh Stitch pattern, slipping the first st and knitting the last st of every row, until piece measures 14.5[15, 15.5, 16, 16.5, 17, 17.5, 18, 18.5] inches / 37[38, 39.5, 40.5, 42, 43, 44.5, 45.5, 47] cm, ending after a WS row.
Break yarn and place sts on holder.

SLEEVES (make 2)
Using smaller needles, CO 37[39, 41, 43, 45, 47, 49, 51, 53] sts.
NOTE: Slip the first and knit the last stitch of every row.
Cuff
Row 1 [WS]: Sl1, purl to last st, k1.
Row 2: Sl1, *k2tog, yo; repeat from * to last 2 sts, k2.
Row 3: Sl1, purl to last st, k1.
Row 4 [RS]: Fold the work at the yarnover ridge formed by Row 2 with WS together. *Knit 1 together with 1 st from cast-on edge; rep from * to end.
Row 1 [WS]: Sl1, p1, *k1, p1; rep from * to last st, k1.
Row 2 [RS]: Sl1, k1, *p1, k1; repeat from * to last st, k1.
Repeat last 2 rows until cuff measures 4.25 inches/ 11cm, ending after a RS row.
Change to larger needles.
Next row [WS]: Sl1, *k1, yo; rep from * to last st, k1. 72[76, 80, 84, 88, 92, 96, 100, 104] sts.
Next row [RS]: Sl1, work in Mesh Stitch patt to last st, k1.
Cont in Mesh Stitch patt, slipping first st and knitting last st of every row, until work measures 18 inches/45.5 cm, ending after a WS row.
BO all sts very loosely knitwise.
FINISHING
Wet block each panel to measurements.
Join shoulders using 3-needle bind off.
Sew side seams, leaving 7.25[7.5, 7.75, 8, 8.25, 8.5, 8.75, 9, 9.25] inches/ 18.5[19, 19.5, 20.5, 21, 21.5, 22, 23, 23.5] cm on each side of shoulders open for armholes.
Gathering the top of each sleeve to fit evenly into each opening, sew sleeve tops to Fronts and Back at the armhole opening. To make this easier, weave a long strand of contrasting yarn along the top edge of the sleeve. Then gather the fabric evenly to the desired measurement, pin the sleeve top in place, sew to secure the sleeve, and finally remove the contrasting yarn.
Sew sleeve seams. Weave in ends.
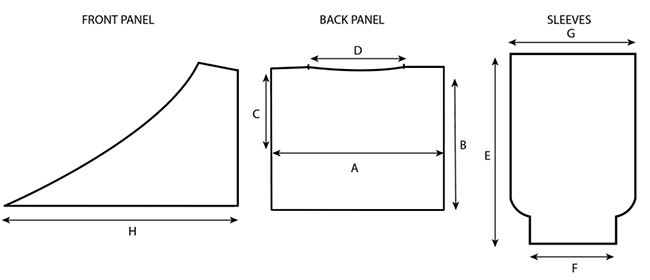
A–Back width: 16[18, 20, 22, 24, 26, 28, 30, 32] inches / 40.5[45.5, 51, 56, 61, 66, 71, 76, 81.5] cm
B–Length: 14.5[15, 15.5, 16, 16.5, 17, 17.5, 18, 18.5] inches/ 37[38, 39.5, 40.5, 42, 43, 44.5, 45.5, 47] cm
C–Armhole depth: 7.25[7.5, 7.75, 8, 8.25, 8.5, 8.75, 9, 9.25] inches/ 18.5[19, 19.5, 20.5, 21, 21.5, 22, 23, 23.5] cm
D–Back neck width: 4.75[5.25, 6, 6.75, 7.25, 8, 8.75, 9.25, 10] inches / 12[13.5, 15, 17, 18.5, 20.5, 22, 23.5, 25.5] cm
E–Sleeve length: 18 inches/45.5 cm
F–Wrist circumference: 5[5.25, 5.5, 5.75, 6.25, 6.5, 6.75, 7, 7.25] inches/ 12.5[13.5, 14, 14.5, 16, 16.5, 17, 18, 18.5] cm
G–Upper arm circumference: 23.25[24.75, 26, 27.25, 28.75, 30, 31.25, 32.75, 34] inches / 59[63, 66, 69, 73, 76, 79.5, 83, 86.5] cm
H—Front hem width: 19[20.25, 21.75, 23, 24.25, 25.75, 27, 28.25, 29.75] inches / 48.5[51.5, 55, 58.5, 61.5, 65.5, 68.5, 72, 75.5] cm
Wingspan (not shown on schematic): 52[54, 56, 58, 60, 62, 64, 66, 68] inches / 132[137, 142, 147.5, 152.5, 157.5, 162.5, 167.5, 172.5]
ABOUT THE DESIGNER
 Laura Zukaite was born and raised in Lithuania. She studied Fashion Design in New York City, where she also lived for close to 20 years, working in the fashion industry. She designed for such companies as Ralph Lauren and Gap. Now Laura designs from her residence in Ecuador.
She learned to knit as a child and has always loved the physical act of making things and working with her hands. It is very rewarding to create something from an idea and then make it stitch by stitch, having a functional item at the end.
Laura has been published in various knitting magazines such as Vogue Knitting and Interweave Knits. She is an author of Luxe Knits, Luxe Knits: The Accessories, and Inspired Shawls.
Pattern & images © 2026 Laura Zukaite