Knitty: little purls of wisdom
Quince & Co.
Title
beauty shot

Tangy

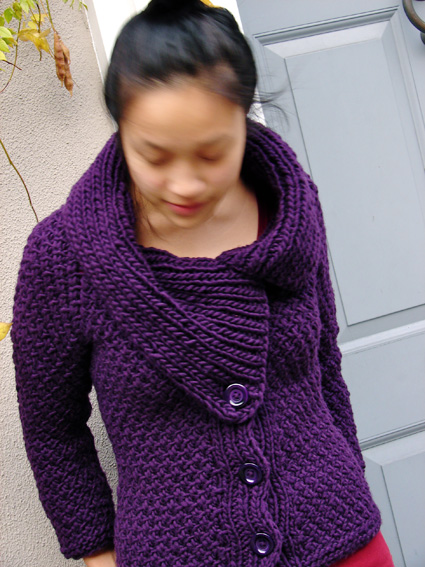
The design for Jacqueline was inspired by the fashion of the ‘60s—mod culture, Chanel jackets, and, of course, Jackie O. A modern update on the styles of that decade, this jacket combines a vintage texture and silhouette with a modern fit and chunky convertible collar. Wear it to the office with the collar buttoned up or casually with the collar open!

Jacqueline is designed for a bulky wool yarn that holds its shape in the weave-like Rizotto stitch. The body is worked in one piece from the bottom up, with sleeves attached raglan-style and collar worked separately.

 
spacer model: Karina Liu spacer photos: Zach Walker

SIZE
XS[S, M, L, 1X, 2X, 3X] (shown in size Small)

spacer

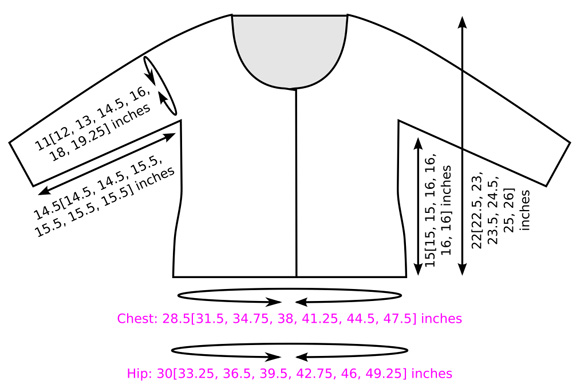
FINISHED MEASUREMENTS
Chest: 28.5[31.5, 34.75, 38, 41.25, 44.5, 47.5] inches with front bands overlapped
Length: 22[22.5, 23, 23.5, 24.5, 25, 26] inches (not including collar)

Editor's note: the above chest measurements differ greatly from the original version as published.
We apologize for the error. Please check the revised schematic at the bottom of the pattern for updated hip measurements.

spacer

MATERIALS
Yarn

spacer Quince & Co. Puffin [100% American Wool; 112yd/102m per 100g skein]; color: Frank’s Plum; 6[6, 7, 9, 10, 11, 12] skeins

Recommended needle size
[always use a needle size that gives you the gauge listed below -- every knitter's gauge is unique]
spacer 1 US #10.5/6.5mm circular needle, 29 inches or longer (longer needle recommended for larger sizes)
spacer 1 set US #10.5/6.5mm straight needles or shorter circular needle (used for working sleeves and collar)

Notions
spacer Stitch markers
spacer Row counter (optional but recommended)
spacer Stitch holder
spacer Yarn needle
spacer Plant mister (used for blocking)
spacer Rust-proof pins
spacer 5[5, 5, 6, 6, 6, 6] buttons, 1 inch diameter

spacer

GAUGE

12 sts/14 rows = 4" in stockinette st
10 sts/15 rows = 4" in Rizotto Pattern after blocking

Note: Ensure you match the specified row gauge in this pattern to get the best fit.


PATTERN NOTES
[Knitty's list of standard abbreviations and techniques can be found here.]

SKP: Sl 1 knitwise, k1, pass slipped st over. Forms a left-leaning decrease.

Rizotto Pattern (Worked over an even number of sts):
Row 1 [RS]: K all sts.
Row 2 [WS]: [P2tog but do not drop sts from left needle; k2tog in front loops of same 2 sts, drop sts from left needle] to end of row.
Row 3 [RS]: K all sts.
Row 4 [WS]: P1, [p2tog but do not drop sts from left needle; k2tog in front loops of same 2 sts, drop sts from left needle] to last st, p1.
Repeat Rows 1-4 for Rizotto Pattern.

Cold-Water Mist Blocking:
Fill plant mister with cool water. Pin garment to blocking board or other surface at dimensions shown in schematic. It may be necessary to spray garment before pinning to achieve desired dimensions.
Spray garment until damp. Allow to dry completely before removing pins.

DIRECTIONS
LOWER BODY
Using long circular needle, CO 81[89, 97, 105, 113, 121, 129] sts.

Note: The first st of each row is slipped purlwise.

The ribbed front bands are worked at the same time as the body of the sweater. Use row counter to help keep track of buttonhole placement.


Row 1 [RS]: Sl 1, yo, [k1, p1] twice, k1, place marker, k to last 7 sts, place marker, [k1, p1] twice, k1, k2tog.

Row 2 [WS]: Sl 1, yo, [p1, k1] twice, p1, k to last 7 sts, [p1, k1] twice, p1, k2tog.

Rows 3-4: Work as for Rows 1-2.

These rows set pattern for front bands. From this point on, work sts before first marker and after last marker in pattern as set.

Establish Rizotto Pattern:
Row 5 [RS]: Work in pattern to marker, k to last marker (Row 1 of Rizotto Pattern), work in pattern to end.

Row 6 [WS]: Work in pattern to marker, work Row 2 of Rizotto Pattern to last marker, work in pattern to end.

These 2 rows set pattern for lower body. From this point on, work sts between markers in Rizotto Pattern as set.

Sizes XS, S, M, L Only:
Work 2 more rows in pattern (these will be Rows 7 and 8).

All Sizes:
Buttonhole Row 1 [RS]: Sl 1, yo, k1, p1, BO 1 st, work in pattern to end.
Buttonhole Row 2 [WS]: Work in pattern to bound off st, yo, work in pattern to end.

The first buttonhole was worked beginning on Row 9[9, 9, 9, 7, 7, 7]. As you work the lower body, work three more buttonholes, working Buttonhole Row 1 on the rows indicated for your size below.
Sizes XS, S, M, L: Rows 23, 37, 51
Sizes 1X, 2X, 3X: Rows 23, 39, 55

Continue in pattern until you have completed Row 22[22, 22, 22, 26, 26, 26]. You will have just worked Row 2 of Rizotto Pattern.

Shape Waist:
Next Row [RS]: Work in pattern to marker, k14[16, 19, 20, 22, 24, 26], SKP, k2tog, k32[36, 40, 44, 48, 52, 56], SKP, k2tog, k14[16, 19, 20, 22, 24, 26], work in pattern to end. 77[85, 93, 101, 109, 117, 125] sts.

Continue in pattern until you have completed Row 53[53, 53, 57, 57, 57, 57]; work measures approx. 15[15, 15, 16, 16, 16, 16] inches. You will have just worked Row 1 of Rizotto Pattern.

Next Row [WS]: Work in pattern to marker, work 14[16, 18, 20, 22, 24, 26] sts in pattern, BO 4 sts, work in pattern until there are 28[32, 36, 40, 44, 48, 52] sts on right needle after bound off sts, BO 4 sts, work in pattern to end.

Set work aside. Do not break yarn; begin sleeve with new ball of yarn.

SLEEVES
Using straight needles or short circular needle, CO 24[26, 30, 32, 36, 42, 46] sts.

K 4 rows.

Work Rows 1-4 of Rizotto Pattern.

Increase Row [RS]: Kfb, k to last 2 sts, kfb, k1.

Work 9 rows in pattern. Note that in order to maintain st pattern, the pattern row worked directly after the increase row will be the same as the pattern row worked directly before the increase row (ie. after working first increase row, work Row 4 of Rizotto Pattern once more).

Repeat these 10 rows three times, then work Increase Row once more. 34[36, 40, 42, 46, 52, 56] sts.

Continue in pattern until work measures 14.5[14.5, 14.5, 15.5, 15.5, 15.5, 15.5] inches or desired length to underarm, ending with Row 3 of Rizotto Pattern (a RS row).

Next Row [WS]: BO 3 sts, work in pattern to last 3 sts, BO 3 sts.
Place remaining 28[30, 34, 36, 40, 46, 50] sts on stitch holder.

Make a second sleeve in the same way.

YOKE
In Joining Row, sts of lower body and sleeves are worked together onto long circular needle. When working sleeve sts, be sure RS is facing. Use ball of yarn attached to right front edge of lower body.

Important: For sizes L, 1X, 2X, 3X only, count rows. Joining Row will be Row 1. Work Buttonhole Row on Row -[-, -, 9, 13, 13, 13].

Joining Row/Row 1 [RS]: Work in pattern to first set of bound off sts, place marker, k sts of one sleeve, place marker, k to next set of bound off sts, place marker, k sts of remaining sleeve, place marker, work in pattern to end. 125[137, 153, 165, 181, 201, 217] sts: 21[23, 25, 27, 29, 31, 33] sts for right front, 28[30, 34, 36, 40, 46, 50] sts for each sleeve, 28[32, 36, 40, 44, 48, 52] sts for back, 20[22, 24, 26, 28, 30, 32] sts for left front. Six stitch markers on needle.

Work 3 rows in pattern. Note that when working some rows, it will be necessary to remove, then replace, each stitch marker in order to work the stitch pattern.

Shape Yoke:
Raglan Decrease Row [RS]: Work in pattern to first marker, [k to 2 sts before next marker, SKP, slip marker, k2tog] four times, work in pattern to end. 8 sts decreased.

Work 1 row in pattern.

Repeat these 2 rows 2[2, 4, 5, 7, 8, 9] times more. 101[113, 113, 117, 117, 129, 137] sts: 17[19, 19, 20, 20, 21, 22] sts for right front, 22[24, 24, 24, 24, 28, 30] sts for each sleeve, 22[26, 26, 28, 28, 30, 32] sts for back, 18[20, 20, 21, 21, 22, 23] sts for left front.

Shape Neckline:
Note: Continue working raglan decreases before and after markers as established while shaping neckline.

BO 6 sts at beginning of next 2 rows, removing first and last markers. 80[92, 92, 96, 96, 108, 116] sts.

BO 2 sts at beginning of next 4[6, 6, 6, 6, 8, 8] rows, removing first and fourth markers when working last row.
56[56, 56, 60, 60, 60, 68] sts: 4[3, 3, 4, 4, 2, 3] sts for each front, 16[16, 16, 16, 16, 18, 20] sts for each sleeve, 16[18, 18, 20, 20, 20, 22] sts for back. Two stitch markers remain.

Next Row [RS]: BO 2 sts, [k to 2 sts before next marker, SKP, slip marker, k2tog] twice, k to end. 6 sts decreased.

Next Row [WS]: BO 2 sts, work in pattern to end.

Repeat these 2 rows 3[3, 3, 3, 3, 2, 2] times more. 24[24, 24, 28, 28, 36, 42] sts: 8[7, 7, 8, 8, 11, 14] sts for each sleeve, 8[10, 10, 12, 12, 14, 16] sts for back.

BO all sts.

COLLAR
Use tape measure to measure length of neckline edge, including front bands. The collar will be knit to this length.

Using straight needles or shorter circular needle, CO 27 sts.
All Rows: Sl 1, yo, [k1, p1] to last 2 sts, k2tog.
Work in pattern until work measures 1 inch less than desired collar length.

Buttonhole Row 1: Sl 1, yo, k1, p1, k1, BO next st, work in pattern to last 6 sts, BO next st, work in pattern to end.
Buttonhole Row 2: [Work in pattern to bound off st, yo] twice, work in pattern to end.
Work 3 more rows in pattern. BO all sts.

spacer

FINISHING
Sew sleeve seams. Sew sleeves to body at underarms.
Aligning buttonhole edge of collar with front buttonhole band, pin collar to neckline edge of jacket. Sew in place.

Weave in ends and block jacket – see Pattern Notes for recommended blocking technique. Keep ribbed collar and front bands as dry as possible to avoid stretching.

Sew buttons to front band and collar edge, opposite buttonholes. Collar button should be sewn opposite lower collar buttonhole; there is no button opposite upper collar buttonhole. When jacket is buttoned, upper corner of collar may be buttoned to lower collar button, or to a lower button (see photos).

spacerimage
ABOUT THE DESIGNER

Karina lives in NYC. She is currently working towards a Masters in Math Education and spends her free time designing, dancing, and turning everyone she knows into a knitting enthusiast.

Check out more of her designs on Ravelry!


spacer