
|
|
 |
|
|
 |
(pronunciation: ma-eva) I got inspired by those new versions of gussets. After looking at many, many stitch patterns and some nights worth of creative sleep, I woke with this design in my head. From the toe emerges a cable, broadening to the whole instep. Then the gusset divides it. Those cables give some interest, but are also entirely doable by a not-so-experienced knitter. The leg part contains small seed stitch ribs, which break that sometimes boring stockinette stitch. |
 |
|
|
SIZE |
|
FINISHED MEASUREMENTS |
|
MATERIALS Notions |
|
GAUGE |
34 sts/50 rounds = 4 inches in stockinette stitch |
|
PATTERN NOTES |
|
Wrap & Turn [W&T] – used when working
short rows
To wrap and turn on a RS row, knit to point specified in pattern,
bring yarn to front of work between needles, slip next stitch
to right-hand needle, bring yarn around this stitch to back of
work, slip stitch back to left-hand needle, turn work to begin
purling back in the other direction.
To wrap and turn on a WS row, purl to point specified in pattern,
bring yarn to back of work between needles, slip next stitch
to right-hand needle, bring yarn around this stitch to front
of work, slip stitch back to left-hand needle, turn work to begin
knitting back in the other direction.
If you have a heavier gauge (fewer rounds), you need to reduce some rounds in the pattern to get socks to the right length. There are several ways to do this: You can omit one or two repeats of the cabling (1 repeat = 6 rounds) on the foot. Or you can increase in every second round at the gusset instead of every third. If you need to add a few rounds, you can do some plain knitted rounds after the toe and before starting the pattern on the foot. |
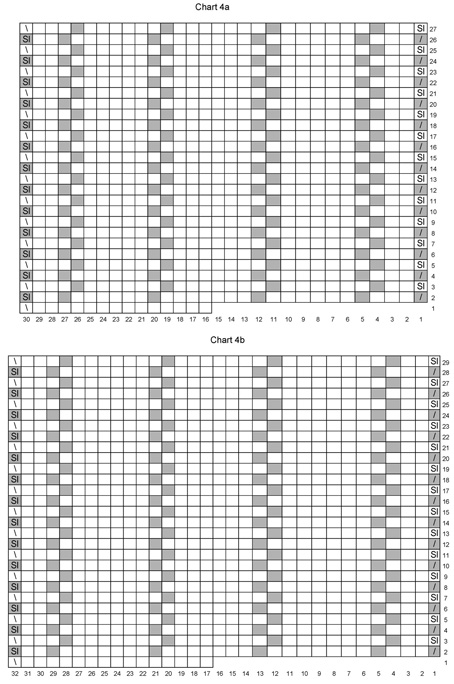
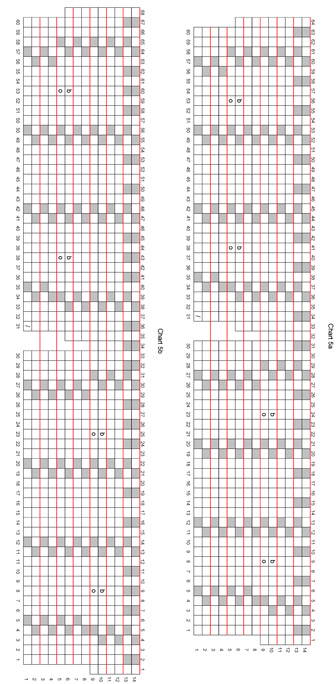
Chart
1 • Charts
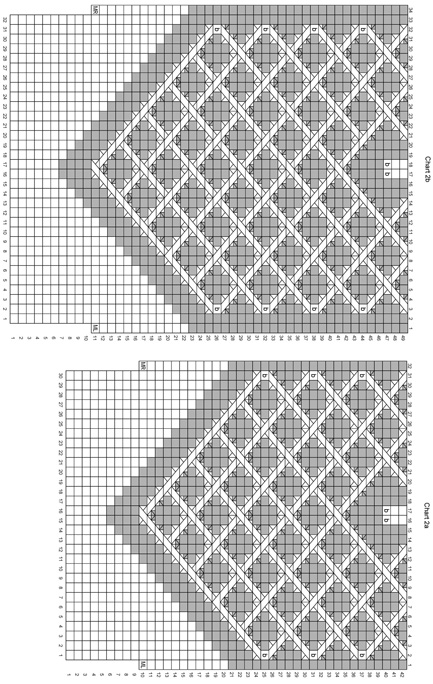
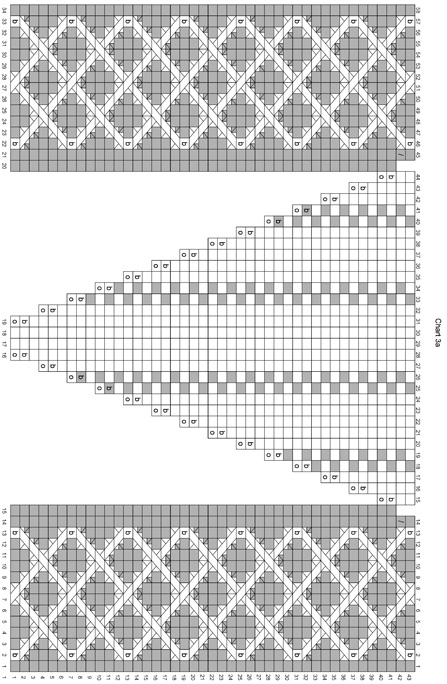
2a+b • Chart 3a •
Chart 3b • Charts
4a+b • Charts 5a+b |
|
DIRECTIONS Toe round: Work chart 1 twice across round. Foot round: Starting with row 6[1, 6, 1] work chart 2a[2a, 2b, 2b] for the instep, knit to end of round. Work until round 42[42, 49, 49] of chart 2a or 2b are complete. 62[62, 66, 66] sts. Gusset Check the length of your sock: it should be 7.5[7.75, 8.25, 8.75] inches long. If it is too short, work additional rounds continuing the cable pattern. If it is too long, unfortunately you may want to undo a few rounds and adjust the gusset. Add or reduce rounds only in even numbers, remembering to stop partway through the final round. Starting at stitch 16[16, 17, 17] of the sole, where you left
off after the gusset, proceed as follows: For all sizes: For sizes M & L: For sizes XS and S: Now work one round, using the last round given in chart 3a[3a, 3b, 3b] for the instep, and knitting the sole stitches, knitting the wrapped stitches together with their wraps. Stop at center back, that is after stitch 15[15, 16, 16] of the sole. Heel flapStarting at stitch 16[16, 17, 17] of the sole, follow chart 4a[4a, 4b, 4b] while working on the 30[30, 32, 32] “sole” stitches only. Row 1 is worked across the remaining 15[15, 16,16] sts on the sole. For ease of working, slip all heel stitches to a single needle or holder. The sole stitches become the back part of the leg. To avoid holes, the last gusset stitch gets decreased working in rounds again. This is included in the leg chart. Stop where the chart ends. This is new beginning of round. You now have 61[61, 65, 65] stitches. LegLeg round: Work chart 5a[5a, 5b, 5b] around. Note: Round 1 contains the last decrease for the heel flap. Work Rounds 1-4 of chart 5a or b, then repeat Rounds 3-4 twice more. Work Rounds 5-8, then repeat rounds 7-8 18 times more. 62[62, 66, 66] stitches. Work Rounds 9-12, then repeat Rounds 11-12 14 times more. 64[64, 68, 68] stitches. Work Rounds 13-14, then repeat 9 times more or until leg is desired length. Bind off loosely and work a second sock. |
|
FINISHING |
| ABOUT THE DESIGNER |
|
Stefanie got introduced to knitting by her Mom at the age of about 8. Since then, she's added lots of techniques and other crafts to her repertoire, thanks to books and the internet. She blogs here [in German], and you can find her on Ravelry. |
|
Pattern & images © 2011 Stefanie Bold. Contact Stefanie |
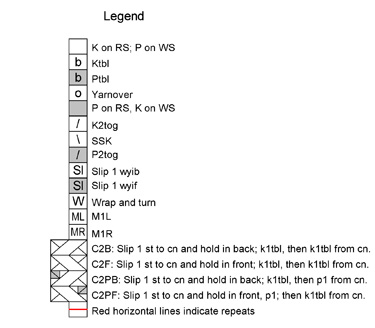 M1L: Left-leaning Lifted Increase. Insert your
left needle, from front to back, under the left leg of the stitch
two rows below the stitch just knit. Knit into the back of this
stitch.
M1L: Left-leaning Lifted Increase. Insert your
left needle, from front to back, under the left leg of the stitch
two rows below the stitch just knit. Knit into the back of this
stitch.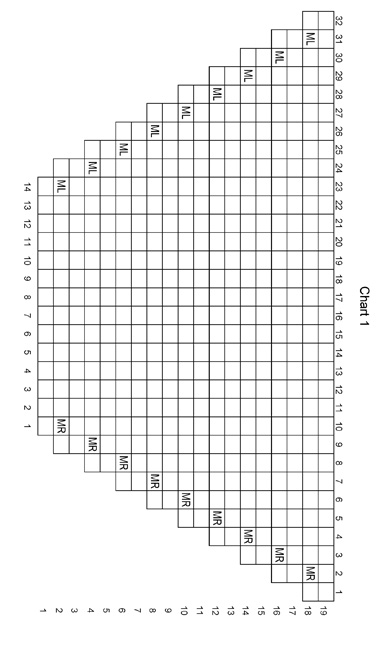