
|
|
|

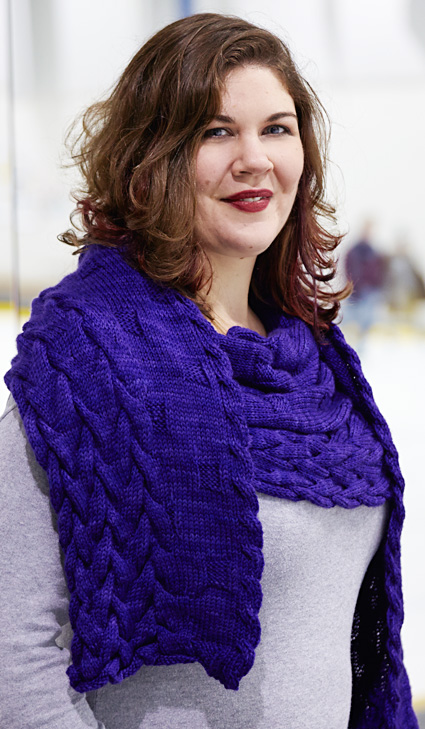
When I first saw the stitch pattern featured in the body of this shawl, I was amazed that simple blocks of reverse stockinette could create the optical illusion of circles in the fabric. I knew instantly that I wanted to use this op-art stitch pattern in combination with a densely cabled pattern -- I was curious to see how the patterns would play off each other. The result is this elongated crescent shawl. The dense cables along the bottom edge provide weight to ensure the piece stays in place while the stockinette sections lend drape to the piece. The gently scalloped cables along the upper edge provide a beautiful frame to the face. Work the shawl in a squishy worsted weight yarn in a luminescent shade and you'll be sure to chase away any winter blues. The stitch patterns, used in a different manner for the matching infinity cowl, have a very different effect.
|
||
|
|
||
|
SIZE |
|
|
FINISHED MEASUREMENTS |
|
MATERIALS Notions |
|
GAUGE |
| 20 sts/27.5 rows = 4 inches in Chart A 20.5 sts/29 rows = 4 inches in st st |
|
PATTERN NOTES |
The crescent shawl is knit from end to end. Periodic short rows are worked in the Chart C sections to compensate for the row gauge difference between the two stitch patterns. CO using a stretchy cast on like the Long Tail Cast-On or the Twisted German Cast On. Two excellent BO choices are Jeny's Surprisingly Stretchy Bind-Off or the Knit Lace Bind-Off.
C7PL: Slip next 3 sts on to cable needle and hold in front, slip next st on to second cable needle and hold in back. (K1, p1, k1), p the st from the cable needle in the back, then (k1, p1, k1) the 3 sts on the cable needle in front. M1: To make it easy to incorporate the stitches into the pattern, we recommend the backwards loop (e-wrap) make 1. When working the decrease section, the decrease to be used will be set by where you are in the pattern. Two knit stitches should be decreased using k2tog and two purl stitches should be decreased using p2tog. When decreasing a knit and purl stitch, select a decrease based on how the resulting stitch works in the pattern. |
|
|
|
DIRECTIONS First setup row [RS]: (K1, p1) 4 times, k2, pm (for start of Chart B), k4, m1, k2, pm (for start of Chart C), k to end of row. 62 sts. Row 1 [RS]: Work R1 of Chart A, work R1 of Chart B, work R1 of Chart C three times.
Charts are now set. NOTE: Read ahead before you proceed, as short rows will be worked at various points along the way. Rows 3 - 8: Work 6 rows even in pattern as set.
Once the 29 repeats are complete, proceed as follows: Size L Only: Both Sizes: Work 13 rows even, working w&t as before on the seventh row (a WS row). Decrease section: Repeat these last 2 rows 4 more times. 101 sts. Work a decrease row followed by 3 even rows 9 times. 92 sts. Both sizes: BO loosely (see Pattern notes). |
|
|
FINISHING Thread blocking wires through the outer edge of the scallops along the top edge of the shawl. Thread flexible blocking wires through the lower edge of the shawl at the widest points of Chart B. Gently stretch the middle of the piece to the centre back depth given on the schematic and pin in place. Shaping the piece into a crescent and ensuring both wings of the shawl are even, pin the lower edge into place along the blocking wire. Do not unpin until completely dry. If you've worked the piece in superwash wool, unpin the piece when it is still partially damp and place in dryer set at medium heat. Dry for 15-20 minutes, checking the piece at 5 minute intervals. Do not overdry! |
| ABOUT THE DESIGNER |
|
Janelle has been an avid knitter for the past 30 years, been teaching for 6 years and designing for 4 years. Her ongoing fascination is with Japanese Stitch Patterns. She received the 2011-12 Sally Melville Award from the K-W Knitters' Guild, awarded (by members' votes) to "the knitter who has most inspired its members." She rarely goes anywhere without a book and her knitting. |
|
Pattern & images © 2014 Janelle Martin. Contact Janelle |