Knitty: little purls of wisdom
Title
beauty shot

Tangy

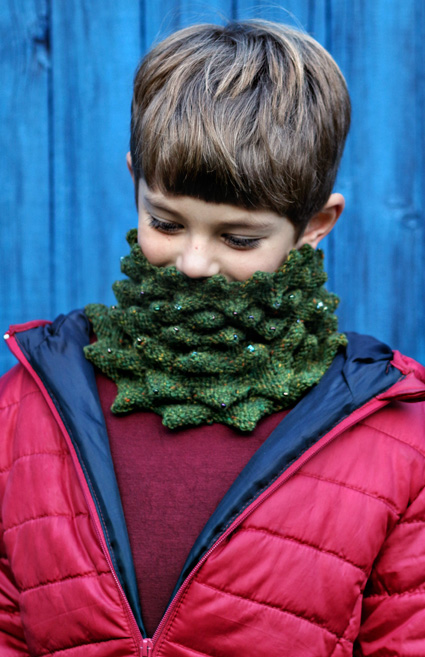
What do you do when you're far from home and haven't got room for a tree? Or when it's the night before the annual end-of-year office party and you haven't got a clue what to give your holiday exchange giftee? You knit up one of these.

Tree is a toasty cowl that doubles up as a miniature tree. Beads on the tips of the branches add a festive air, and its flared shape helps it sit nicely on the mantelpiece or the shoulders.

The stitch pattern is very simple. The same basic row is repeated for a gradually increasing number of rows and then alternated to create points in the fabric. The stitch marker jumps around most rows like a little squirrel, and when offsetting or increasing, the first or last repeat of the row sometimes takes some attention, but other than that it's a straightforward, engaging little knit that can be finished in a day.

(Knit it up in grey and it might even pass for a Dalek.)

spacer model: Thomas Strong
spacer photos: Nim Teasdale
 

SIZE
S[L]
shown in size S

FINISHED MEASUREMENTS
Lower Edge circumference: 21[25] inches
Upper Edge circumference: 13[17] inches
Height: 6 inches

spacer

MATERIALS
Yarn

spacer Rowan Tweed [100% wool; 118/m per 50g skein]; color: Hubberholme; 2 skeins (you may not need the second skein...but some knitters are reporting that they did)

Recommended needle size
[always use a needle size that gives you the gauge listed below — every knitter's gauge is unique]
spacer 1 24-inch US 4/3.5mm circular needle
spacer 1 24-inch US 7/4.5mm circular needle

Notions
spacer stitch marker – a removable marker is best, as you’ll be moving it around
spacer 72[84] 6/0 beads: choose beads that contrast with your yarn – mixed colors work well. Beads shown are iridescent plum and grey.
spacer Crochet hook fine enough to suit beads (1mm or finer)
spacer yarn needle

spacer

GAUGE
20 sts/28 rounds = 4 inches in stockinette stitch
35 sts/28 rounds = 4 inches in pattern stitch
Note: Exact gauge is not critical for this project, but working at a different gauge will affect finished size and yarn usage.


PATTERN NOTES
[Knitty's list of standard abbreviations and techniques can be found here.]

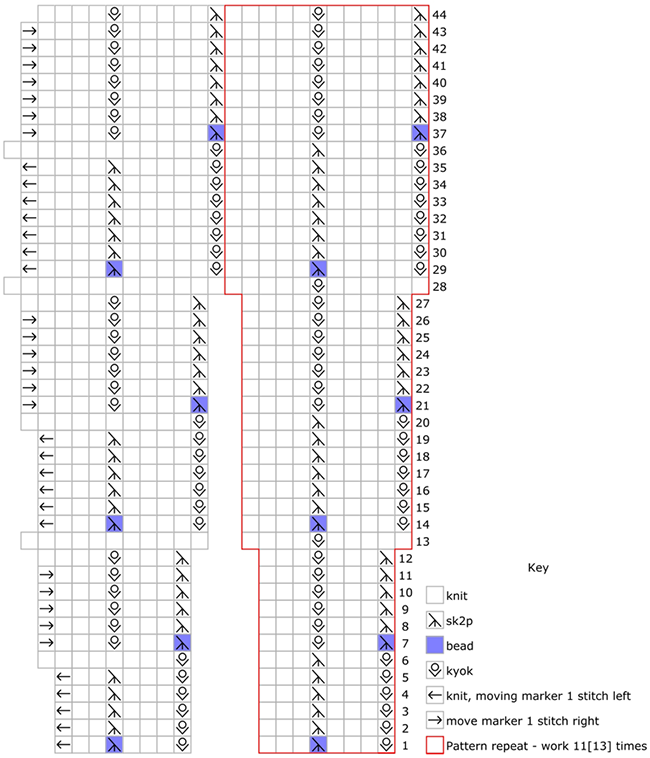
This stitch pattern uses a short sequence of increases and decreases which are stacked vertically for a certain number of rows. In each set, the kyok should be worked into the central yo of the kyok below, and the middle st of the sk2p is the top of the decrease from the row below, and then this pattern is offset so that the increase and decrease columns are swapped over. Note that when offsetting (e.g. rounds 7-12), in the last repeat the kyok will be 1 st to the right of the decrease.

The base pattern is a 10-stitch repeat and the CO is a multiple of 10 stitches less one. As you work, and the stitch count and repeat size increases, you’re always one stitch short of a full repeat. This is so that the start of round shifts to maintain the proper pattern alignment. The use of the marker is important, to help you keep track of where you are. For some rounds, you will be working 1 stitch past the start of the round, and replacing the marker at that point – moving the stitch marker one stitch left. For other rounds, you will move the marker right, to before those final stitches. Because of this, it’s best to use a removable stitch marker for the start of the round.

Length can be adjusted by casting on more or less repeats of the lace pattern, in multiples of 10 sts. Each repeat adds approx 1 inch to the width of the cowl, and requires about 11 yds of yarn. The small size (pictured) uses 135 yds, and the large uses 157 yds.

Casting on and binding off with larger needles allows the edging to form points, and helps prevent rolling. You can alternately use Jeny’s Surprisingly Stretchy BO, but you don’t need to use the larger needle for this.

kyok: (K1, yo, k1) all into the same st, making three sts from one.

sk2p & bead: work the decrease, and then use the crochet hook to place a bead on the resulting stitch, place bead on crochet hook, use hook to lift st just worked off the needle, slide bead onto st, then replace stitch on right needle.

chart

DIRECTIONS
Using larger needle, CO 119[139] sts. Place marker and join for working in the round.

Change to smaller needle, and work Pattern (from chart or written instructions) around.

Rnd 1: [Kyok, k3, sk2p & bead, k3] 12[14] times, shifting marker 1 st left to work final st in rnd.

Rnds 2-5: [Kyok, k3, sk2p, k3] 12[14] times, shifting marker 1 st left to work final st in rnd.

Rnd 6: [Kyok, k3, sk2p, k3] 11[13] times, kyok, k8. 121[141] sts.

Rnd 7: [Sk2p & bead, k3, kyok, k3] 12[14] times, this is the start of new round. Shift marker 1 st right to this position.  

Rnds 8-11: [Sk2p, k3, kyok, k3] 12[14] times, this is the start of new round. Shift marker 1 st right to this position.

Rnds 12: [Sk2p, k3, kyok, k3] 12[14] times, k1.

Rnd 13: [K5, kyok, k4] 11[13] times, k11. 143[167] sts.

Rnd 14: [Kyok, k4, sk2p & bead, k4] 12[14] times, shifting marker 1 st left to work final st in rnd.

Rnds 15-19: [Kyok, k4, sk2p, k4] 12[14] times, shifting marker 1 st left to work final st in rnd.
Rnds 20: [Kyok, k4, sk2p, k4] 11[13] times, kyok, k10. 145[169] sts.

Rnds 21: [Sk2p & bead, k4, kyok, k4] 12[14] times, this is the start of new round. Shift marker 1 st right to this position.  

Rnds 22-26: [Sk2p, k4, kyok, k4] 12[14] times, this is the start of new round. Shift marker 1 st right to this position.  

Rnd 27: [Sk2p, k4, kyok, k4] 12[14] times, k1.

Rnd 28: [K6, kyok, k5] 11[13] times, k13. 167[195] sts.

Rnd 29: [Kyok, k5, sk2p & bead, k5] 12[14] times, shifting marker 1 st left to work final st in rnd.

Rnds 30-35: [Kyok, k5, sk2p, k5] 12[14] times, shifting marker 1 st left to work final st in rnd.

Rnd 36: [Kyok, k5, sk2p, k5] 11[12] times, kyok, k12. 169[197] sts.

Rnds 37: [Sk2p & bead, k5, kyok, k5] 12[14] times, this is the start of new round. Shift marker 1 st right to this position.  

Rnds 38-43: [Sk2p, k5, kyok, k5] 12[14] times, this is the start of new round. Shift marker 1 st right to this position.  

Rnd 44: [Sk2p, k5, kyok, k5] 12[14] times. This leaves you one stitch before the existing start of round marker. Remove the marker, and then use this stitch to start the bind off.

spacer

FINISHING
Change back to larger needles and bind off using your preferred stretchy bind off.
Turn inside out, or pop the points out to the stockinette side.
Block gently if you wish, laying flat and poking out the points if they flatten out.

spacer
ABOUT THE DESIGNER

Nim is a laceaholic who knits in search of (elusive) sanity and can still be found up to her elbows in yarn and pointy sticks even while travelling the globe in a very small campervan for a year with 3 young (grubby) children.

Find her on Ravelry.

spacer