Elf Mouse, a free knitting pattern from Knitty.com.
INTRODUCTION
Elf Mouse
 by Manon Lemaire

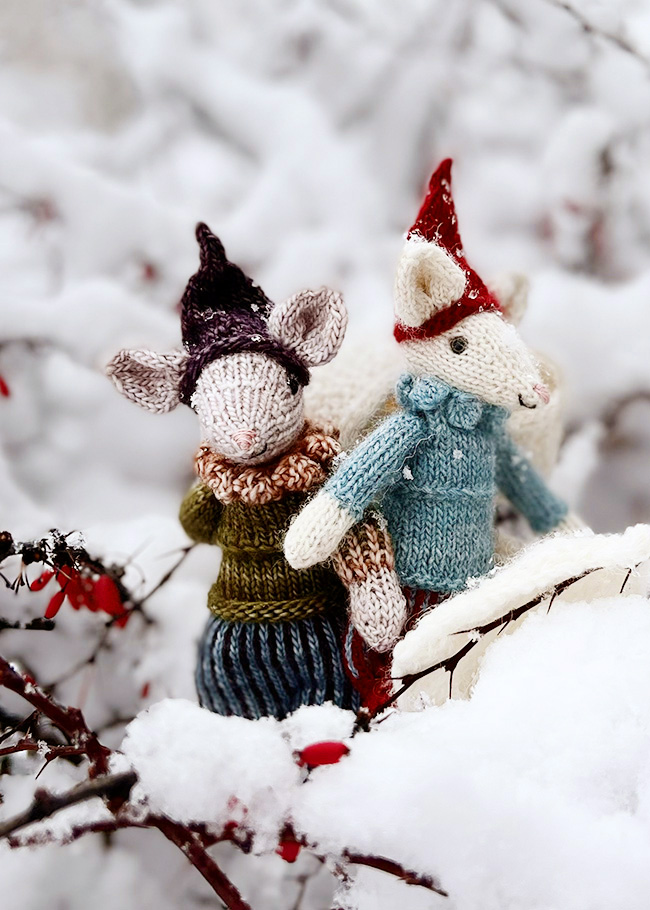
I present to you Casper and Parch!
These two elf mice are adorable, have such unique personalities, and are so much fun to knit up!
Casper is very festive and outgoing in a red and blue outfit, whereas Parch has more of a forest-dweller vibe with a woodsy color scheme.
At just 6 inches/ 15cm tall, this project is a great stashbuster and it knits up pretty quickly!
 photos: Manon Lemaire
SIZE
One
FINISHED MEASUREMENTS
At gauge given, mouse is 6 inches / 15cm tall
MATERIALS
Casper – Red Hat and Blue Shirt
Blue Sky Fibers Woolstok Light [100% fine Highland Wool; 218yd/199m per 50g skein];
![]() [MC] 2303 Highland Fleece; approximately 0.2 skeins
[MC] 2303 Highland Fleece; approximately 0.2 skeins
![]() [CC1] 2320 Spring Ice; approximately 0.2 skeins
[CC1] 2320 Spring Ice; approximately 0.2 skeins
![]() [CC2] 2315 Red Rock; approximately 0.2 skeins
[CC2] 2315 Red Rock; approximately 0.2 skeins
Parch – Purple Hat and Green Shirt
Madelinetosh Unicorn Tails [100% Merino Wool; 52yd/48m per 14g skein];
![]() [MC] Dustweaver; approximately 0.5 skeins
[MC] Dustweaver; approximately 0.5 skeins
![]() [CC1] Oak; approximately 0.3 skeins
[CC1] Oak; approximately 0.3 skeins
![]() [CC2] Penumbra; approximately 0.5 skeins
[CC2] Penumbra; approximately 0.5 skeins
![]() [CC3] Well Water; approximately 0.3 skeins
[CC3] Well Water; approximately 0.3 skeins
![]() [CC4] Filtered Day Dreams; approximately 0.3 skeins
[CC4] Filtered Day Dreams; approximately 0.3 skeins
Yarn Characteristics
Casper is knit in a fingering-weight 100% Fine Highland Wool single ply.
Parch is knit in a fingering-weight 100% Superwash Merino Wool single ply.
For this project, any fingering-weight yarn can be used. It is possible to use a thicker yarn as long as all colours used are of the same weight and the needle size is adjusted accordingly. Choose a needle a few sizes smaller than recommend for the yarn, so that the stuffing stays in. For example, a DK-weight yarn and US #2.5/3mm needles would work very well for this project.
Colour recommendations
I recommend 3 contrasting colours: a light MC and a medium and a dark for the contrast colours.
Recommended needle size
[always use a needle size that gives you the gauge listed below - every knitter's gauge is unique]
![]() US #1/2.25mm needles for small circumference in the round Note: because of the small stitch counts, short DPNs are recommended for this project
US #1/2.25mm needles for small circumference in the round Note: because of the small stitch counts, short DPNs are recommended for this project
![]() US #1/2.25mm needles for working flat
US #1/2.25mm needles for working flat
Notions
![]() tapestry needle
tapestry needle
![]() 5 removable stitch markers
5 removable stitch markers
![]() fiber fill, corn fiber or carded wool for stuffing
fiber fill, corn fiber or carded wool for stuffing
![]() black and light pink embroidery floss
black and light pink embroidery floss
![]() embroidery needle
embroidery needle
![]() optional: 4.5mm safety eyes, a pencil with an eraser end to help with stuffing
optional: 4.5mm safety eyes, a pencil with an eraser end to help with stuffing
GAUGE
40 sts /52 rounds = 4 inches/10cm in stockinette stitch
The exact gauge is not crucial for this project as long as the fabric is tightly knit so the stuffing is not visible through the stitches.
PATTERN NOTES
[Knitty's list of standard abbreviations and techniques can be found here.]
The elf mouse is knit in the round, bottom up. There is minimal sewing.
The arms and tail are worked separately, then knitted with body.
The ears are knit by picking up marked stitches.
The eyes can be embroidered or 4.5mm safety eyes can be inserted
The nose and mouth are embroidered.
When stuffing, add small amounts at a time.
A pencil eraser end is a great stuffing tool.
The hat is knit in the round.
The tunic and pants are knit flat, then seamed.
Techniques:
- CDD: Slip 2 sts together (as if for k2tog), k1, and pass 2 slipped sts over st just knit. 2 sts decreased.
- Make DS (double stitch): With yarn in front, slip next st purlwise and then tug on yarn to bring both legs of the stitch up onto the needle; bring the yarn over to the back, and then into position for the next stitch; if the next stitch is a knit, leave it at the back; if the next stitch is a purl, bring it around between the tips of the needles to the front.
- Knitting 2 Stitches Together on 2 Parallel Needles
Place extra needle with tail or arm sts on hold in front of and parallel to the left needle, insert right needle through first stitch of extra needle and first stitch of left needle and knit both these stitches together. Repeat as instructed. - Vikkel Braid video tutorial.
Set up: S1, M1R.
Step 1: Slip 1 st from right to left needle,
Step 2: Knit second st through back loop, leaving it on the needle
Step 3: Knit first st through front loop (the regular way) loosely, and let both stitches move to right needle
Repeat Steps 1-3 until 2 sts remain, k these 2 together through back loop. - MB: Make Bobble
Row 1 [RS]: Work (k1, yo, k1, yo, k1) in the same st. Turn work.
Row 2 [WS]: P1, p1tbl, p1, p1tbl, p1. Turn work.
Row 3: K5. Turn work.
Row 4: P5. Turn work.
Row 5: K5, *pass second st on the right needle over the first st; repeat from * 3 more times, until 1 st rems. Do not turn. - Bobble Bind Off video tutorial
- German Short Rows video tutorial
DIRECTIONS
Head
Using MC and the Long Tail method, CO 6 sts, making sure to leave yourself a tail of about 4 inches/10 cm. Distribute sts across needles as you prefer and join for working in the round.
Round 1: Knit.
Round 2: Kfb, k1, kfb 4 times. 11 sts.
Rounds 3-5: Knit 3 rounds.
Round 6, increase: K3, (kfb, k1) 4 times. 15 sts.
Rounds 7-8: Knit 2 rounds.
Use yarn end to gather CO loops using tapestry needle and hide it inside work; weave in end.
Round 9: K3, (kfb, k3, kfb, k1) 2 times. 19 sts.
Round 10: Kfb 2 times, k to end. 21 sts.
Round 11: Knit.
Round 12: K5, (kfb, k5, kfb, k1) 2 times. 25 sts.
Round 13: Knit.
Round 14, place markers for eyes: Kfb, k2, kfb, k4, place removeable marker in st just knitted, k to 2 sts before end of round, place removeable marker in st just knitted, k to end. 27 sts.
Round 15: K7, (kfb, k7, kfb, k1) 2 times. 31 sts.
Round 16: Knit.
Round 17, place markers for ears: K8, place removeable marker in st just knitted, k to end of round, place removeable marker in st just knitted.
Rounds 18-19: Knit 2 rounds.
If using safety eyes, insert them at this time. Embroidered features will be worked when head is finished and stuffed.
Round 20: (K2, k2tog) 7 times, k1, k2tog. 23 sts.
Rounds 21-23: Knit 3 rnds.
Round 24: (K1, k2tog) 7 times, k2tog. 15 sts.
Stuff head.
Round 25: Knit.
Round 26: K2tog 7 times, k1. 8 sts.
Cut yarn. Pass yarn end through sts with tapestry needle. Finish stuffing head. Leave hole open for now.
Ears
Work 2, one for each marker placed in Round 17 above.
Using ear marker placement as a reference, pick up (but do not knit) 4 sts at a slight angle as follows: 1 strand of the marked st and 3 more sts towards side of head, making sure the last one is 1 round back from the marked stitch, to set the ear at an angle. See Figure 1.
Figure 1
Using a second needle, pick up (but do not knit) 4 strands just behind the first needle (towards back of head).
With back of head facing you, join MC. Leave the stitches on two needles as set for now.
Round 1: Kfb 8 times. 16 sts.
If working on traditional DPNs, distribute your sts across three needles at this point.
Round 2: Knit.
Round 3: (K1, M1R, k6, M1L, k1) 2 times. 20 sts.
Round 4: Knit.
Round 5: (K1, M1R, k8, M1L, k1) 2 times. 24 sts.
Round 6: Knit.
Round 7, Left Ear ONLY: K1, ssk, k18, k2tog, k1. 22 sts.
Round 7, Right Ear ONLY: K9, k2tog, k2, ssk, k9. 22 sts.
Round 8: Knit.
Round 9: (K1, ssk, k5, k2tog, k1) 2 times. 18 sts.
Round 10, Left Ear ONLY: K1, ssk, k12, k2tog, k1. 16 sts.
Round 10, Right Ear ONLY: K6, k2tog, k2, ssk, k6. 16 sts.
Round 11: Knit.
Round 12: (Ssk 2 times, k2tog 2 times) 2 times. 8 sts.
Round 13, Left Ear ONLY: K2, k2tog, ssk, k2. 6 sts.
Round 13, Right Ear ONLY: Ssk, k4, k2tog. 6 sts.
Cut yarn. Close ear tip by passing yarn through sts with tapestry needle and cinching. Bring yarn inside ear and out at back of head. Use ear CO yarn end to sew a small pleat at base front of ear. See Figure 2.
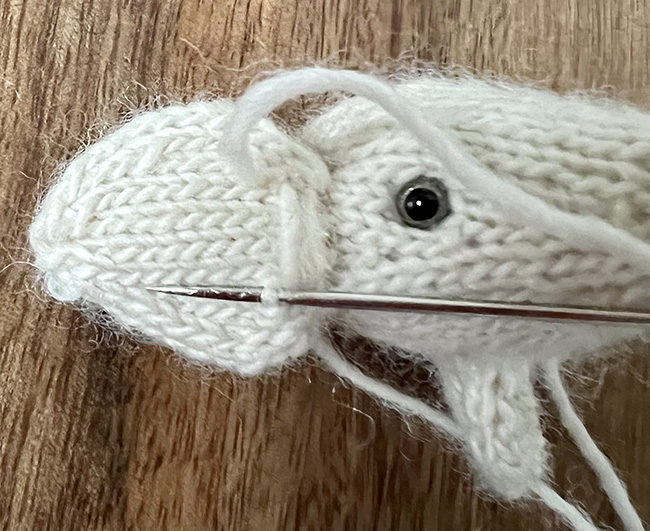
Figure 2
Poke end through to back of head. Tie a knot with other ear yarn end. Poke ends inside head.
Embroider Facial Features
Embroidered Eyes – If Not Using Safety Eyes
Using an embroidery needle and 14 inches (35 cm) of 3 strands of black embroidery thread, embroider eye using satin st, as follows:
Begin by stitching the width of the marked stitch 5-6 times. See Figure 3.
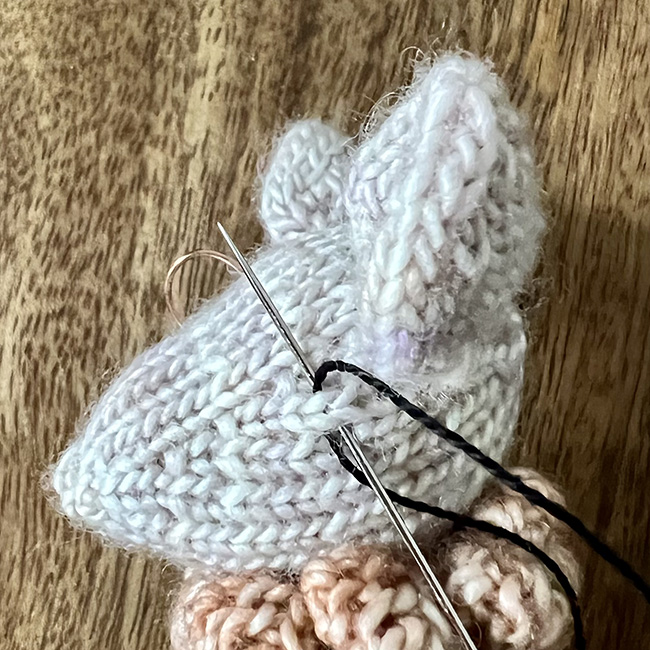
Figure 3
Then, st several sts above and under the shape to even it out. See Figure 4.
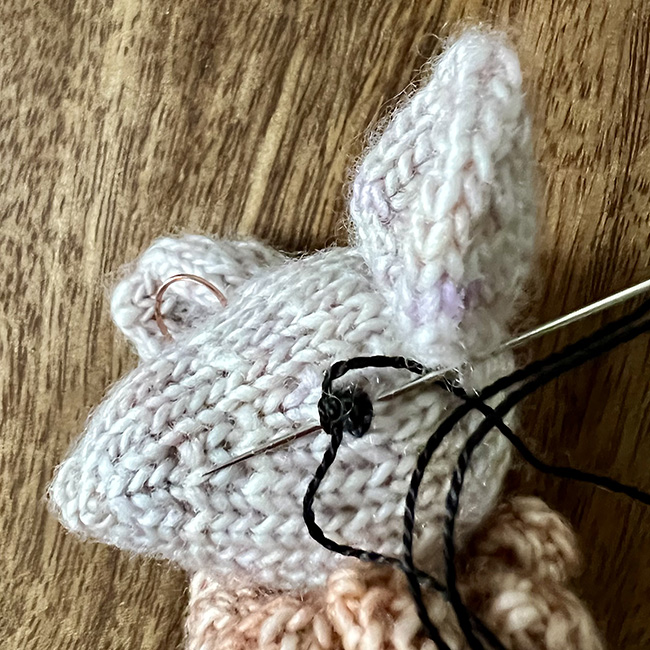
Figure 4
When happy with shape poke both ends out at back of head. Pull lightly, knot and hide ends inside head. It can be a circular or an oval shape. This is really up to you. The important thing is symmetry. You'll want to try to stitch two eyes of similar shape and size.
Nose
Using an embroidery needle and 14 inches (35 cm) of 3 strands of light pink embroidery floss, embroider nose using satin st. Leaving a 4 in (10cm) tail, begin under the nose and bring needle up on one side of the nose area. Embroider a small “V” shape, to outline the nose. Satin st horizontal lines back and forth to cover the nose area until the yarn below your sts is hidden and you are satisfied with the look. See Figure 5.
Figure 5
To finish, bring thread out under nose, in the same space as the other end. Pull lightly, knot and hide ends inside head.
Mouth
Using an embroidery needle and 8 inches (20 cm) of 3 strands of black embroidery thread embroider mouth under nose using running st, as follows:
Leaving a 4 inch/10 cm tail, insert needle near neck area lower down and exit near nose tip. See Figure 6.
Figure 6
Then, stitch a small vertical line under the nose. Exit one and a half sts to the left of the bottom of the line. Stitch back to center and exit needle on the other side of the vertical line one and a half sts away. See Figure 7.
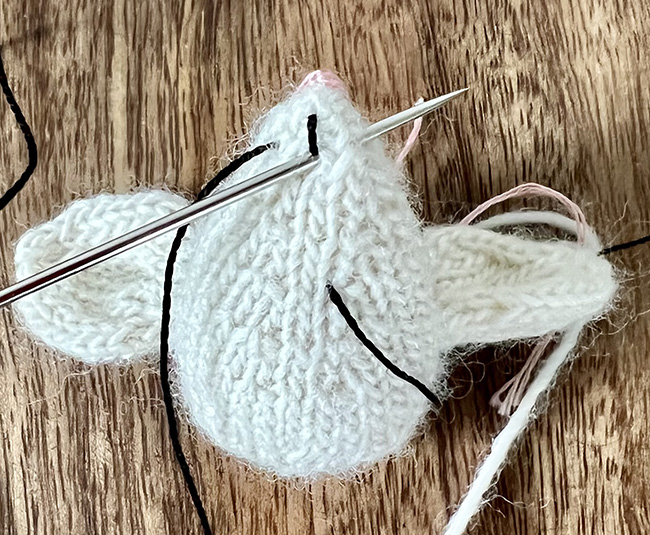
Figure 7
Stitch back to center once again to finish the shape. See Figure 8.
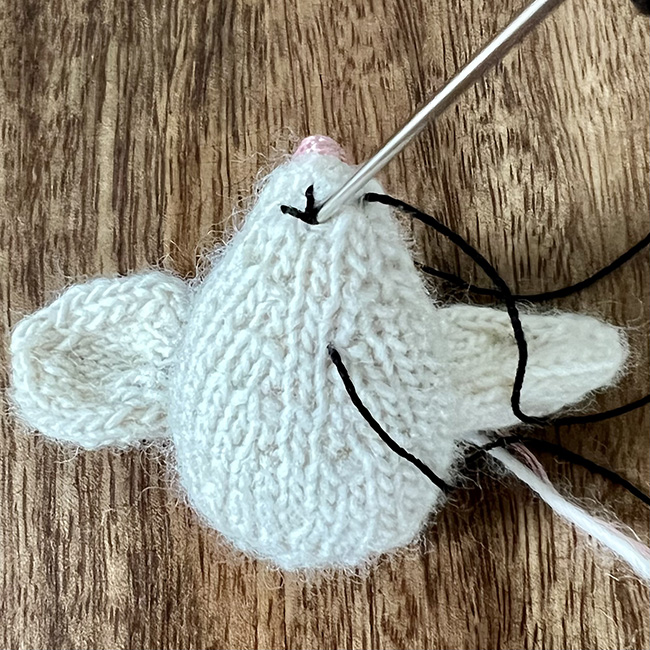
Figure 8
Push thread out to same space as other yarn end lower down. See Figure 9.

Figure 9
Pull lightly, secure and hide ends inside head.
Once facial features are embroidered, cinch back of head sts to close hole, secure and hide end inside head.
Arms
Using MC and the Long Tail method, CO 6 sts, making sure to leave yourself a tail of about 6 inches/15 cm. Distribute sts across needles as you prefer and join for working in the round.
Round 1: (K1, kfb) 3 times. 9 sts.
Round 2: Knit.
Round 3: (K2, kfb) 3 times. 12 sts.
Round 4-5: Knit 2 rounds.
Round 6: (K2, k2tog) 3 times. 9 sts.
Rounds 7-8: Knit 2 rounds.
Cut yarn, leaving a tail of about 4 inches/10 cm.
Use CO yarn end and tapestry needle to close hole by passing yarn through CO loops. Secure and weave in end inside. As you work the following rounds, pause a few times to lightly stuff the hand and arm; you should only stuff the lower two-thirds of the arm, leave the upper third unstuffed,
Join CC1. You may prefer to knot yarns ends because of the small circumference.
Round 9: Knit.
Round 10: Sl1, p to end.
Round 11: P1, k to end.
Secure color change yarn ends.
Round 12-24: Knit 13 rounds.
Finish stuffing.
Round 25: (K1, k2tog) 3 times. 6 sts.
Round 26: Knit.
Place first 3 sts on 1 needle and last 3 sts on another. Using an extra needle, join front and back of arm as follows: (K1 st from each needle tog) 3 times. 3 sts.
Cut yarn, leaving a tail of about 4 inches/10 cm. Place remaining 3 sts on waste yarn.
Tail
CO 3 sts with MC. Work i-cord as follows:
*K3; return these sts to left needle; repeat from * until you have worked 16 rows.
Next row: K2, kfb. 4 sts. Return them to left needle.
Work another 9 rows of i-cord.
Cut yarn leaving a 5-inch (12.5 cm) tail. Place sts on waste yarn.
Legs
Make 2
Using CC2 and the Long Tail method, CO 6 sts, making sure to leave yourself a tail of about 3-4 inches/8-10cm. Distribute sts across needles as you prefer and join for working in the round.
Round 1: (K1, kfb) 3 times. 9 sts.
Round 2: Knit.
Round 3: (K2, M1L, k2, M1R) 2 times, k1. 13 sts.
Round 4: Knit.
Round 5: K4, M1R, k5, M1L, k4. 15 sts.
Round 6: K6, M1R, k3, M1L, k6. 17 sts.
Rounds 7-8: Knit 2 rnds.
Round 9: K7, CDD, k7. 15 sts.
Round 10: K6, CDD, k6. 13 sts.
Round 11: K5, CDD, k5. 11 sts.
Round 12: K4, CDD, k4. 9 sts.
Round 13: Purl.
Cut yarn, leaving a tail of about 4 inches/10 cm. Gather CO sts with tapestry needle by passing yarn end through sts. Pass yarn to wrong side of fabric. Secure and weave in end.
As you work the following rounds, pause a few times to lightly stuff the foot and leg; you should leave the top half inch/1 cm unstuffed.
Join MC. You may prefer to knot yarns ends because of the small circumference.
Round 14: Knit.
Round 15: Sl1, k to end.
Secure color change yarn ends.
Rounds 16-26: Knit 11 rnds.
Round 27: (K3, M1L) 3 times. 12 sts.
Round 28: Knit.
Round 29: K3. Do not finish round.
For the first leg, cut yarn leaving an 8 inch (20 cm) tail. Finish stuffing, leaving the top half inch/1 cm unstuffed. This will be the left leg.
Then place sts parallel on 2 pieces of waste yarn or spare needles as follows: next 6 sts of rnd on waste yarn or spare needle for front of leg, and last 6 sts on waste yarn or spare needle for back of leg.
For the second leg, work as for the first, up to and including Round 29.
Do not cut yarn. Place a removable stitch marker in last k st. Finish stuffing, leaving the top half inch/1 cm unstuffed. This will be the right leg.
Then place sts parallel on 2 needles as follows: next 6 sts of rnd on one needle for front of leg, and last 6 sts on the second needle for back of leg.
Body
Set Up
See Figure 10.
Figure 10
Hold the needles with the second (the right) leg so that the back of the leg faces you; the working yarn will be on the left.
Place the 6 sts of the front of the first (the left) leg on the same needle as the front sts of the second leg, to the left. Place the 6 sts of the back of the first (the left) leg on a third needle. 24 sts total for the two legs. The start of the round is where the working yarn is positioned, between the two sets of back leg sts.
Join Legs
Round 1: K6, M1R, k5, k2tog, k5, M1l, k5; work k2tog on last st of round and first stitch of next. This is the new start of round. Reposition the marker.
Round 1: Knit.
Close and Join Legs
At this point, to allow legs to be mobile, we will sew several stitches on the wrong side of the work where the top of legs and the body meet, to bring front and back of each leg together.
Using yarn tail end of left leg, working 2 rounds down from the needles, pass tapestry needle through purl bumps on the inside of the work, alternating between front and back of leg stitches. Sew from one side of the body to the other. When you reach the center where the legs join, close the space, if any, with several stitches. It is important to stay level, working into the same round's purl bumps, as you sew across, so that the join is straight across and even. See Figure 11.
Figure 11
Secure and weave in end.
Continue knitting
Round 2: (K5, M1L, k2, M1R, k5) 2 times. 28 sts.
Rounds 3-4: Knit 2 rounds.
Round 5: K7, M1R, k14, M1L, k to last 2 sts. Stop here. Slip the last 2 sts of the round to the start of the round. 30 sts.
Join Tail
Round 6: Place 4 tail sts on a spare needle, and hold it parallel to the needle holding the next sts to be worked, (k1 body st tog with 1 tail st) 4 times, k to end; then k2 from the start of the round. This positions you at the center of the tail, and at the previous start of round.
See Figures 12 and 13.
Figure 12
Figure 13
Rounds 7-11: Knit 5 rounds.
Weave in tail yarn end.
Round 12: (K4, k2tog, k3, ssk, k4) 2 times. 26 sts.
Rounds 13-15: Knit 3 rounds.
Round 16: (K3, k2tog, k3, ssk, k3) 2 times. 22 sts.
Rounds 17-19: Knit 3 rounds.
Round 20: (K2, k2tog, k3, ssk, k2) 2 times. 18 sts.
Rounds 21-23: Knit 3 rounds.
Join Arms
Place arm sts on spare needles. Remove waste yarn.
Round 24: K3; then hold the needle with the first set of arm sts in front of the body stitches with RS facing (purl bumps to the back), and k3 left arm sts tog with next 3 body sts (same method as for tail); k6; then hold the needle with the second set of arm sts in front of the body stitches with RS facing (purl bumps to the back), and k3 right arm sts tog with 3 body sts, k3. 18 sts. See Figure 14.
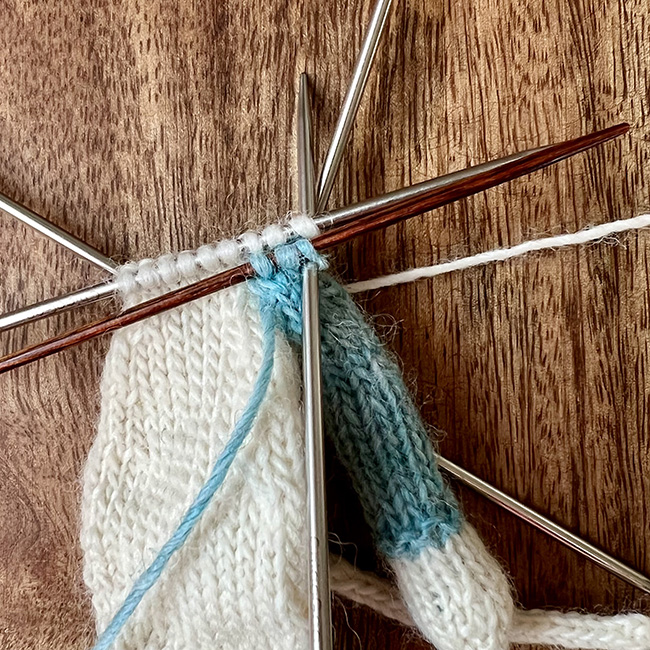
Figure 14
Rounds 25-26: Knit 2 rounds.
Weave in arm yarn ends and add stuffing to body.
Round 27: (K2, k2tog, k1, ssk, k2) 2 times. 14 sts.
Cut yarn, leaving a 10 inch/ 25 cm tail. Pass yarn end through sts with tapestry needle. Finish stuffing body. Cinch hole closed and secure. Sew head to body using yarn end at neck. Sew around neck once or twice stopping frequently to verify position See Figures 15, 16 and 17.
Figure 15
Figure 16
Figure 17
Tunic/Dress
Using CC1, needles for working flat and the Long Tail method, CO 38 sts, leaving an 8 inch (20 cm) tail.
Purl 2 rows.
For a Tunic, beginning with a knit row, work 4 rows st st.
For a Dress, work 10 rows st st.
Row 7 [RS]: K7, k2tog, k1, ssk, k14, k2tog, k1, ssk, k7. 34 sts.
Rows 8-12: Work 5 rows St st, starting with purl.
Row 9: K6, k2tog, k1, ssk, k12, k2tog, k1, ssk, k6. 30 sts.
Row 10: Purl.
Row 11: Work Vikkel braid (see Pattern Notes above).
Rows 12-16: Work 5 rows St st, starting with purl.
Row 17: K5, k2tog, k1, ssk, k10, k2tog, k1, ssk, k5. 26 sts.
Rows 18-20: Work 3 rows St st, starting with purl.
Split for Bodice
Row 21: K7, turn.
Rows 22-24: Work 7 rows St st, starting with purl.
Break yarn and place these 7 sts on hold.
Work central panel as follows:
Next row: With right side of work facing, rejoin yarn to remaining sts and k12, turn. 7 sts will remain unworked.
Work 3 rows St st, starting with purl.
Break yarn and place these 12 sts on hold.
With WS facing, rejoin yarn to rem 7 sts.
Work 4 rows of St st, beginning with a purl row.
Leave yarn attached.
Rejoin 3 sections
Note: If you wish to work the collar in a contrasting color, change to that color now.
Row 25: P6, p2tog, p10, ssp, p6. 24 sts.
Bobble BO
Complete Bobble bind-off as follows (see Pattern Notes above):
K1, MB, BO 1 st, *(k1, BO 1 st) 2 times, MB, BO 1 st; repeat from * until 1 st rems. K last st and bind that off. Pass yarn end through st. Weave in all ends except CO end which will be used to sew back seam.
Gently steam pieces to block. Dress elf mouse with tunic. Use BO yarn end to seam tunic at the back using mattress st, sewing from the collar downward. When you pass the Vikkel braid, work a horizontal duplicate st over the sewn sts and continue mattress st to end. Weave in ends.
Pants
Using CC2 and the Long Tail method, CO 15 sts.
Leg
Using CC2, needles for working flat and the Long Tail method,
Row 1 [WS]: Knit.
Row 2 [RS]: Kfb to last st, k1. 29 sts.
Join CC1.
Row 3: [P1 CC2, p1 CC1] to last st, p1 CC2.
Row 4: [K1 CC2, k1 CC1] to last st, k1 CC2.
For first leg, cut both yarns, leaving a tail of 4 inches/10 cm and slip sts to a spare needle or waste yarn.
Work another leg the same way, but do not cut the yarn, and leave the sts on the working needles.
Join Legs
Return the held sts of the first leg to a needle if required.
Row 5 [WS]: [P1 CC2, p1 CC1] to last st of second leg, with CC2 work p2tog on last st of second leg and first st of first leg, [p1 CC1, p1 CC2] to end. 57 sts.
Rows 6-17: work 12 rows in stripe pattern, placing a removable marker on first st of row 12.
Cut CC1. Finish pants with CC2.
Row 18: K1, k2tog to end. 29 sts.
Row 19: [(P1, k1) 2 times, p2tog, k1] 4 times, p1. 25 sts.
Row 20: (K1, p1) to last st, k1.
BO in pattern Cut yarn.
Sew up inner seams of pants, starting at lower edge of legs, then sew back of pants from crotch up to marked st. Leave a space for the tail. Sew ribbing section at the waist. Weave in ends. Steam block.
Hat
Using CC2 and the Long Tail method, CO 28 sts, making sure to leave yourself a tail of about 3-4 inches/8-10cm. Distribute sts across needles as you prefer and join for working in the round.
Round 1: Purl.
Round 2: Knit.
If you're using DPNS, to facilitate next step, distribute sts on needles as follows: needle 1: 11 sts; needle 2: 6 sts; needle 3: 11 sts.
Round 3, make buttonholes for ears: K5, **kfb, (sl next st, pass second st on right needle over first to bind off a st) 5 times, return st from right to left needle; turn work. Using cable method, CO 5 sts, turn work again to RS. With yarn in back, sl 1 st from right to left needle, k2togtbl*, k6, repeat from * to ** to make second ear hole, k to end.
Round 4-6: Knit 3 rounds.
Round 7: (K5, k2tog) 4 times. 24 sts.
Work short rows to shape hat:
Row 1 [RS]: K9, turn.
Row 2 [WS]: Make DS, p16, turn.
Row 3: Make DS, k13, turn.
Row 4: Make DS, p10, turn.
Row 5: Make DS, k to end of round.
Round 8: Knit around, working both legs of DS together.
Rounds 9-10: Knit 2 rounds.
Round 11: (K2, k2tog) 6 times. 18 sts.
Rounds 12-14: Knit 3 rounds.
Round 15: (K1, k2tog) 6 times. 12 sts.
Rounds 16-18: Knit 3 rounds.
Round 19: K2tog 6 times. 6 sts.
Rounds 20-21: Knit 2 rounds.
Round 22: K2tog 3 times, working all sts onto one needle.
Work 2 rows of i-cord as before.
Cut yarn, pass through sts, secure and weave in ends.
FINISHING
To block, gently steam the finished mouse and its outfit.
ABOUT THE DESIGNER
 Manon lives in Bromont, Quebec in Canada. After a 25-year career in education, she now allows her passion for the arts to inspire her daily occupations: Knitting, sewing, quilting, needle felting, painting, hiking, photography, and teaching a few knitting classes. She values the precious moments spent with family, friends and this wonderful online knitting community.
You can find more of her designs on Ravelry.
Pattern & images © 2022 Manon Lemaire