Remnants of Summer, a free knitting pattern from Knitty.com.
INTRODUCTION
Remnants of Summer
 by Kate Agner
![]()
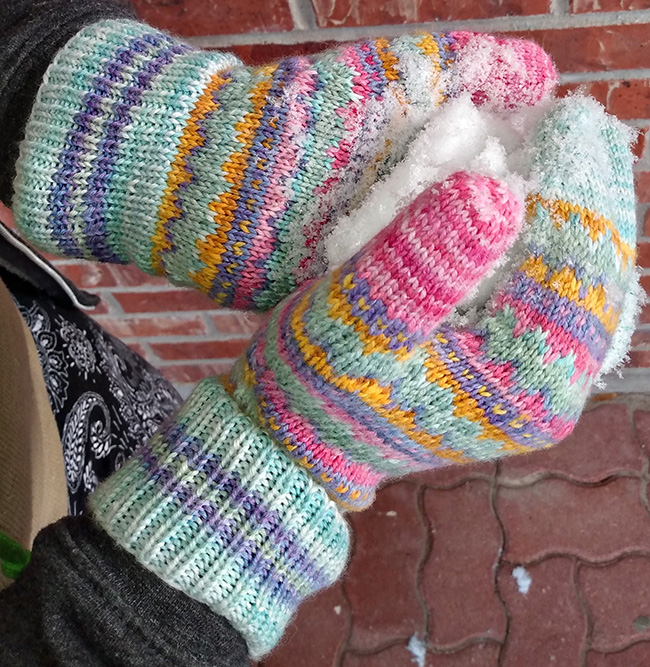
These mittens are meant to play with 3 shades of the same color of yarn emulating how the light would hit the zigzag and create depth. Mittens are worked in the round using stranded colorwork.
This pattern is ideal for using up mini skeins of yarn, or scraps – you need five colors, and approximately 100 yds 350m (400yds) in total for largest size.
 photos: Cory Agner
SIZE
Adult XS[S, M, L]
FINISHED MEASUREMENTS
Hand circumference: 6.5 [7.5, 8.5, 9.5]inch/17[19, 22, 24]cm
Hand length: 7.25[7.75, 8.5, 9.75]/18[20, 22, 25]cm
Choose a size with .5 inches/ 1 cm of positive ease.
MATERIALS
Yarn
Knit Picks Stroll Tonal Mini Pack in colorway Wildflowers [75% Superwash Merino Wool, 25% Nylon; 460yds/m
![]() [MC] Frozen; 1 mini skein
[MC] Frozen; 1 mini skein
![]() [CC1] Poppy Field; 1 mini skein
[CC1] Poppy Field; 1 mini skein
![]() [CC2] High Tea; 1 mini skein
[CC2] High Tea; 1 mini skein
![]() [CC3] Blue Violet; 1 mini skein
[CC3] Blue Violet; 1 mini skein
![]() [CC4] Eucalyptus; 1 mini skein
[CC4] Eucalyptus; 1 mini skein
Yarn Characteristics
![]() The sample shown uses a fingering-weight tonal mini pack of 75% Superwash Merino Wool, 25% Nylon for soft comfortable mittens. Use 1, 2, or many different yarns for the background; just make sure there is a good contrast with your zigzag color. Work in tonal yarns for a watercolor look or in solid yarns for a bold look. Choose 3 yarns that are shades of 1 primary color and yarn with a high contrast for the background color(s). This is a great opportunity to use up leftover yarns from other projects.
The sample shown uses a fingering-weight tonal mini pack of 75% Superwash Merino Wool, 25% Nylon for soft comfortable mittens. Use 1, 2, or many different yarns for the background; just make sure there is a good contrast with your zigzag color. Work in tonal yarns for a watercolor look or in solid yarns for a bold look. Choose 3 yarns that are shades of 1 primary color and yarn with a high contrast for the background color(s). This is a great opportunity to use up leftover yarns from other projects.
Recommended needle size
[always use a needle size that gives you the gauge listed below - every knitter's gauge is unique]
![]() US 1.5/2.5mm needles for small circumference in the round
US 1.5/2.5mm needles for small circumference in the round
Notions
![]() stitch markers
stitch markers
![]() scrap yarn or stitch holder for thumb
scrap yarn or stitch holder for thumb
![]() yarn needle
yarn needle
GAUGE
34 sts/40 rounds= 4 inches/10 cm in stranded colorwork after blocking
32 sts/40 rounds= 4 inches/10 cm in single color stockinette
PATTERN NOTES
[Knitty's list of standard abbreviations and techniques can be found here.]
The project is straightforward, and the colorwork charts have small repeats that don’t require any special handling of the yarn. Do note, however, that there’s a couple of chart rounds that use three colors rather than the standard two. When working those, go slowly and try to keep the yarns from crossing or tangling as much as you can. If you usually work with one in each hand, add a second yarn to usual working hand.
Grafting:
Instructions for grafting can be found here and here.
Colorwork: That there are some rounds that use 3 colors. For these, you’ll need to add a third colour to however you’re holding your yarn. If you work with one in each hand, consider adding a second to the right hand. If you work with all in the right hand, pick them up and drop them as required, trying to keep the tangling to a minimum. Pay special attention to the floats and ensure they all retain the same tension.
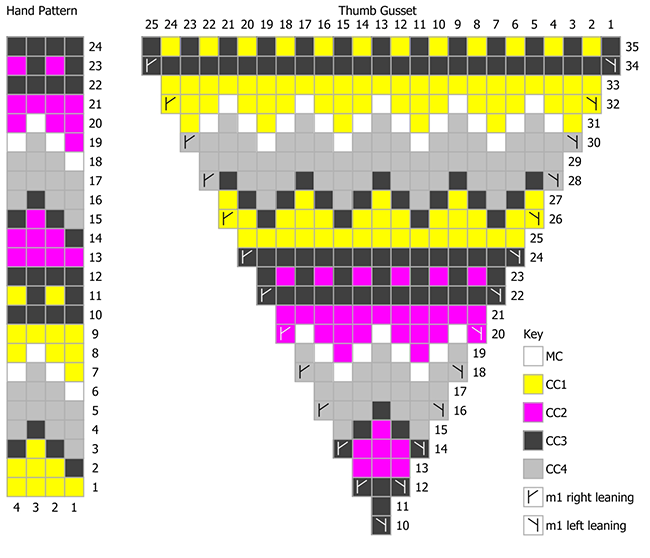
CHARTS

DIRECTIONS
Cuff
With MC using Long Tail Cast on or method of your choice, CO 56[64, 72, 80] sts. Distribute sts across needles as you prefer and join for working in the round. Note or mark start of round.
Ribbing round: [K1, p1] around.
Work ribbing as set for 8 rounds.
JoinCC3, work in ribbing as established for 3 rounds carrying yarn not in use up the side by twisting yarns around each other at the start of the round.
JoinCC4, work in ribbing for 2 rounds.
Cut CC4.
With CC3, work in ribbing for 3 rounds.
Cut CC3.
With MC, work in ribbing for 8 rounds.
Hand
Next round: Work Hand pattern chart 14[16, 18, 20] times around.
Round 10, establish gusset: Work Hand pattern chart as established over 28[32, 36, 40] sts, place a marker, work Thumb Gusset chart, place a marker; work Hand pattern chart to end of round. 57[65, 73, 81] sts.
Round 11: Work Hand pattern chart as established to first marker; work Gusset chart to next markers; work Hand pattern chart to end of round.
Continue in pattern as established until you complete round 29[31, 33, 35] on thumb chart, you will have 19[21, 23, 25] sts between stitch markers for thumb.
Dividing round: Work Hand pattern chart to first marker, remove marker, place next 19[21, 23, 25] sts onto scrap yarn, remove second marker; work Hand pattern chart to end of round. 56[64, 72, 80] sts.
Continuing working mitt for an additional 28[26, 27, 37] rounds in pattern as established, end after completing a round 9[9, 12, 24] , then start decreases below. Cut CCs and continue with MC. If you need more length in the hand work in MC in stockinette stitch until mitt measures 2.25[2.5, 2.5, 2.75] inches / 5.5[6.5, 7, 7] cm less than desired length.
Decreases
Note: In the instruction below, you’re asked to place a marker. Depending on which needles you’re using, you might not need the marker – instead just divide the stitches into two equal halves, the back of hand and the palm side of the mitten. The decrease round refers to these "sides".
Round 1: K1, ssk, k 22[26, 30, 34] , k2tog, k1, place marker or divide the stitches on your needles at this point, k1, ssk, k 22[26, 30, 34] , k2tog, k1. 52[60, 68, 76] sts.
Round 2: K all sts.
Round 3: [K1, ssk, k to 3 stitches before the end of the side, k2tog, k1] twice. 4 sts decreased.
Repeat Rounds 2-3, 6[8, 10, 12] more times, until 24 total sts remain.
Cut MC, leaving an 8-inch/20-cm tail and graft the remaining sts together.
Thumb
On the next round you will be picking up and working the sts from the scrap yarn for the thumb andpicking up stitches from the mitt on the gap at the top of the thumb.
Return held thumb sts to needles, removing scrap yarn.
Extra Small start here:
Round 1: With CC4, M1l; work the 19 sts from scrap yarn in pattern as follows: *k3 with CC4, k1 with MC; repeat from * to last 3 sts, k3 in CC4, with CC4, M1r, then pick up and knit 3 sts in the gap, one in each of the corners and one in the center of the gap. 24 sts.
Distribute sts across needles as you prefer and join for working in the round.
Round 2: Sl1, *k1 with MC, k1 with CC4, k1 with MC, k1 with CC1; repeat from * to end.
Round 3: *K1 with CC1, k1 with MC, k2 with CC1; repeat from * to end.
Round 4: K to end with CC1.
Round 5: K to end with CC3.
Round 6: *K1 with CC3, k1 with CC1; repeat from * to end
Round 7: With CC3, k to end.
Cut all working colors and attach CC2 and knit 13 rounds in CC2, or until it matches the length of your thumb, then continue at "Decreases" below.
Small start here:
Round 1: With CC1, M1L, work the 21 sts from scrap yarn in pattern as follows: *k2 with CC1, k1 with MC, k1 with CC1; repeat from * to last st, then with CC1, k1, M1R, and pick up and knit 3 sts in the gap, one in each of the corners and one in the center of the gap. Cut MC. 26 sts.
Distribute sts across needles as you prefer and join for working in the round.
Round 2: With CC1, K then slip this st to end of round; this position in the new start of round. K to end with CC1.
Round 3: K to end with CC3.
Round 4: *K1 with CC3, k1 with CC1; repeat from * to end.
Round 5: With CC3, k to end.
Cut all working colors and attach CC2 and knit 16 rounds in CC2, or until it matches the length of your thumb, then continue at "Decreases" below.
Medium start here:
Round 1: With CC3, M1l, knit across the 23 held sts, M1r, then pick up and knit 3 sts in the gap, one in each of the corners and one in the center of the gap. 28 sts.
Distribute sts across needles as you prefer and join for working in the round.
Round 2: *K1 with CC3, k1 with CC1; repeat from end.
Round 3: With CC3, k to end.
Cut all working colors and attach CC2 and knit 20 rounds, or until it matches the length of your thumb, then continue at "Decreases" below.
Large start here:
Round 1: With CC3, M1l, k to end, M1r, then pick up and knit 3 sts in the gap, one in each of the corners and one in the center of the gap. 30 sts.
Distribute sts across needles as you prefer and join for working in the round.
Cut all working colors and attach CC2 and knit 22 rounds, or until it matches the length of your thumb, then continue at "Decreases" below.
Decreases – All Sizes
Round 1: K2tog around. 12[13, 14, 15] sts.
Round 2: K.
Round 3: K 0[1, 0, 1] , k2tog 6[6, 7, 7] times. 6[7, 7, 8] sts.
Cut yarn, leaving a 4 inch/ 10 cm tail and pull it through live stitches to close.
FINISHING
Weave in all ends. Soak mitts in cool water. Carefully squeeze out water and roll mittens in a towel to absorb excess water. Unroll towel, lay mittens flat and gently smooth out stitches. Lay flat and let air dry.
ABOUT THE DESIGNER
 Kate lives in Colorado and loves knitting patterns that are easily memorizable as she likes to knit while hiking with the pups or while trying not to disturb a chicken on her lap.
You can contact Kate and find more of her work on Ravelry.
Pattern & images © 2022 Kate Agner