|
|
 |
|
|
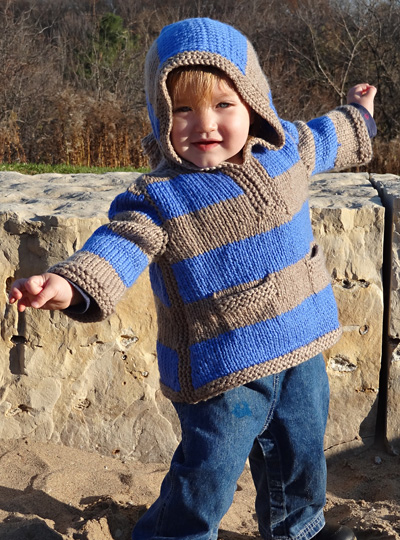
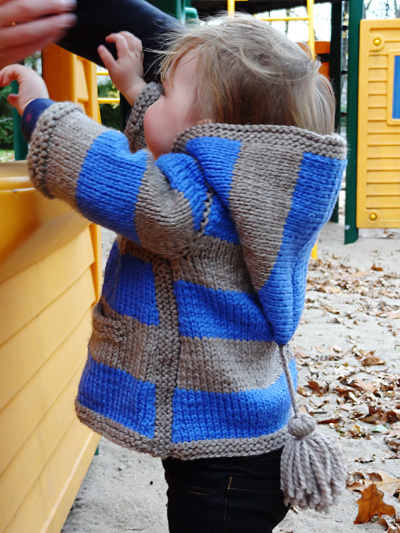
Inspiration comes from all sorts of places. In this case the original design came out of the planning for an upcoming ski trip to Idaho. Seeing as baby couldn't go on the ski field, clearly some fabulous après ski wear was needed for crawling around the chalet. Full of great little design features, like the garter stitch side seams, and cute shaped hood this is a sweater for junior to snuggle into, once you've had the fun of knitting it. The sleeves are worked top down from stitches picked up around the armhole, with the shoulder cap shaped by short rows, and then continued in the round, to make a seamless piece. In addition, because of the use of three-needle bind-off throughout the pattern there are almost no seams to sew at the end. |
||
|
|
Tweet
|
|
|
SIZE |
|
|
FINISHED MEASUREMENTS |
|
MATERIALS Notions |
|
GAUGE |
| 14 sts/21 rows = 4 inches in stockinette stitch |
|
PATTERN NOTES |
|
Instructions for the long tail cast on method can be found here Instructions for the three needle bind off method can be found here. Instructions for working Japanese short rows can be found here. Instructions for making a tassel can be found here. Color pattern (in St st): |
|
DIRECTIONS 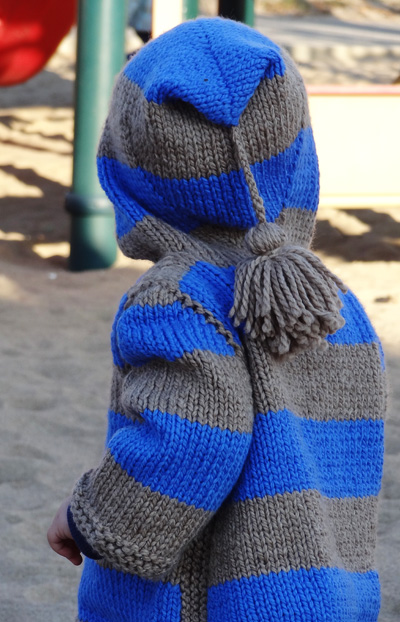
Using Color 1 and long-tail method, CO 50[54, 58, 64, 68] sts. K 4 rows. Break yarn and join Color 2. K 4 rows. Maintaining color pattern, continue in stocking stitch until you have completed 36[40, 46, 56, 64] st st rows, ending with a WS row. Shape for armholes Decrease row [RS]: K1, ssk, k to last 3 sts, k2tog, k1. 34[38, 42, 46, 50] sts. Work until there are 24[24, 26, 28, 30] rows from the start
of the armhole. Using Color 1[1, 1, 2, 2], CO 12[12, 14, 16, 16] sts. Work in St st for 14[14, 16, 16, 18] rows, ending with a WS row. Break yarn and place sts on holder. 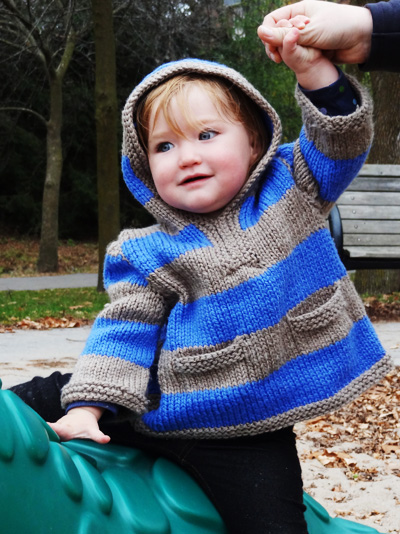 Work as for BACK for 19[19, 19, 31, 31] St st rows, ending with a RS row. 44[50, 54, 56, 62] sts Work pocket cuffs Place pocket linings Continue working front, maintaining color pattern and working side decreases, until front matches back to armholes, ending with a WS row. Shape for armholes and front opening Left side of front Work even until there are 24[24, 26, 28, 30] rows from the start of the armhole, ending with a RS row. Break yarn, leaving a long tail. Leave sts on holder. Right side of front Bind off 2 sts at beg of next row. 15[17, 19, 21, 23] sts Work until there are 25[25, 27, 29, 31] rows from the start of the armhole, ending with a RS row. Leave sts on holder; do not break yarn. |
|
 Shoulder seams With right sides together, join left shoulder seam by binding off 6[7, 8, 9, 10] sts moving from shoulder edge to neck edge, using 3 needle bind off and the long tail from the back. Place 7[8, 9, 10, 11] remaining live front sts on a holder. With right sides together, moving from shoulder edge to neck edge, join right shoulder seam by binding off 6[7, 8, 9, 10] sts using 3 needle bind off . Turn work so right side of work faces you. Place remaining right front sts and last live st from bind off onto the right needle, so the working yarn is ready to work. Work across back of neck and remaining left front sts. 36[40, 44, 48, 52] sts. Hood Row 1 [RS]: K 16[18, 20, 22, 24] sts, pm, M1L, k4, M1R, pm, k to end of row. 38[42, 46, 50, 54]. Row 2 [WS]: Purl. Maintaining color pattern, repeat last 2 rows 10 more times. Remove markers. 60[64, 68, 72, 76] sts. Continue in color pattern until hood measures 9[9.25, 9.5, 10, 10.5] inches from base of hood, ending with a WS row. Move sts to circular needle. Fold hood in half with RS together, so 29[32, 36, 38, 40] sts are on front needle, and 29[32, 36, 38, 40] sts are on rear needle. BO, using 3 needle bind off. Side seams K 5 rows. With RS facing, pick up 33[37, 40, 47, 56] sts along back right side seam. Place right sides of front and back together, and bind off live sts using 3-needle bind off. Repeat for second side seam. Sleeves
Distribute stitches on dpns and join for working in the round, marking the start of round at the center of the side seam with a stitch marker. Round 1: Purl. Row 1 [RS]: Using Color 1 and dpns, and changing colors
when you reach the start of a different
color band, knit 19[19, 22, 25, 28] sts,
turn & pin using
the Japanese short row method. Repeat Rows 3-4, working up to last pin placed, picking up wrap, then turning and placing new pin. Each stitch will be separated by a pin hanging to the back of the work. Change colors to match front and back color bands, until there are 4[4, 4, 6, 6] sts total remaining unknit in the middle. Begin working in the round, picking up the 2 remaining wraps as you reach them. 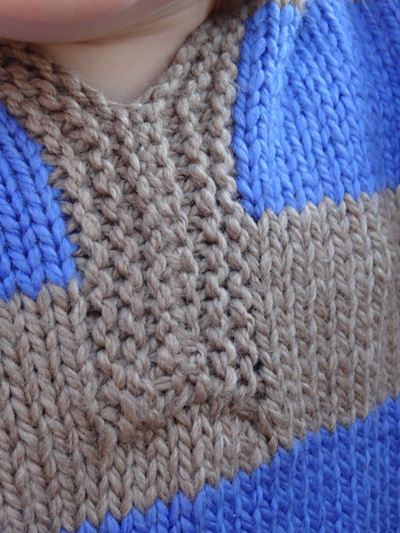 Change to or continue using Color 1. Round 1: Knit. Hood trim Sew together the two bound off edges of the hood trim at the
bottom of the hood, so the front facing is sewn together. Sew pocket linings to insides of front. Weave in ends. Make a 4-inch tassel. |
| ABOUT THE DESIGNER | |
|
|
 |
|
Pattern & images © 2011 by Keri Williams, design © 2011 Ingrid deHoop. Contact Keri, Ingrid |
|