Spinning Slubby Bulky Yarn
Many people start off big spinning slubby bulky
yarn, myself included. Once we tune our drafting
skills and gain more control, we start to make
evenly spun finer yarns.
Occasionally we run into problems
trying to return to that bulky slubby stuff. This
can be a big pain, especially when you have a
project that calls for bulky yarn, or when you
want a bit of texture in your work. [Just a note:
with every new wheel or flyer I've gotten, I've
had to reteach myself to spin bulky, as every
wheel/flyer has its own unique ebb and flow.]
Spinning bulky yarn requires
a different type of control and rhythm. I'm convinced
spinning is mostly rhythm. It's all about syncing
the body (hands and feet) with senses (sight and
touch), when all of these personal elements are
in tune, good spinning happens.
 Fiber
selection Fiber
selection
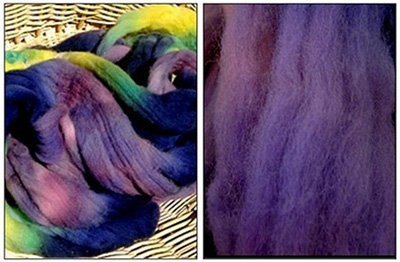
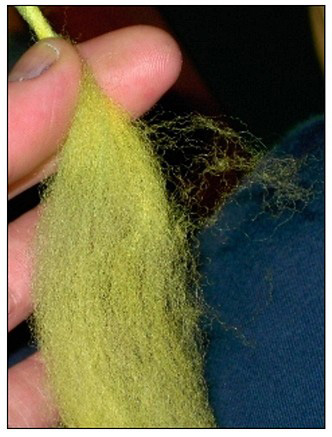
When I spin bulky yarn, I go
for a combed top. I prefer it for singles as the
shorter and weaker fibers are often eliminated
in preparation.
"Top"
means the fibers are prepared for spinning by
combing; which aligns the fibers side by side.
This arrangement is preferred in worsted spinning.
Although I am spinning this 'semi-worsted style'
(which simply means that I'm spinning a traditionally
worsted prep in more of woolen style and in less
"true worsted style") I find this method
useful for adding a good amount of loft to the
yarn while retaining smoothness.
Top is often found sold
displayed in 'wheels' or 'braids', from suppliers
like Spunky
Eclectic &
Hello
Yarn. Here, I chose to use my own dyed
fiber.
Pre drafting is your
friend.
 The
more you predraft, the less you will need to draft
while spinning, giving you more of an opportunity
to concentrate on your twist angle and TPI (twists
per inch). The
more you predraft, the less you will need to draft
while spinning, giving you more of an opportunity
to concentrate on your twist angle and TPI (twists
per inch).
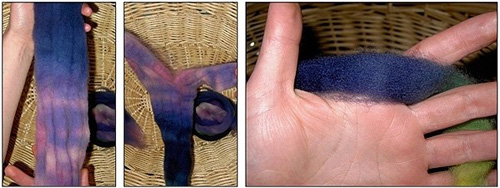
Starting off with a section
of top that is about 2.5" across, I split
it several times, until I get strips that are
about the size of a pencil(roughly, a quarter
of an inch).
But,
I don't stop there. I take those quarter inch
strips and gently give them a pull, lengthwise,
to draft the fibers apart, working down the length
of the strip.
Slow and steady wins
this race.
Treadaling
painfully slowly is key in making bulky weight
yarns. If you are like me (lead footed), try practice
treadling without spinning any fiber.
Once
you have your slow groove on, grab your pre-drafted
fiber & go for it.
  I
start off spinning the first two yards in about
a worsted weight, I find this helpful in keeping
my new yarn attached to my leader yarn. I
start off spinning the first two yards in about
a worsted weight, I find this helpful in keeping
my new yarn attached to my leader yarn.
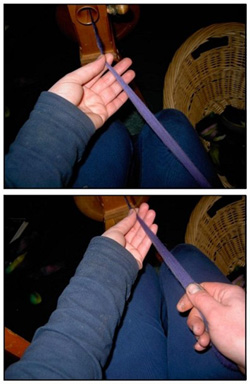
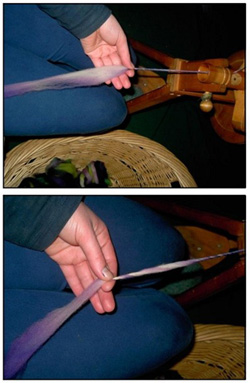
Once
a good base is established, I like to get into
my "slubby rhythm".
This
goes something like...
draft, draft, treadle [see left]
draft draft, treadle SLUB [see
right] (no drafting)!
Once you establish your own
rhythm, you will notice that your slubs become
evenly distributed, based on the natural size
of your drafting.
Holding it together with
TPI
Bulky wool yarn takes shockingly little twist
to stay together (general rule of thumb, the thinner
your yarn the more twist you need). Bulky wool
yarn needs about one twist per inch (TPI).
This example has slightly less,
maybe .75 TPI., and has a twist angle of 27, for
the bulky parts.
My thinner bits range from
2-3 TPI with and a twist angle of 17
|
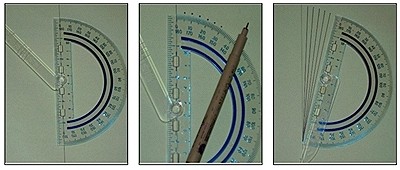 Measuring
twist angle is easier that it sounds. Measuring
twist angle is easier that it sounds.
All you need is:
- a protractor
- a pen
= a sheet of paper.
Ready?
Drawing a straight line to serve as your
anchor.
Line your protractor up with your straight
line, and mark angles off in 5 degree increments.
Once you have your angles marked, you can
draw lines to denote angle segments.
 Place your yarn on your straight line, and
look for the angle of your twist.
Place your yarn on your straight line, and
look for the angle of your twist.
It’s easier to read the twist angle
if you visually extend the line from your
twist.
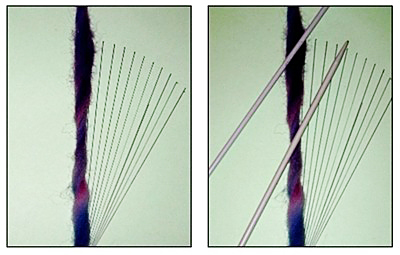
I placed some knitting needles over my yarn
following the the line that the twist makes.
Read your twist angle by where your needle
crosses or touches an angle line.
The bottom (tighter) twist is 20
The top (looser) twist is more like 40 (you
have to imagine the yarn scooted down to
catch the correct line)
The thicker the yarn, the more obtuse the
angle, as the yarn thins out the angle becomes
more acute, or the thicker your yarn, the
less twist it needs to achieve balance.
|
Finish
to avoid pilling
 Singles
are notorious for developing pills. While I've
found no way to avoid them all together, there
are a few things you can do to lessen the occurrence.
First, pick out any neeps & noils you find. Singles
are notorious for developing pills. While I've
found no way to avoid them all together, there
are a few things you can do to lessen the occurrence.
First, pick out any neeps & noils you find.
These little lumps and bumps
eventually work themselves out of the twist and
become little warty pills. Another factor would
be project selection. A garment that is going
to be worn alot and exposed to alot of friction,
like socks, wouldn't be a good candidate for use
of singles. Felting projects on the other hand,
are ideal. As well as hats, scarves, and trims
and accents in other projects. See Shannon Okey's
new book "Spin to Knit" for more project
ideas.
The way you finish your yarn
has a big impact on its longevity.
I finish mine by shocking and
whacking. I submerge my finished hanks is water
as hot as I can take it, then plunge them into
cold water. Then I proceed to unleash aggression
by giving them a good whack on the side of the
bathtub. This helps devlop the fibers 'bloom',
encourage any twist settlements you may have in
your thinner bits, to inch back up into the slubs,
and prevents your yarn from sticking together.
(If done properly, your yarn will not felt. The
key ingredience for felting are warm/hot water,
soap and agitation. As long as you aren't adigtating,
it will turn out fine.)
After finishing, your twist is "set".
Simply place your yarn in the shower or on a drying
rack. Blocking is an unnecessary step.
|
Don't block
knitting yarn
Blocking, especially under
tension or weight, degrades wool. Also,
blocking is a reversible process, so it
would be counter productive if you were
making a knitting yarn. Think of what happens
when you wash lace. Inevitably, you need
to re block. The same thing will happen
when you wash a garment created with a blocked
yarn, it will revert back to it's preblocked
state -- sproing!
|
Now you are done! All you need
to do is wait patiently for it to dry. (In these
winter months, aiming fans at your yarn helps
hurry up the drying process.)

Have an issue or question
you would like to see resolved here? Send email
to Symeon.
|


