Grandma Knitty Home
Knitty®: little purls of wisdom
what's the editor up to lately?feature articlesKnitty's generous selection of patternsKnittyspinşarchive of previous issuesMeet other Knitty readers and chat in our coffeeshop!sign up for the free Knitty newsletterLooking for an ad fromone of our advertisers? Click here!Our tiny, perfect online shopping mallGet yourself a little Knitty treat!read the behind-the-scenes news at Knitty


Find exactly what you're looking for

The answer to your question about Knitty is probably here!

Take home something Knitty today

Advertise with Knitty

Get your cool stuff reviewed in Knitty

Full information about how  to get published in Knitty

Read exactly what FREE PATTERNS really means...respect our designers and authors rights [and thank you]

Knitty is produced in a pro-rabbit environment

© Knitty 2002-2008. All rights reserved. Unauthorized reproduction prohibited. This means you.


<click for more!
 

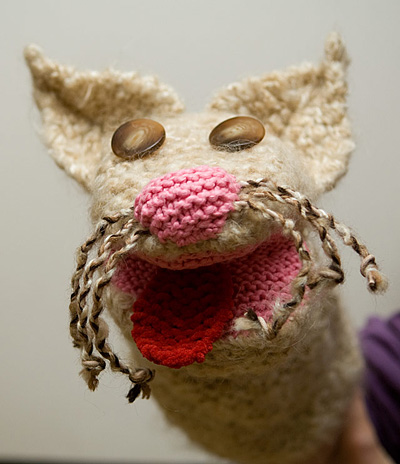
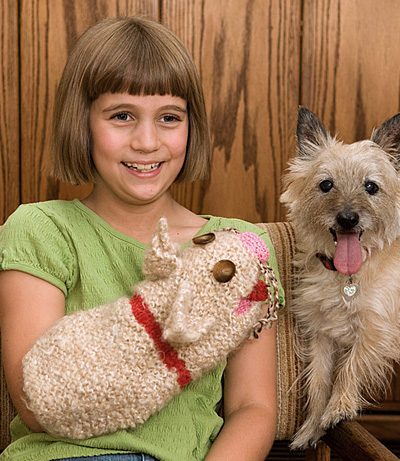
Kitty is a toy that kids of all ages will enjoy. It is quick to knit and the bonus is that one size fits all. Feel free to make Kitty your own by changing yarns or colors -- have fun!

Kitty is knitted in pieces and then assembled. The mouth is shaped with short rows.


SIZE
One
 
MATERIALS

[MC] Patons Divine [76.5% acrylic, 10.5% wool, 10.5% mohair, 2.5% polyester; 142yd/129m per 100g skein]; color: #06011 Soft Earth; 1 skein  
[CC1] Lion Brand Lion Suede [100% polyester; 122yd/110m per 85g skein]; color: #189 Garnet; 1 skein
[CC2] Bernat Cottontots [100% cotton; 171yd/156m per 100g skein]; color: #90421 Strawberry; 1 skein

Recommended needle size:
1 set US #10.5/6.5mm straight needles
1 set US #6/4mm straight needles
[always use a needle size that gives you the gauge listed below -- every knitter's gauge is unique]

Stitch markers
Safety pins or split ring markers
Tapestry needle
3yd/2.7m tan-colored leather cord (used for whiskers)
3yd/2.7m scrap yarn in dark brown (used for whiskers)
2 buttons for eyes; buttons shown are 1.25 inches/32mm in diameter, with a shank
Small amount of stuffing (for nose)
Small jingle bell (for collar; to keep the birds safe)


GAUGE

12 sts/24 rows = 4 inches in garter st using larger needles and MC

18 sts/38 rows = 4 inches in garter st using smaller needles and CC2
 
PATTERN NOTES

[Knitty's list of standard abbreviations and techniques can be found here]

Because of all the small parts, this puppet as written is not safe for a very small child. To make it more child-safe, omit the bell, and embroider eyes and whiskers instead of using buttons and cord.

 
DIRECTIONS

BACK OF BODY
Using larger needles and MC, CO 20 sts.

Rows 1-33: K all sts.

Rows 34-35: K2tog, k to end. 18 sts.

Rows 36-37: K all sts.

Join CC1; do not break MC.

Rows 38-41: Using CC1, work in stockinette st, beginning with a WS row.

Break CC1.

Rows 42-43: Using MC, k all sts.

Rows 44-45: Kfb, k to end. 20 sts.

Rows 46-62: K all sts.

Place a safety pin or split ring marker at each end of Row 62 to mark beginning of head.

Top of Head:
Row 63 [RS]: K2tog, k to end. 19 sts.

Row 64 [WS]: K all sts.

Row 65 [RS]: K to last 2 sts, k2tog. 18 sts.

Row 66 [WS]: K all sts.

Rows 67-70: Work as for Rows 63-66. 16 sts.

Row 71 [RS]: K2tog, k to last 2 sts, k2tog. 14 sts.

Row 72 [WS]: K all sts.

Rows 73-80: Work as for Rows 71-72.

BO remaining 6 sts.
FRONT OF BODY
Work as for Back of Body until Row 62 is complete, marking each end of Row 62.

Bottom of Head:
Row 63 [RS]: K2tog, k to last 2 sts, k2tog. 18 sts.

Row 64 [WS]: K all sts.

Rows 65-72: Work as for Rows 63-64.

BO remaining 10 sts.

INNER MOUTH

Lower Mouth:
Using smaller needles and CC2, CO 16 sts.

Row 1 [RS]: K8, place marker, k8.

Rows 2-3: Kfb, k to end. 18 sts.

Rows 4-5: Kfb, k to 2 sts before marker, ktog, k to end.

Rows 6-7: Kfb, k to end. 20 sts.

Rows 8-11: Work as for Rows 4-7. 22 sts.

Rows 12-13: K all sts.

Shape back of mouth using short rows as follows:
*K6, w&t; k to end.

K4, w&t; k to end.

K2, w&t; k to end.

K 1 row across all sts.*

Repeat from * to * once more.
Upper Mouth:
Rows 1-2: K2tog, k to end. 20 sts.

Row 3 [WS]: K all sts.

Rows 4-5: K to 2 sts before marker, k2tog, k to end. 18 sts.

Row 6 [RS]: K all sts.

Rows 7-8: K2tog, k to end. 16 sts.

Row 9 [WS]: K all sts.

Rows 10-11: K to marker, kfb, k to end. 18 sts.

Row 12 [RS]: K all sts.

Rows 13-14: K2tog, k to end. 16 sts.

Row 15 [WS]: K all sts.
Rows 16-17: K to marker, kfb, k to end. 18 sts.

Rows 18-20: K2tog, k to last 2 sts, k2tog.

BO remaining 12 sts.

TONGUE
Using smaller needles and CC1, CO 4 sts. CO edge is tip of tongue.

Rows 1-4: Kfb, k to end. 8 sts.

Rows 5-6: K3, k2tog, k to end. 6 sts.

Rows 7-8: K2, k2tog, k to end.

BO remaining 4 sts. BO edge is back of tongue.
EARS (Make 2)
Using larger needles and MC, CO 16 sts
.
Row 1: K all sts.

Row 2: K2tog, k to last 2 sts, k2tog. 14 sts.

Rows 3-14: Work as for Rows 1-2. 2 sts.

Row 15: K2.

Row 16: K2tog. Break yarn and draw through last st.

NOSE
Using smaller needles and CC2, CO 4 sts.

Row 1 [RS]: K all sts.

Rows 2-7: Kfb, k to end. 10 sts.

Rows 8-11: K all sts.

Row 12 [WS]: [K2tog, k2] twice, k2tog. 7 sts.

Row 13 [RS]: K2tog, k1, k2tog.

BO remaining 3 sts.

WHISKERS
Cut 30-inch lengths of MC, leather cord, and brown scrap yarn. Tie one strand of each together at one end. Braid together until braid measures 10 inches, then knot strands together at end of braid. Trim ends.
Make 2 more braids in the same way.

Holding braids so that ends are even, sew braids together at center. Do not worry about weaving in ends of yarn used for sewing; this will be hidden behind puppet's nose.

FINISHING

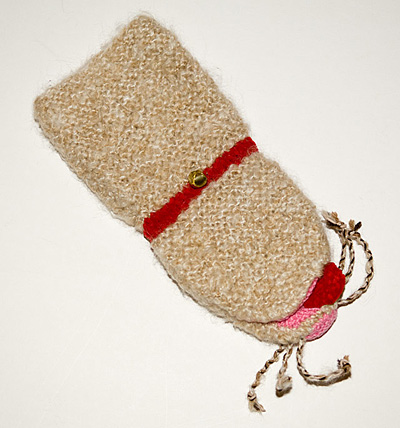
Sew front of body to back of body at side edges, matching rows of CC1 and ending at marked rows.

Pin inner mouth piece to edges of head, ensuring that lower portion of mouth is matched to bottom of head, and upper portion of mouth to top of head. Lower mouth is shorter and wider than top of mouth. Sew in place.

Sew BO end of tongue to fold at back of mouth.
Sew whiskers to face near front of mouth. Position nose over whiskers and sew in place, stuffing lightly.

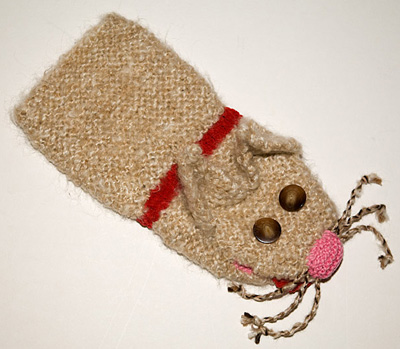
Fold each ear in half at center of CO edge. Sew a seam close to this fold to form a ridge along the center of each ear. Unfold ears and sew in place. On puppet shown, ears are positioned approx. 0.5 inch apart, 4 inches from tip of nose.

Sew buttons in place for eyes. On puppet shown, eyes are positioned approx 1 inch apart, 3 inches from tip of nose.

Sew bell to collar. Weave in ends.

 
ABOUT THE DESIGNER

Judy lives in the Los Angeles area and works as a Costumer for the Film/TV Industry, as well as a Sales Representative for Yarn Distributors.

Visit her website for patterns and kits to make other puppets and stuffed toys.