Knitty: little purls of wisdom
Lexie Barnes
Title
beauty shot

Tangy

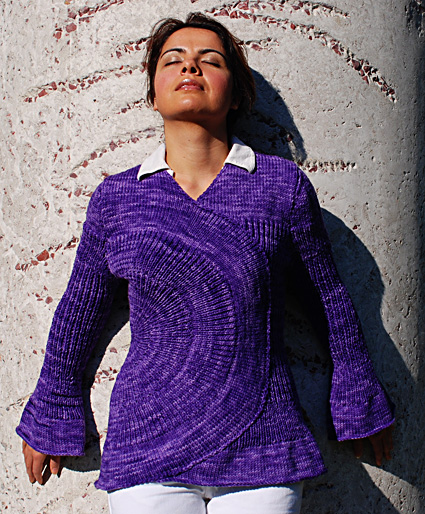
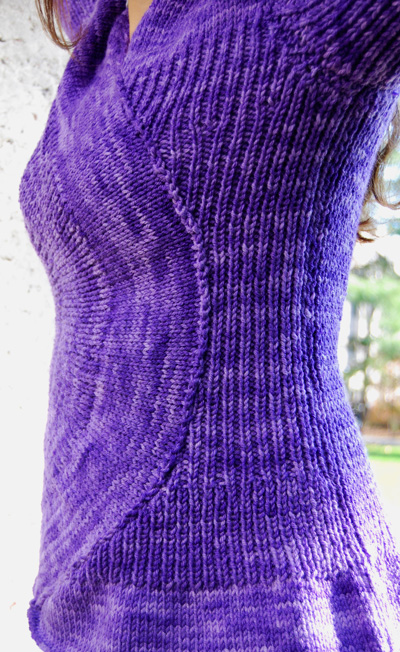
Inspired by Paris fashions, this sweater was the result of a trip my daughter and I took to London and Paris during National Knitting Week.

The design has a flattering pull at the waist and flares around the hips. While it looks complicated, and does require some concentration during the increases and decreases, if you know how to knit, purl, increase and decrease, and you can count rows, you can make it.

spacer model: Enise Dadak spacer photos: Chrissie Knight

SIZE
XS[S, M, L, 1X, 2X] (Shown in size M)

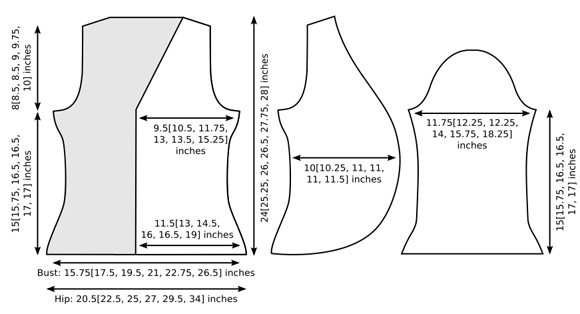
FINISHED MEASUREMENTS
Chest: 31.5[35, 39, 42, 45.5, 53] inches, with ribbing slightly stretched
Length: 24[25.25, 26, 26.5, 27.75, 28] inches

spacer

MATERIALS
Yarn

spacer Classic Elite Yarns Waterlily [100% extra fine merino wool; 100yd/91m per 50g skein]; color: #1979 Delphinium; 10[11, 12, 13, 15, 16] skeins

Recommended needle size
[always use a needle size that gives you the gauge listed below -- every knitter's gauge is unique]
spacer 1 US #8/5mm circular needle, 32 inches  or longer
spacer 1 spare circular needle, US #8/5mm or smaller, 32 inches or longer
Note: If you have additional US #8/5mm circular needles of any length, they will be useful when working the edging. If you are buying only one needle for this project, consider buying a 40-inch needle.

Notions
spacer Stitch markers
spacer Row counter
spacer Safety pins or split ring markers
spacer Stitch holders
spacer Yarn needle
spacer Buttons or hooks and eyes (optional)

spacer

GAUGE
16 sts / 21 rows = 4” in stockinette st
18 sts / 21 rows = 4” in 1x1 Rib, slightly stretched

spacer

PATTERN NOTES
[Knitty's list of standard abbreviations and techniques can be found here.]

Note: Sweater shown has been sewn shut, to function as a pullover. If you wish to use the sweater as a cardigan, buttons and button loops or hooks and eyes may be added. Try the sweater on after knitting it to determine which way of wearing it will suit you best.

cdd (Centered Double Decrease, worked on WS rows): The next st sts on the needle will be a k st, a p st, and another k st. Sl first 2 sts, one at a time, knitwise, to right needle. Reach tip of left needle around fronts of these 2 sts and insert it from right to left into both sts; slip them back to left needle. Sts will have been reordered, so that the k st which had been the first st is now the second st. K3tog. On RS of work, this will appear as a double p decrease centered above a k st.

ssp: Slip next 2 sts knitwise, one at a time, to right needle. Slip them both, purlwise, back to left needle. Purl them together through their back loops.

Inc 1: Increases for this project are worked using the backward loop increase. Directions for this increase can be found here, described as Elizabeth Zimmermann's m1 increase.

1x1 Rib (Worked over an odd number of sts):
Row 1 [RS]: [P1, k1] to last st, p1.
Row 2 [WS]: [K1, p1] to last st, k1.
Repeat these 2 rows for 1x1 Rib.

Working wraps together with wrapped sts on WS rows:
Insert tip of left needle into back of wrap and purl it together with wrapped st.

spacer

DIRECTIONS
BACK
CO 83[91, 101, 109, 119, 137] sts. Do not join.
Row 1 [WS]: K1, p to last st, k1.
Row 2 [RS]: P1, k to last st, p1.

Work 12[12, 14, 14, 16, 16] more rows in stockinette st, maintaining 1 st at each edge in reverse stockinette st as set.

Note: All pieces are worked with 1 st at each edge in reverse stockinette st.

Work 14[14, 16, 16, 16, 18] rows in 1x1 Rib (see Pattern Notes above), beginning with a WS row and ending with a RS row.

Sizes XS, M, 1X, 2X Only:
Next Row [WS]: Work 4 sts in pattern, [cdd, p1, k1, p1] to last st, k1. 57[-, 69, -, 81, 93] sts.

Sizes S, L Only:
Next Row [WS]: Work 2 sts in pattern, [cdd, p1, k1, p1] to last 5 sts, cdd, p1, k1. -[61, -, 73, -, -] sts.

All Sizes:
Work 49[53, 53, 53, 53, 49] rows in 1x1 Rib, ending with a RS row.

Next Row [WS]: Work 10[4, 10, 4, 10, 10] sts in pattern, [inc 1, p1, inc 1, work 5 sts in pattern] to last 5[3, 5, 3, 5, 5] sts, work in pattern to end. 71[79, 87, 95, 103, 119] sts.

Note: Read ahead! Armhole shaping begins on next row.

Work 13[13, 15, 15, 17, 17] more rows in 1x1 Rib, ending with a RS row.
Continue in stockinette st until back is complete, working 1 st at each edge in reverse stockinette st.

AT THE SAME TIME, shape armholes as follows:
BO 5[6, 6, 6, 8, 10] sts at beginning of next 2 rows. 61[67, 75, 83, 85, 99] sts.

Decrease Row 1 [RS]: P1, k2tog, work in pattern to last 3 sts, ssk, p1.
Decrease Row 2 [WS]: K1, ssp, work in pattern to last 3 sts, p2tog, k1.
Repeat these 2 rows 0[0, 0, 1, 1, 2] times more. 57[63, 71, 75, 77, 87] sts.

Work Decrease Row 1. Work 1 row in pattern.
Repeat these 2 rows 0[2, 2, 3, 2, 3] times more. 55[57, 65, 67, 71, 79] sts.

Work Decrease Row 1. Work 3 rows in pattern.
Repeat these 4 rows twice more. 49[51, 59, 61, 65, 73] sts.

Continue in stockinette st until a total of 31[33, 31, 33, 35, 37] rows stockinette st have been worked, ending with a WS row.

Shape Neckline and Shoulders:
Next Row [RS]: BO 5[5, 6, 6, 6, 7] sts, k15[15, 17, 18, 20, 22] (16[16, 18, 19, 21, 23] sts on right needle), place all sts just worked in st holder for right shoulder; BO next 7[9, 11, 11, 11, 13] sts, k to last st, p1. 21[21, 24, 25, 27, 30] sts.

Left Shoulder:
Row 1 [WS]: BO 5[5, 6, 6, 6, 7] sts, p to end. 16[16, 18, 19, 21, 23] sts.
Row 2 [RS]: BO 3[3, 4, 5, 5, 6] sts, k to end. 13[13, 14, 14, 16, 17] sts.
Row 3 [WS]: Work as for Row 1. 8[8, 8, 8, 8, 10] sts.
Row 4 [RS]: BO 3[3, 2, 2, 4, 3] sts, k to end.
BO remaining 5[5, 6, 6, 6, 7] sts.

Right Shoulder:
Place held sts of right shoulder on needle with WS facing and join yarn at neckline edge.
Row 1 [WS]: BO 3[3, 4, 5, 5, 6] sts, p to end. 13[13, 14, 14, 16, 17] sts.
Row 2 [RS]: BO 5(5, 6, 6, 6, 7), k to end. 8[8, 8, 8, 8, 10] sts.
Row 3 [WS]: BO 3[3, 2, 2, 4, 3] sts, p to end.
BO remaining 5[5, 6, 6, 6, 7] sts. RIGHT FRONT
The ribbed semi-circle shape that forms most of the right front is worked first, from the center out. Armhole shaping begins before the semi-circle is complete. Once it is complete, the neckline is shaped using short rows.

First Tier:
CO 6 sts.
Row 1 [WS]: K1, [m1, p1] four times, m1, k1. 11 sts.

Row 2 [RS]: P1, k9, p1.

Row 3 [WS]: K1, [p1, m1] eight times, p1, k1. 19 sts.

Row 4 [RS]: P1, k17, p1.

Row 5 [WS]: K1, [p1, m1] 16 times, p1, k1. 35 sts.

Rows 6-12: Work in 1x1 Rib.

Second Tier:
Next Row [WS]: K1, [p1, m1] 32 times, p1, m1. 67 sts.

Work 11[13, 13, 13, 13, 11] rows in 1x1 Rib. Place a safety pin or split ring marker at each end of last row worked to indicate end of second tier.

Third Tier:
Next Row [WS]: K1, [p1, m1] 64 times, p1, k1. 131 sts.
Work 1 row in 1x1 Rib.

Begin shaping armhole on next row. AT THE SAME TIME, work 12[12, 14, 14, 14, 16] more rows in 1x1 Rib; there are 14[14, 16, 16, 16, 18] rows in third tier, including first row (increase row). After all rows of third tier are complete, proceed to outer tier. Outer tier begins before armhole shaping is complete; be sure to read ahead.

Shape Armhole:
Next Row [WS]: BO 5[6, 6, 6, 8, 10] sts, work in pattern to end. 126[125, 125, 125, 123, 121] sts.

Decrease Row 1 [RS]: Work in pattern to last 3 sts, ssk, p1.
Decrease Row 2 [WS]: K1, ssp, work in pattern to end.
Repeat these 2 rows 0[0, 0, 1, 1, 2] times more.

Work Decrease Row 1. Work 1 row in pattern.
Repeat these 2 rows 0[2, 2, 3, 2, 3] times more.

Work Decrease Row 1. Work 3 rows in pattern.
Repeat these 4 rows twice more.

Outer Tier:
When last row of third tier has been worked, there will be 121[119, 118, 116, 115, 110] sts.
Note that armhole shaping is not yet complete.

Sizes XS, S, M:
Next Row [WS]: K1, p to last st, k1.

Sizes L, 1X, 2X Only:
Next Row [WS]: K1, p-[-, -, 9, 9, 4], [m1, p5] -[-, -, 19, 19, 20] times, m1, p-[-, -, 10, 9, 4], k1. -[-, -, 136, 135, 131] sts.

All Sizes:
Shaping armhole as set, work 13[13, 15, 15, 17, 17] rows in stockinette st, ending with a RS row and maintaining edge sts in reverse stockinette st. 120[117, 117, 134, 133, 129] sts when armhole shaping is complete.

Shape Neckline:
Neckline is shaped using short rows.
Row 1 [WS]: K1, p25[26, 27, 28, 28, 32], W&T. Place 94[90, 89, 105, 104, 96] unworked sts (including wrapped st) on hold on spare circular needle.
Row 2 [RS]: K1, place marker, k to last st, p1.
Row 3 [WS]: K1, p to marker, remove marker, W&T.
Repeat Rows 2 and 3 8[9, 7, 8, 8, 9] times more, then work Row 2 once more. 17[17, 20, 20, 20, 23] sts remain unwrapped; work measures same as back to beginning of shoulder shaping.

Shape Shoulder:
Next Row [WS]: BO 5[5, 6, 6, 6, 7] sts, p to marker, remove marker, W&T.
Next Row [RS]: K1, place marker, k to last st, p1.
Repeat these 2 rows once more, removing marker on last row.
BO remaining 5[5, 6, 6, 6, 7] unwrapped sts. Do not break yarn. Place all wrapped sts on spare circular needle with other held sts of right front. spacerLEFT FRONT
CO 47[53, 59, 65, 67, 77] sts.
Row 1 [WS]: K1, p to last st, k1.
Row 2 [RS]: P1, k to last st, p1.
Work 12[12, 14, 14, 16, 16] more rows in stockinette st, maintaining 1 st at each edge in reverse stockinette st as set.

Work 14[14, 16, 16, 16, 18] rows in 1x1 Rib (see Pattern Notes), beginning with a WS row and ending with a RS row.

Next Row [WS]: Work 4 sts in pattern, [cdd, p1, k1, p1] to last st 1[1, 1, 1, 3, 1] sts, work remaining st(s) in pattern. 33[37, 41, 45, 47, 53] sts.
Work 49[53, 53, 53, 53, 49] rows in 1x1 Rib, ending with a RS row.

Next Row [WS]: Work 2[6, 4, 2, 4, 4] sts in pattern, [inc 1, p1, inc 1, work 5 sts in pattern] to last st, k1. 43[47, 53, 59, 61, 69] sts.

Note: Read ahead! Armhole shaping begins on next row. Armhole and neckline shaping are worked at the same time.

Work 13[13, 15, 15, 15, 17] more rows in 1x1 Rib, ending with a RS row. Continue in stockinette st until front is complete, working 1 st at each edge in reverse stockinette st.

AT THE SAME TIME, shape armholes as follows:
Next Row [RS]: BO 5[6, 6, 6, 8, 10] sts, work in pattern to end. 38[41, 47, 53, 53, 59] sts.

Decrease Row 1 [WS]: Work in pattern to last 3 sts, p2tog, k1.
Decrease Row 2 [RS]: P1, k2tog, work in pattern to end.
Repeat these 2 rows 0[0, 0, 1, 1, 2] times more.

Work 1 row in pattern. Work Decrease Row 2.
Repeat these 2 rows 1[3, 3, 4, 3, 4] times more.

Work 3 rows in pattern. Work Decrease Row 2.
Repeat these 4 rows once more.

AT THE SAME TIME:
Neckline shaping for sizes XS and S begins after 1 row stockinette st have been worked.

For sizes M, L, 1X, 2X and 3X, neckline shaping begins after -[-, 8, 4, 6, 8] rows 1x1 Rib have been worked after increase row. Next row will be a RS row.

Row 1 [RS]: Work in pattern to last st, W&T.
Row 2 [WS]: Work 1 st, place marker, work in pattern to end.
Row 3 [RS]: Work in pattern to marker, remove marker, W&T.
Repeat Rows 2 and 3 13[14, 17, 20, 21, 21] times more, then work Row 2 once more.
Work measures same as back to beginning of shoulder shaping.

Shape Shoulder:
Next Row [RS]: BO 5[5, 6, 6, 6, 7] sts, k to marker, remove marker, W&T.
Next Row [WS]: P1, place marker, p to last st, k1.
Repeat these 2 rows once more, removing marker on last row.
BO remaining 5[5, 6, 6, 6, 7] unwrapped sts. Break yarn and place sts on st holder.

Edging:
Sew shoulder seams and side seams.

In the next step, sts will be picked up around the entire outer edge of the sweater, including front edges, lower edge and neckline edge. Use longest available US #8/5mm circular needle, or if possible, a series of circular needles.

With WS facing and using yarn attached to right front, p all sts of right front, picking up wraps and working them together with wrapped sts (see Pattern Notes); pick up and p 1 st in each CO st around lower edges of back and left front; pick up and p 3 sts for every 4 rows up left front edge; p wrapped sts of left front neckline, picking up wraps and working them together with wrapped sts; pick up and p 1 st in each BO st across back neckline, ending at right shoulder seam. Join to work in the round.

BO as follows with WS facing: [K2tog, sl st back to left needle] until all sts have been worked. Fasten off, and use yarn tail to bew beginning and end of BO round together. SLEEVES (Make 2)
CO 59[61, 63, 71, 79, 91] sts.
Row 1 [WS]: K1, p to last st, k1.
Row 2 [RS]: P1, k to last st, p1.
Work 12[12, 14, 14, 16, 16] more rows in stockinette st, maintaining 1 st at each edge in reverse stockinette st as set.

Note: As written, sleeve measures 15[15.75, 16.5, 16.5, 17, 17] inches to underarm. If shorter or longer sleeves are desired, work less or more length now. If length is added to another section of the sleeve, texture pattern will not line up.

Work 14[14, 16, 16, 16, 18] rows in 1x1 Rib (see Pattern Notes), beginning with a WS row and ending with a RS row.

Next Row [WS]: Work 4[4, 2, 4, 4, 4] sts in pattern, [cdd, p1, k1, p1] to last st 1[3, 1, 1, 3, 3] sts, work remaining st(s) in pattern. 41[43, 43, 49, 55, 63] sts.

Work 49[53, 53, 53, 53, 49] rows in 1x1 Rib, ending with a RS row.

Next Row [WS]: Work 4[4, 4, 4, 4, 2] sts in pattern, [inc 1, p1, inc 1, work 5 sts in pattern] to last 1[3, 3, 3, 3, 1] sts, work in pattern to end. 53[55, 55, 63, 71, 83] sts.

Note: Read ahead! Armhole shaping begins on next row.

Work 13[13, 15, 15, 17, 17] more rows in 1x1 Rib, ending with a RS row.
Continue in stockinette st until back is complete, working 1 st at each edge in reverse stockinette st.

AT THE SAME TIME, shape armholes as follows:
BO 5[6, 6, 6, 8, 10] sts at beginning of next 2 rows. 43[43, 43, 51, 55, 63] sts.

Decrease Row 1 [RS]: P1, k2tog, work in pattern to last 3 sts, ssk, p1.
Decrease Row 2 [WS]: K1, ssp, work in pattern to last 3 sts, p2tog, k1.
Repeat these 2 rows 0[0, 0, 1, 1, 2] times more. 39[39, 39, 43, 47, 51] sts.

Work Decrease Row 1. Work 1 row in pattern.
Repeat these 2 rows 0[2, 2, 3, 2, 3] times more. 37[33, 33, 35, 41, 43] sts.

Work Decrease Row 1. Work 3 rows in pattern.
Repeat these 4 rows 2[2, 2, 2, 2, 2] times more. 31[27, 27, 29, 35, 37] sts.

Work Decrease Row 1. Work 1 row in pattern.
Repeat these 2 rows 8[6, 5, 6, 8, 9] times more.

BO remaining 13[13, 15, 15, 17, 17] sts.

spacer

FINISHING
Sew sleeve seams, and sew sleeve caps into armholes. Weave in ends and block sweater.
Try on sweater to determine whether you prefer it to be a pullover or a cardigan.
Sew sweater closed or attach closures as desired.

spacer
ABOUT THE DESIGNER

Lori, who lives in Princeton, NJ, with her family, has been knitting and designing for herself for over 30 years. Two years ago, she decided to retire from her “day job” and plunge headlong into hand-knit design.

This marks Lori’s debut publication. You can find more of Lori’s designs at loriversaci.com.

spacer