NAME, a free knitting pattern from Knitty.com. Free knitting pattern for a DETAILS HERE.
INTRODUCTION
Knoop
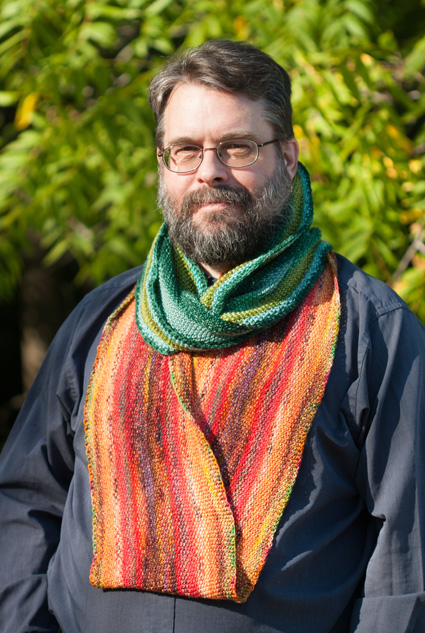 by Danny Ouellette
![]() or
or ![]()
We all have one. That bag, box or huge plastic tote filled with leftover balls from past projects – little scraps accumulated that we just can’t bear to part with.
I had finished making a large shawl project and was getting ready to add the remaining balls into my bin. Seeing it was almost full, I decided I should use up these scraps and make something.
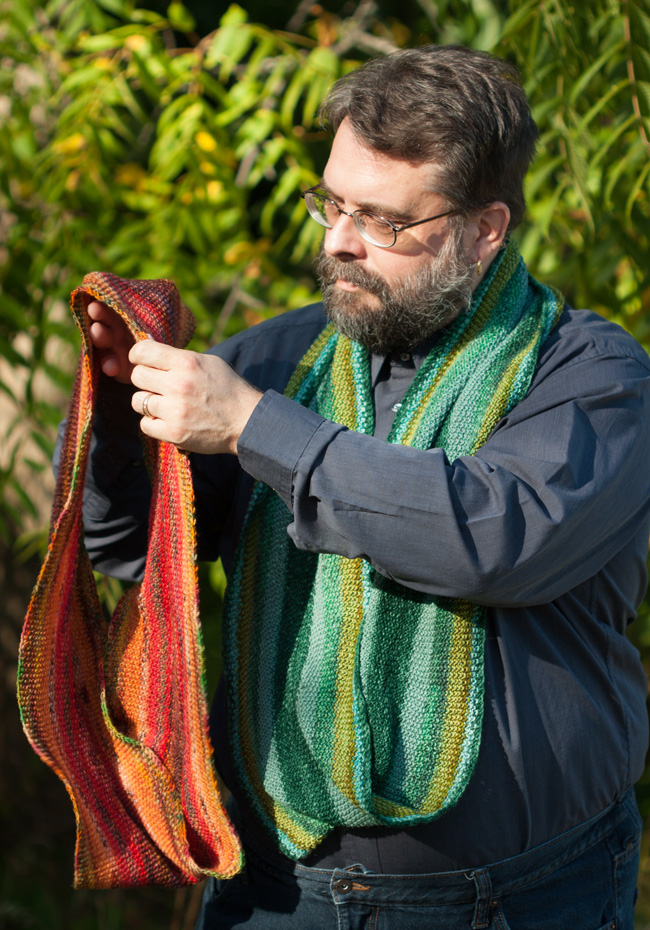
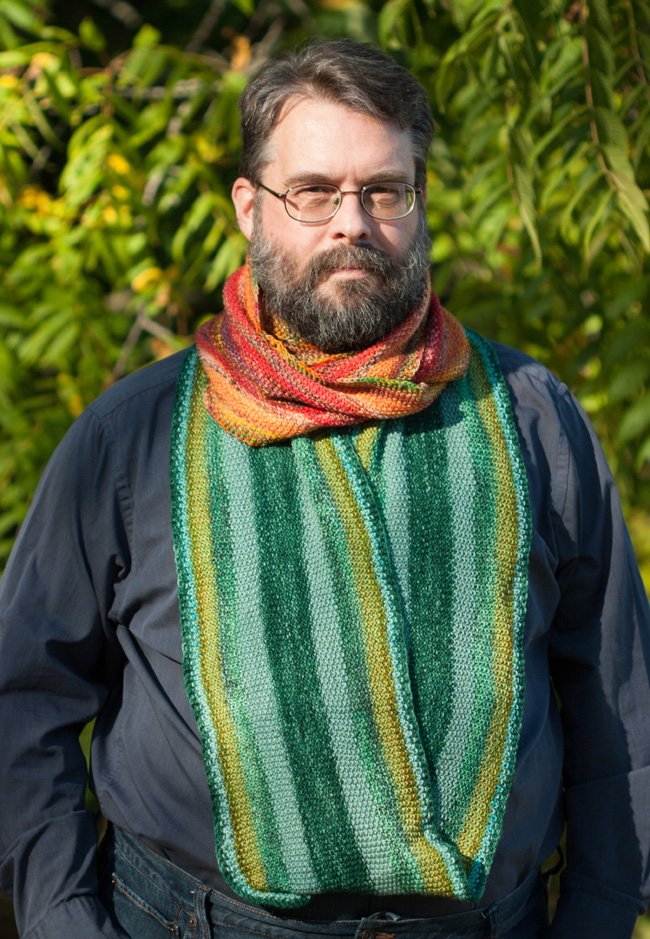
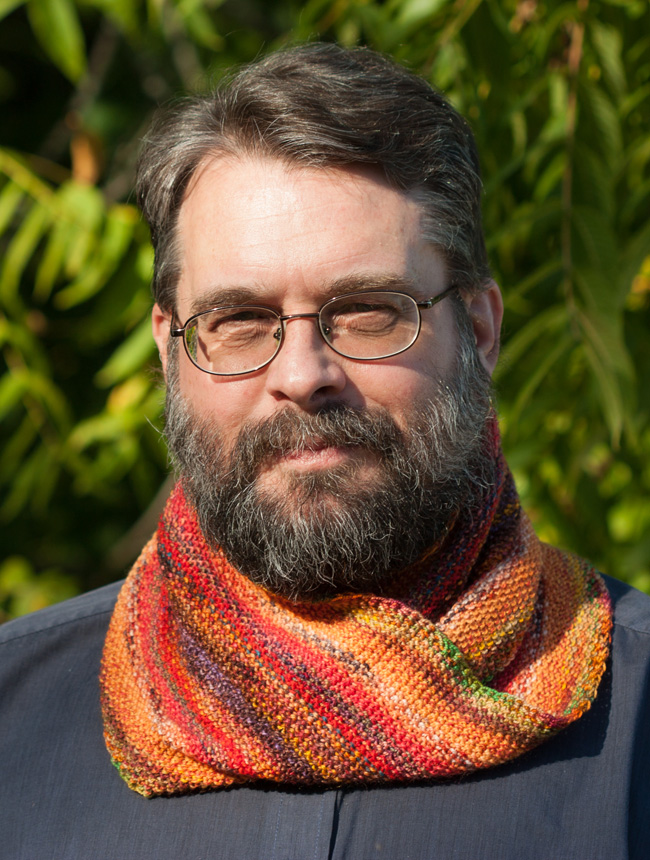
I had about 120 grams of yarn left and knew I could make a nice sized Moebius cowl from it, so I quickly made up this pattern, cast it on and made the blue version of the cowl.
I loved it and I knew I had to make another one! So I dived into my bin and pulled out the twelve colors used in the red-orange version. I joined them together using the Magic Knot Ball method and worked away.
And thus Knoop was born!
The big fun with this pattern is finding your yarns, sorting them into a color progression you like and making up the ball you’ll work from. I've written a tutorial to help guide your color choices so that the finished result looks the way you'd like it to.
Once the first couple rounds are completed the rest of the cowl is an easy, relaxing knit. The seed stitch pattern used blends the colors together and makes for more subtle color transitions.
The size of the cowl can easily be changed by altering your needle size, amount of yarn used and the number of stitches cast on.
Knoop comes in two difficulty levels. The Mellow version is entirely straightforward; it’s a jump-in-right-awa easy project. The Piquant version uses a clever cast on that takes a bit more skill and effort. The difference between the two is in the color distribution. The Piquant version is worked as a true Moebius, meaning that you’re knitting from the center towards the outer edges, so you get to see the last color of your Magic Knot Ball on both edges of the cowl. The Mellow version shows your colors in the order they appear in the ball from the top to the bottom of the cowl. Both versions will create a wonderful one-of-a-kind cowl with fun color changes and an easy-to-wear twist.
 model: Danny Ouellette
 photos: Van Waffle
SIZE
Large[XL]
FINISHED MEASUREMENTS
Depth: 8.5[10] inches/22[25] cm
Circumference: 45[50] inches/114[127] cm
MATERIALS
Yarn
![]() Handmade Fingering-Weight Magic Knot Ball; (approx. 100-120 grams) (see Pattern Notes)
Handmade Fingering-Weight Magic Knot Ball; (approx. 100-120 grams) (see Pattern Notes)
Recommended needle size
[always use a needle size that gives you the gauge listed below - every knitter's gauge is unique]
Piquant:
![]() Large (red-orange version): US #2.5/3mm circular needle, 40 inch/100 cm
Large (red-orange version): US #2.5/3mm circular needle, 40 inch/100 cm
![]() XL (blue-green version): US #4/3.5mm circular needle, 40-47 inch/100-120 cm
XL (blue-green version): US #4/3.5mm circular needle, 40-47 inch/100-120 cm
Mellow (not pictured):
![]() Large: US #2.5/3mm circular needle, 32-40 inch/80-100 cm
Large: US #2.5/3mm circular needle, 32-40 inch/80-100 cm
![]() XL: US #4/3.5mm circular needle, 32-47 inch/80-120 cm
XL: US #4/3.5mm circular needle, 32-47 inch/80-120 cm
![]() A single needle two sizes larger for binding off
A single needle two sizes larger for binding off
Notions
![]() stitch markers, with a contrasting one for the start of the round
stitch markers, with a contrasting one for the start of the round
![]() yarn needle
yarn needle
![]() scissors
scissors
![]() kitchen or small digital scale - optional but recommended
kitchen or small digital scale - optional but recommended
GAUGE
Large: 22 sts/46 rounds = 4 inches/10 cm in Seed Stitch on US #2.5/3mm needles, after blocking.
XL: 20 sts/42 rounds = 4 inches/10 cm in Seed Stitch on US #4/3.5mm needles, after blocking.
Note: it is hard to measure round gauge in Seed Stitch. As long as you are close and you have a fabric you like, that will work fine.
PATTERN NOTES
[Knitty's list of standard abbreviations and techniques can be found here.]
Handmade Fingering-Weight Magic Knot Ball
Read the tutorial on how to choose colors and put them together here.
Instructions for tying the Magic Knot can be found in Jane Richmond's Magic Knot video.
- Collect the yarns that you want to use and order them in a progression you like (see tutorial above for suggestions).
- The Mellow version uses approx. 1 gram of yarn per round, and the Piquant version uses approx. 2 grams.
- Choose a length of yarn that weighs at least 10 grams to complete the cast on and first couple rounds.
- The length of the last yarn depends on the difficulty level of the cowl you are making.
- Mellow: The last yarn should weigh at least 8 grams. The bind off uses about 5 grams. Having 8 grams, will allow for a couple rounds and the bind off.
- Piquant: The last yarn should weigh at least 13 grams. The bind off uses about 8 grams. With 13 grams, you will be able to work two rounds and then bind off.
- Start with the bind off color and wind it into a ball. When the ball weighs the amount needed to bind off your version of the cowl – 5 or 8 grams – tie a slip knot into the yarn. This marks the point at which the bind off needs to begin. Continue winding the rest of that color onto the ball.
- Magic Knot the next color and wind on.
- Repeat adding colors until all colors are used and the ball is wound.
- Wind a ball that is at least 440 yards/400 meters and 100 grams.
Seed Stitch in the round (worked on an even number of stitches)
Rnd 1: (K1, p1) around
Rnd 2: (P1, k1) around
Changing Cowl Size
The cowl can easily be made smaller or larger.
- To make a smaller cowl, start with less yarn or cast on fewer stitches, making sure that an even number of stitches is cast on.
- To make a larger cowl, use a larger diameter needle, more yarn, or cast on more stitches, making sure that an even number of stitches is cast on.
Casting on for the Mellow Version
Work your preferred cast on for working in the round, and when you join, make sure you do put a twist in the round! It can be difficult to see if you’re twisted or not with a round of this size. Just join, work the first round, and when you get to the end of the round, check. If it’s not twisted, it’s easy enough to put one in: grab the last few stitches of the round and twist them around the needle. (This will also twist up the yarn of the join, that’s fine, it won’t be visible in the end result.)
Casting on for the Piquant Version using Cat Bordhi’s Moebius Cast On
If you use the Moebius Cast on, pay special attention to working the first half of the first round. The stitches will appear as triangles of yarn over the needle. You need to work into the middle of the triangle, making sure not to twist it.
Stitches will also be tight on the first half of the first round and it will take extra effort to move the next stitches forward. I suggest working 8 - 10 stitches at a time and then moving new stitches up.
Binding Off (Piquant Version Only)
Use Jeny’s Surprisingly Stretchy Bind Off. When working it for Seed stitch, follow the instructions for the knit stitch when working over a purl, and follow the purl instructions for working over a knit.
DIRECTIONS
Mellow Version
Using your preferred method, CO 250 sts. Place a stitch marker every 50 stitches to make counting easier. Place a contrasting stitch marker to mark the beginning of the round and join for working in the round, being careful to add an intentional twist to the round of stitches.
Work Round 1 of the Seed Stitch in the round pattern, and remove any extra stitch markers except the beginning of the round marker.
Continue in pattern until piece measures desired depth, or until you have reached the slip knot in your final color and 5 grams of yarn remains.
Using the needle two sizes larger in your right hand to work the stitches, BO loosely in pattern. When the last stitch has been bound off break the yarn, leaving a tail to weave in, and pull it through.
Piquant True Moebius Version
Using Cat Bordhi’s method (see Pattern Notes), Moebius Cast On 250 stitches. I suggest placing stitch markers every 50 stitches to make counting easier. Place a contrasting stitch marker to mark the beginning of the round.
Preparation Round: (K1, p1) around.
On the first half of the preparation round, stitches will appear as triangles of yarn on the needle. Work into the middle of the triangle so as to not twist that stitch.
On the second half of the preparation round, the stitches will appear as normal stitches.
You should end the round by working a purl stitch. Sometimes the cast on will leave you one stitch short. If this is the case, just make one additional stitch in the cast on and purl it. There are now 500 stitches on your needle.
Proceed to work the Seed Stitch in the round pattern, starting at Round 2. Remove all extra stitch markers as you come to them, leaving only the beginning of the round marker.
Continue working in pattern till you have reached the final color in your Magic Knot Ball.
Then either work two more rounds or work until you have reached the slip knot in the ball and 8 grams of yarn remains.
Bind off the cowl in the Seed Stitch in the round pattern using Jeny's Surprisingly Stretchy Bind Off.
When the last stitch has been bound off, break the yarn, leaving a tail to weave in, and pull it through.
FINISHING
Wash and gently block your cowl to open up the pattern. See the blocking picture below for how to lay it out. Turn the cowl over after a few hours to allow the underside to dry as well.
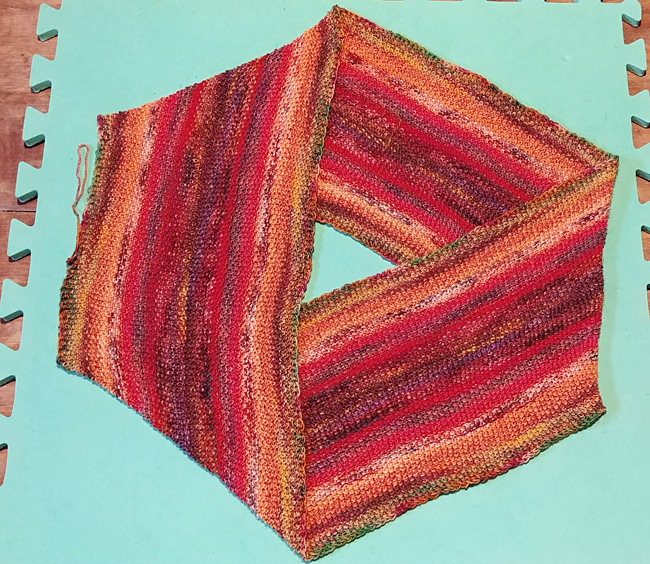
Weave in all ends.
There will be a slight gap between the first and last stitches of the bind off. Start weaving in the yarn tail by putting the darning needle under the first V formed on top of the first stitch bound off and pull the yarn through. Put the needle through the top of the V formed at the last stitch bound off and pull the yarn through. This will create a new V to span the gap. Continue weaving in this yarn end.
Piquant version only
There may be a small hole near the start of the cowl. Weave in the yarn tail around the hole and tighten to close the hole before continuing with weaving in the tail.
ABOUT THE DESIGNER
 Danny Ouellette is a long-time knitter, spinner, dyer and knitwear designer. In 2014, he completed the Ontario Handweavers and Spinners spinning certificate program. He has presented lectures and workshops to several local spinning / weaving and knitting guilds in Southern Ontario and at the Ontario Handspinning Seminar.
He currently lives in Waterloo with his partner and more fiber-related stash and equipment then they know what to do with.
You can find out more about him and his fiber habit online on his website and on Ravelry.
Pattern © 2019 Danny Ouellette; images © 2019 Van Waffle except blocking photo © 2019 Danny Ouellette


