


Gibson, a free knitting pattern from Knitty.com. Free knitting pattern for an open-front cardigan with lace sleeves.
INTRODUCTION
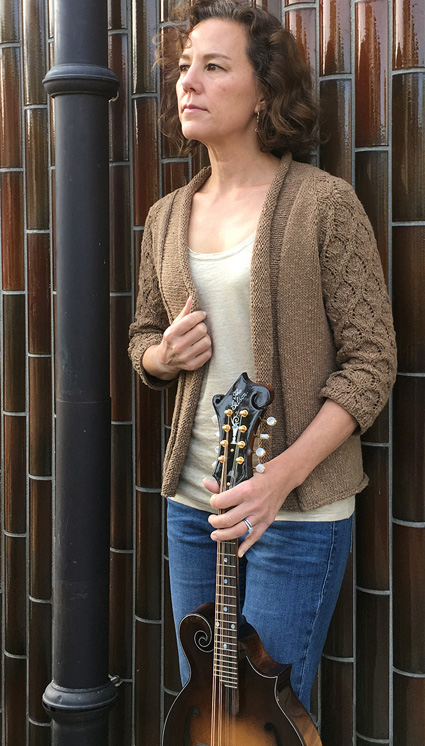
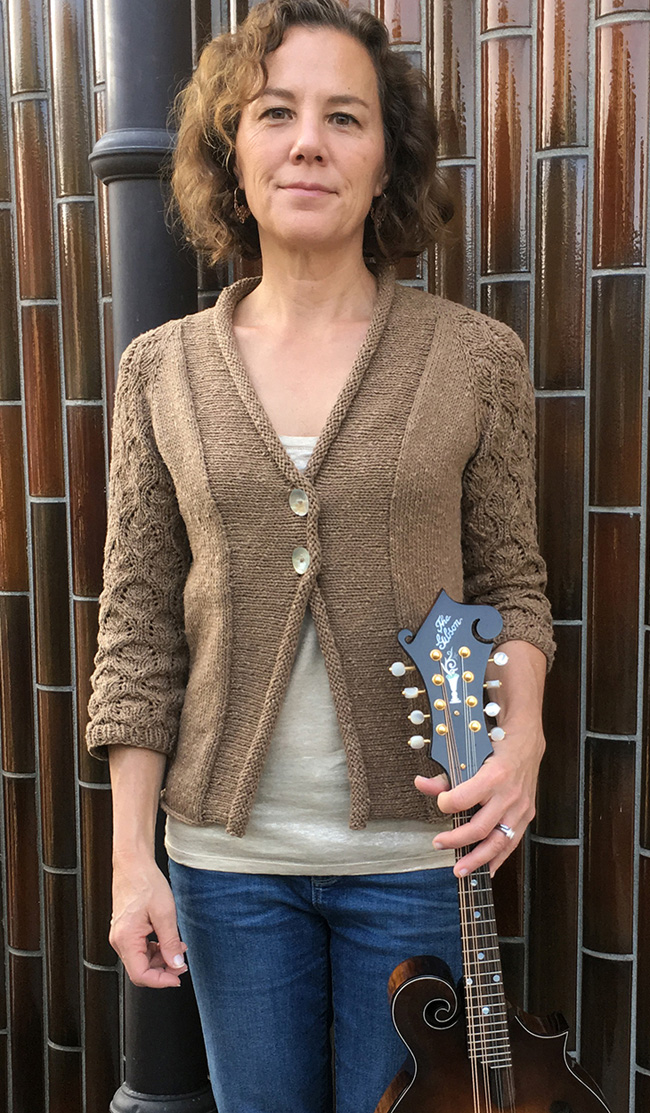
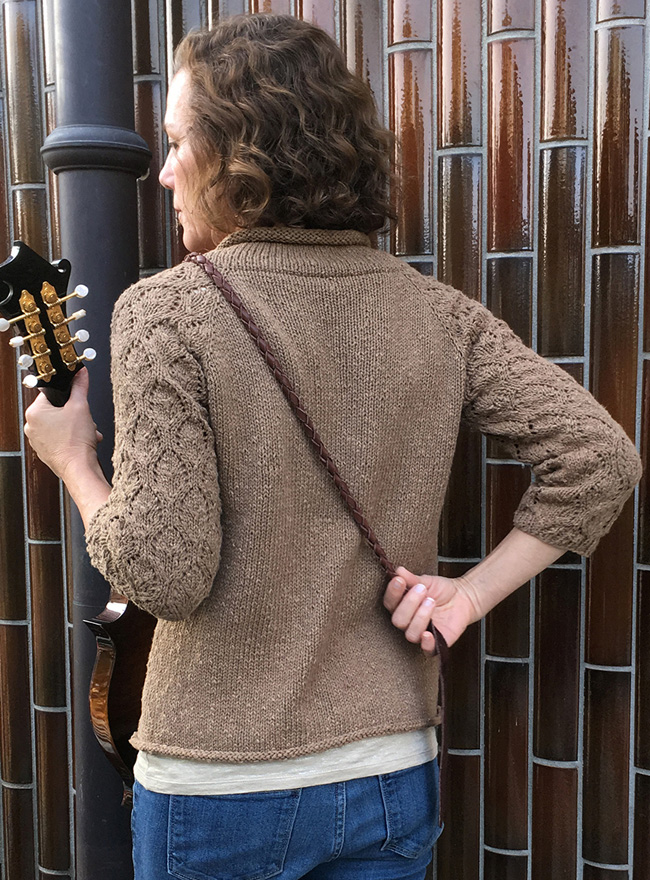
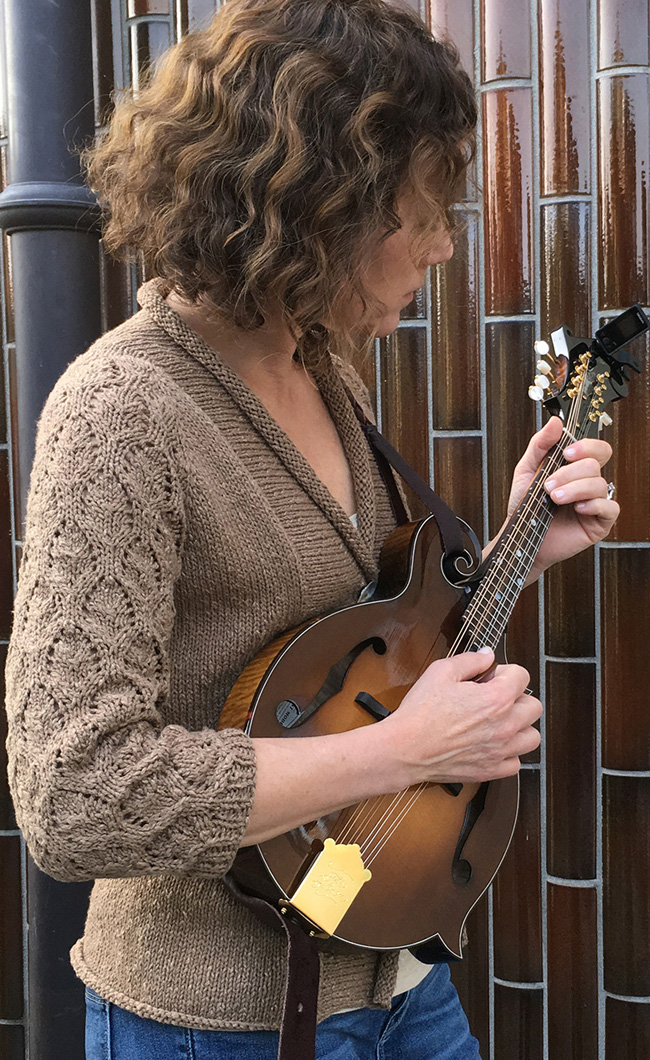
Gibson

I still remember looking at the First Fall 2010 issue of Knitty and spotting the Iced Cardigan, by Carol Feller. I found its simplicity inspiring, and I had never designed a top-down cardigan before, so I was very interested in its construction. The following year, I found the Amiga cardigan by Mags Kandis in the Spring/Summer 2011 issue. Also worked from the top down, at first glance it is very different from Iced: Amiga uses a sport weight yarn worked on larger-than-suggested needles to create an airy, drapey feel, while Iced uses a bulky yarn to create a cozy, substantial garment. One feature they have in common is a wide front band/collar that becomes part of the cardigan fronts, and increases in width for each size. When I looked more closely at both patterns, I realized that another feature they share is that the raglan increases are worked at a wonderfully simple ratio of every right-side row, for all sizes—and that this is made possible by the varying extra width from the front bands. Genius!!
So this cardigan pattern was really inspired by both Amiga and Iced. Like them, it's worked top down, with ¾-length sleeves, and the band/collar is worked from stitches picked up along the front and neck edges. It uses a worsted weight cotton/linen yarn that is similar in texture to the yarn used in Amiga—but like Iced, the fabric is heavy enough to ward off the chill of a late September evening. The body is worked straight, without waist shaping, so it is easily lengthened or shortened (just remember to buy extra yarn for a longer version). The big difference is the lace-patterned sleeves, which add interest to the simple silhouette. I chose the lace pattern so that those every-other-row raglan increases are worked seamlessly into the lace.
The lace motif brings to mind the lyre, an ancient stringed instrument that has given rise to an entire family, including the mandolin. And these days I rarely go anywhere without my beloved Gibson F5, so that is what inspired the name.
P.S. Happy 15th Anniversary, Knitty! And thanks for the chance to be a part of your journey!
 model: Angela Hahn
photos: Tom DeVesto


SIZE
For women's garments: XS[S, M, L, 1X, 2X, 3X]
shown in size S with 1.75 inches/4.5 cm of ease
FINISHED MEASUREMENTS
Chest/Bust: 30.5[34.75, 38.75, 42.75, 46.5, 50.75, 54.75] inches/ 77.5[88.5, 98.5, 108.5, 118, 129, 139] cm
Length: 21.75[22, 22.25, 23, 23.5, 24.25, 24.75] inches/ 55[56, 56.5, 58.5, 60, 61.5, 63] cm
MATERIALS
Yarn
![]() Tahki Yarns Aruba [80% cotton, 20% linen; 98yd/90m per 1.75 oz/50g skein]; color: #004 Driftwood; 9[10, 11, 12, 14, 15, 16] balls.
Tahki Yarns Aruba [80% cotton, 20% linen; 98yd/90m per 1.75 oz/50g skein]; color: #004 Driftwood; 9[10, 11, 12, 14, 15, 16] balls.
Recommended needle size
[always use a needle size that gives you the gauge listed below - every knitter's gauge is unique]
![]() 1 US #7/4.5mm circular needle, 32-inch/81-cm or longer
1 US #7/4.5mm circular needle, 32-inch/81-cm or longer
![]() 1 set US #7/4.5mm preferred needles for sleeve knitting (DPNs or circulars
1 set US #7/4.5mm preferred needles for sleeve knitting (DPNs or circulars
Notions
![]() yarn needle
yarn needle
![]() stitch markers
stitch markers
![]() removable stitch markers
removable stitch markers
![]() stitch holders
stitch holders
![]() 2 one-inch/25mm buttons
2 one-inch/25mm buttons
GAUGE
19 sts/26 rows = 4 inches/10 cm in stockinette stitch
20 sts/27 rows or rounds = 4 inches/10 cm in lace pattern stitch
Note: gauge is always taken after blocking.
PATTERN NOTES
[Knitty's list of standard abbreviations and techniques can be found here.]
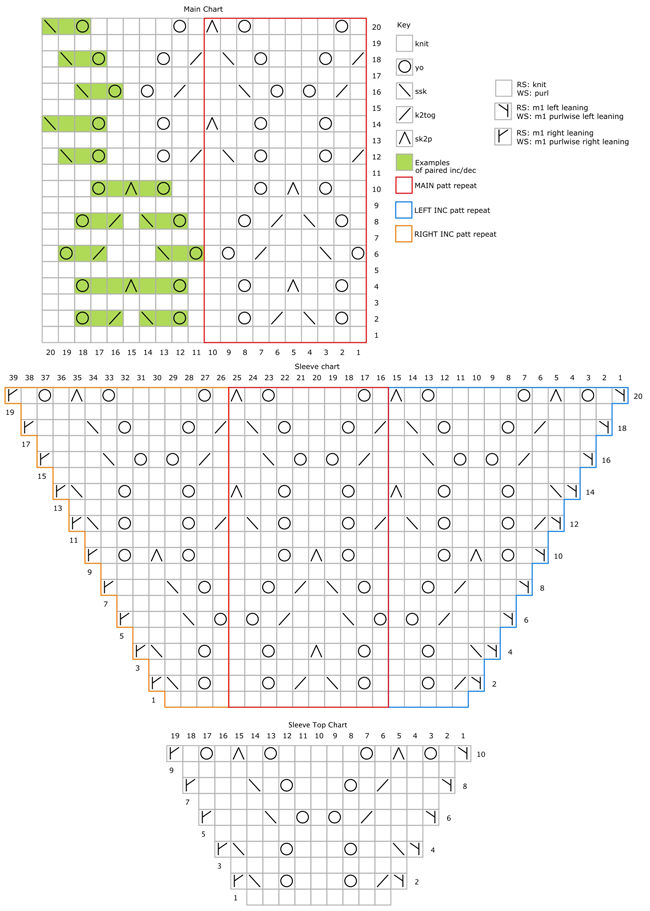
The main lace pattern and sleeve raglan increases are given in chart form only. As increased stitches are worked into stitch pattern, place markers to mark beginning of first full repeat of lace pattern (immediately after double decrease on Main chart Row 20), and end of last full repeat of lace pattern (same). This will aid in staying on the correct raglan increase chart row, working underarm stitches into the lace pattern, and working sleeve decreases.
When working sleeves in the round, there will NOT generally be a full lace pattern repeat at the beginning and end of each round. Instructions are given in the Sleeve section for maintaining the lace pattern near the beginning and end of each round.
Knitted Cast-On
Turn work to WS and *knit one stitch, then return stitch to left-hand needle, taking care not to twist it: one stitch cast on. Rep from * until required number of stitches has been cast on.
Sturdy Cast-On [see photos 3-5 in buttonhole tutorial, under FINISHING]
Turn work to WS. *With yarn in front, insert right-hand needle tip from back to front between first two stitches on left-hand needle, draw loop of yarn through from front to back, and place loop on left-hand needle, taking care not to twist it: one stitch cast on. Rep from * until required number of stitches has been cast on.
CHARTS
charts updated June 28
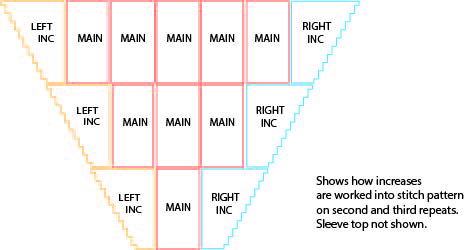
Essential note: When using charts, work 1 rep of Sleeve Top chart [10 rows] followed by Inc and Main charts as pictured [20 rows]. Left Inc and Right Inc charts refer only to position of these charts in relation to Main chart; right and left sleeves are identical. After one rep of Rows 1-20 of Inc and Main charts is completed, there will be 3 reps of Sts 1-10 of Main chart between Left Inc and Right Inc charts. Cont to rep Inc and Main charts as est for as many rows as needed to reach underarm. Lace pattern will then be continued into sleeve using Main chart only.
DIRECTIONS
Yoke
Using circular needle, CO 2 sts, *pm for beg sleeve, CO 9 sts, pm for end sleeve**, CO 26[28, 28, 32, 34, 36, 38] sts, rep from * to **, CO 2 sts. 48[50, 50, 54, 56, 58, 60] sts. Do not join.
Row 1 [WS]: *Purl to beg sleeve m, work Row 1 of Sleeve Top chart; rep from * once, purl to end.
Raglan inc row [RS]: *Knit to 1 st before m, M1R, k1, work Row 2 of chart, k1, M1L; rep from * once, knit to end. 8 sts increased, 1 in each Front, 2 in each Sleeve, 2 in Back. 56[58, 58, 62, 64, 66, 68] sts.
Rep last 2 rows, using subsequent chart rows as described in above Note, 19[22, 24, 26, 28, 30, 32] more times. 22[25, 27, 29, 31, 33, 35] sts in each Front, 49[55, 59, 63, 67, 71, 75] sts in each Sleeve, 66[74, 78, 86, 92, 98, 104] sts in Back, 208[234, 250, 270, 288, 306, 324] total sts.
Sizes XS and S only:
Work 1 row [WS] even in patt.
Sleeve inc row [RS]: *Knit to Sleeve, work next chart row in patt; rep from * once, knit to end. 2 sts inc'd in each Sleeve. 51[57, -, -, -, -, -] sts in each Sleeve, 212[238, -, -, -, -, -] total sts.
Size XS only:
Work 1 row [WS] even in patt, then rep Raglan inc row. 8 sts inc'd.
Work 1 row [WS] even in patt, then rep Sleeve inc row. 4 sts inc'd. 23 sts in each Front, 55 sts in each Sleeve, 68 sts in Back, 224 total sts.
All sizes continue here.
Divide for Body and Sleeves:
Dividing row [WS]: *Purl to beg sleeve m, place sleeve sts on holder (remove beg and end sleeve m, but leave m for beg of first full lace rep and end of last full lace rep in place), turn work and CO 4[6, 10, 12, 14, 16, 18] sts for underarm using Knitted Cast-On [see Pattern Notes]; rep from * once, purl to end. 122[136, 152, 168, 182, 196, 210] sts.
Body
Work even in St st until piece measures 13.75 inches/35 cm, or desired length from underarm CO, ending after a WS row.
Next row [RS]: BO all sts loosely knitwise.
Sleeves
Note: There will NOT generally be a full lace pattern repeat at the beginning and end of each round. The instructions below refer ONLY to the first and last yarnovers of each round; work all other yarnovers as charted.
Work the first and last charted yarnovers of each round as long as the decreases paired with the yarnover can also be worked. Examples of paired increases and decreases are circled on one of the charts. If the stitch count at the end of the round is the same as it was at the beginning, than all paired decreases and increases have been worked properly.
If the decrease paired with the first or last yarnover falls between the yarnover and the beginning or end of the round, the yarnover can be worked as long as it is at least two stitches from the beginning or end of the round—the paired decrease may be moved if necessary so it is next to the yarnover. If either the yarnover or the decrease cannot be worked, eliminate both and knit those stitches instead. If one of the two yarnovers paired with a double decrease (sk2p) has already been eliminated, replace the sk2p with a k2tog if near the beginning of the round, or an ssk if near the end of the round.
On decrease rounds, if the decrease paired with the yarnover falls between the yarnover and the beginning or end of the round, the yarnover can be worked as long as it is at least three stitches from the beginning or end of the round—the sleeve decrease and paired decrease may be combined by working an sk2p at the beginning of the round, and a k3tog at the end of the round.
Place held sleeve sts on preferred needles for sleeve knitting.
Beginning at center of CO underarm sts, pick up and knit 2[3, 5, 6, 7, 8, 9] sts (one for each CO st), work sleeve sts in patt (should be on Main chart row 17[19, 1, 5, 9, 13, 17] ), pick up and knit 2[3, 5, 6, 7, 8, 9] sts (one for each CO st). 59[63, 69, 75, 81, 87, 93] sts. Pm for beg rnd and join to work in the rnd.
Next rnd: Est chart patt over CO sts: Using Main chart (outlined in red) and above Note, and continuing to work subsequent rows of Main chart as est, work CO sts into lace pattern at beg and end of est Sleeve sts. Work 11[11, 9, 9, 9, 9, 9] more rnds even in patt, ending after an odd-numbered chart row.
Dec rnd: Ssk, work in patt to last 2 sts, k2tog. 2 sts dec'd.
Rep Dec rnd every 14th[14th, 12th, 12th, 12th, 12th, 12th] rnd 4[4, 5, 5, 1, 1, 2] more times, then every 10th rnd 0[0, 0, 0, 5, 5, 4] more times. 49[53, 57, 63, 67, 73, 79] sts rem. Work 3[5, 7, 7, 7, 7, 7] rnds even in patt. Last rnd worked should be Main chart Row 9[13, 19, 3, 9, 13, 19] .
Sizes XS, S, M, L, 1X and 3X ONLY:
Final dec rnd: Work patt as est EXCEPT omit all yarnovers. 10[12, 12, 14, 14, -, 16] sts dec'd. 39[41, 45, 49, 53, -, 63] sts rem.
Size 2X ONLY:
Final dec rnd: According to chart, sk2p should fall at beg and end of rnd; instead work ssk at beg of rnd and k2tog at end of rnd; for rest of rnd, work patt as est EXCEPT omit all yarnovers. 14 sts dec'd, 59 sts rem.
All sizes continue here.
Note: When establishing k1,p1 rib on next rnd, beg with p1 or k1 so that a knit st falls on each sk2p from last rnd.
Next rnd: Work in [k1, p1] or [p1, k1] rib as directed in above Note, to 1 st before end of rnd. Pm for new beg of rnd. If last st worked was purled, k2tog (remove old beg of rnd m). If last st worked was knitted, p2tog (remove old beg of rnd m). 1 st dec'd. 38[40, 44, 48, 52, 58, 62] sts.
Work 4 more rnds in rib as est.
Next rnd: BO all sts loosely in patt.
FINISHING
Weave in ends and block to schematic measurements.
Collar/Front Bands
Using circular needle, with RS facing, and beginning at lower right front corner, pick up and knit two sts for every three rows along right front edge, one st for each st along CO neck edge, and two sts for every three rows along left front edge.
Next row [WS]: Purl.
Work in St st until bands measure 2.5[3, 3.5, 3.75, 4.25, 4.75, 5.25] inches/ 6.5[7.5, 9, 9.5, 11, 12, 13.5] cm, ending after a WS row.
Transfer all sts to waste yarn to ensure that front edges meet comfortably over bust. Mark position of two buttonholes on right front band by placing a removable stitch marker in the center st of each 3-st buttonhole, with centers approx 2.5 inches/5 cm apart. Place all sts back on circular needle.
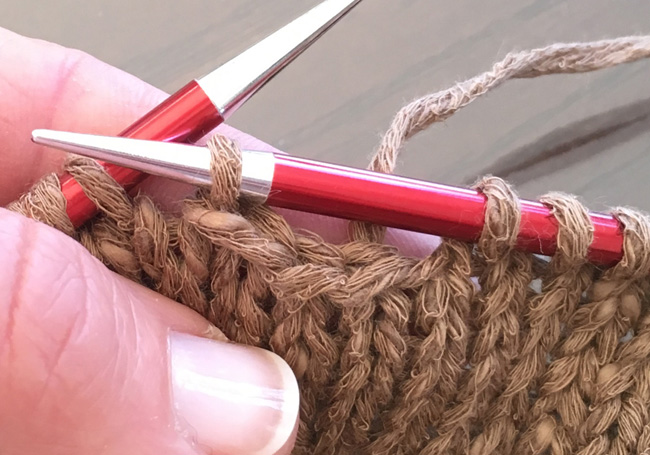
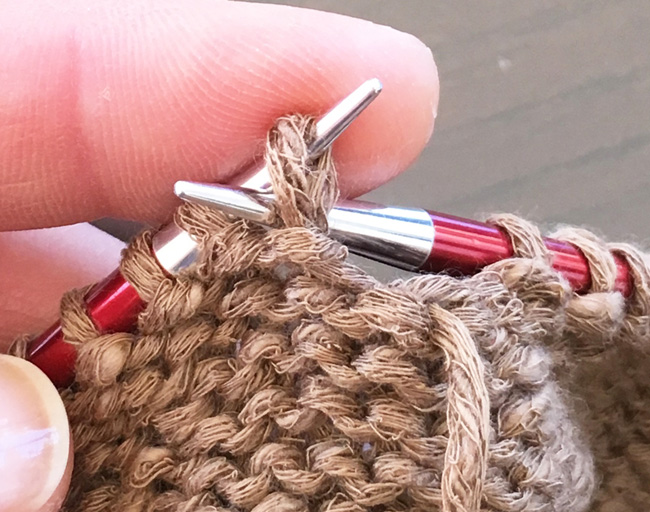
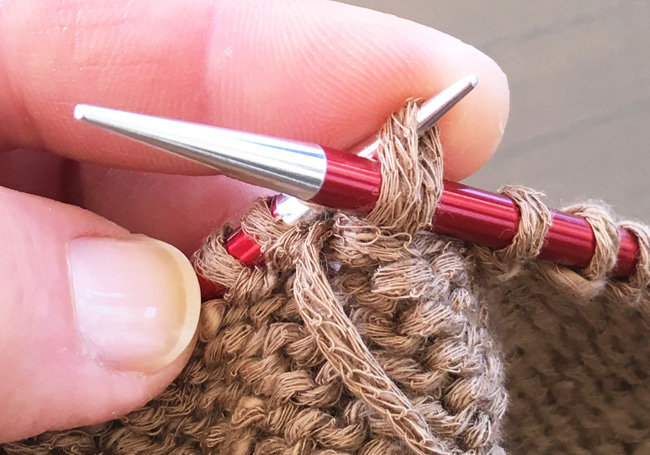
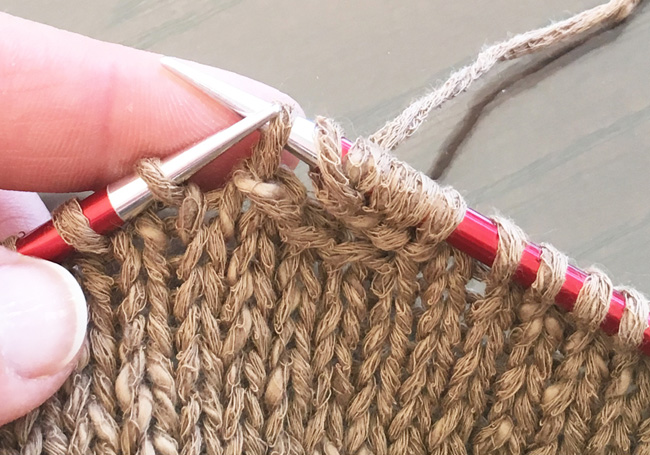
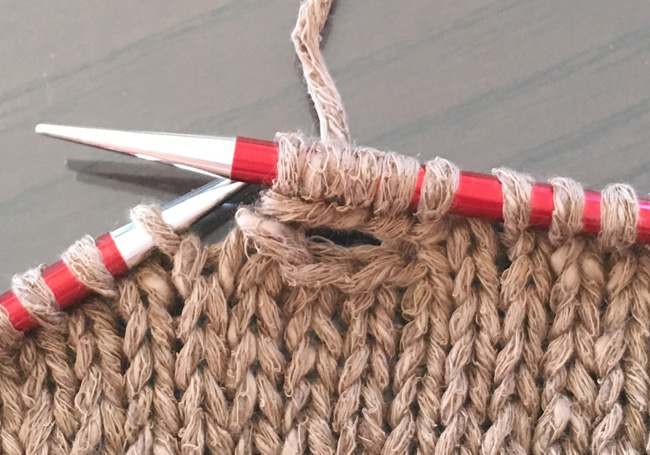
Buttonhole row [RS, photo tutorial below]: *Knit to 1 st before marked st, bring yarn to front, and sl next st purlwise. Bring yarn to back and leave it there [photo 1]. (Sl next st purlwise from left-hand needle and pass first slipped st over it) three times [photo 2], then sl single slipped st remaining on right-hand needle back to left-hand needle. Turn work to WS and use yarn at back to CO 4 sts using Sturdy Cast-On [photos 3-5, also see Pattern Notes]. Turn work back to RS [photo 6], sl first st purlwise from left-hand needle to right-hand needle [photo 7], and pass last CO st over it to close buttonhole [photo 8], then sl st back to left-hand needle and knit it; rep from * for second buttonhole, knit to end of row.
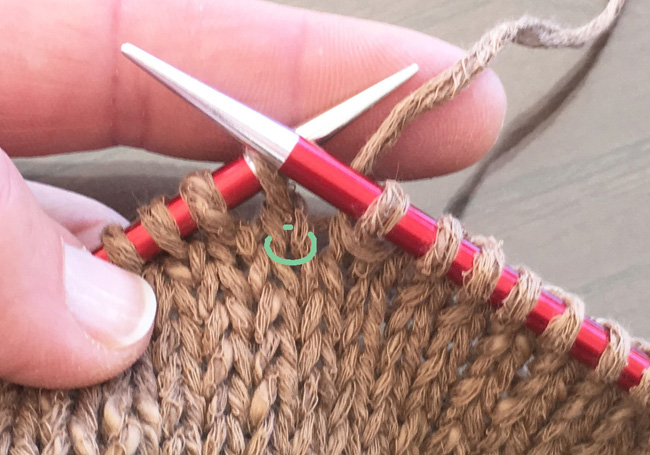
1. Knit to 1 st before marked st, bring yarn to front, and slip next st purlwise. Bring yarn to back and leave it there.
2. 3 sts have been BO. Next step: Slip single slipped st remaining on right-hand needle back to left-hand needle.
3. With WS facing and yarn in front, insert right-hand needle tip from back to front between first two stitches on left-hand needle. Tip will then be used to draw loop of yarn from front to back to create new st.
4. 1 st has already been CO and placed on left-hand needle; to make next st, insert right-hand needle tip from back to front behind both legs of first st, in front of previous st.
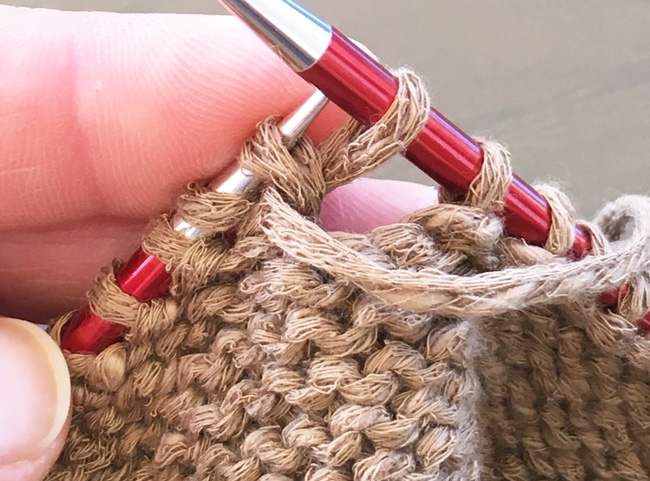
5. Loop of yarn has been drawn through from front to back to create new st.
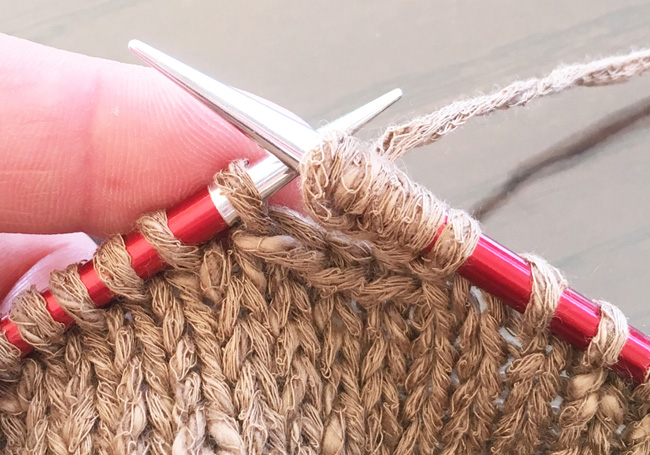
6. 4 sts have been CO and work turned back to RS.
7. First st from left-hand needle has been slipped purlwise to right-hand needle.
8. Last CO st has been passed over slipped st to close buttonhole. Next step: Place slipped st back on left-hand needle and knit it, then proceed with remainder of row.
Work 7 more rows in St st, ending after a WS row.
Next row [RS]: BO all sts loosely knitwise.
Sew buttons to left front band centered over buttonhole row and opposite buttonholes.
Weave in additional ends and block again as needed.

A: Body circumference (does not include front bands): 25.75[28.75, 32, 35.35, 38.35, 41.25, 44.25] inches/ 65.5[73, 81.5, 89.5, 97, 105, 112.5] cm
B: Neck to hem length: 21.75[22, 22.25, 23, 23.5, 24.25, 24.75] inches/ 55[56, 56.5, 58.5, 59.5, 61.5, 63] cm
C: Yoke depth: 8[8.25, 8.5, 9.25, 9.75, 10.5, 11] inches/ 20.5[21, 21.5, 23.5, 25, 26.5, 28] cm
D: Hem to underarm length: 13.75 inches/35 cm
E: Back neck width: 5.5[6, 6, 6.75, 7.25, 7.5, 8] inches/ 14[15, 15, 17, 18.5, 19, 20.5] cm
F: Sleeve length: 11.75[12, 12.5, 12.5, 13, 13, 13.25] inches/ 30[30.5, 32, 32, 33, 33, 33.5] cm
G: Upper sleeve circumference: 11.75[12.25, 13.75, 15, 16.25, 17.5, 18.5] inches/ 30[31, 35, 38, 41.5, 44.5, 47] cm
H: Cuff circumference: 8[8.5, 9.25, 10, 11, 12.25, 13] inches/ 20.5[21.5, 23.5, 25.5, 28, 31, 33] cm
ABOUT THE DESIGNER
 Angela Hahn's designs can be found on her Ravelry designer page.
Her first book of knitting patterns, Knitted Tanks and Tunics: 21 Crisp, Cool Designs for Sleeveless Tops, was released on April 1st, 2018.
Pattern & images © 2018 Angela Hahn.