| In the previous
issue I promised to talk about picking up
stitches along curved edge -- for our purposes,
a neckline. Of course I wound up with the deadline
upon me and nothing on the needles that was
close to a neckline. So I ripped back the mock
turtleneck of Sweetness, bound off for the front
then worked a few rows back and forth for the
back of the neck in order to take these pictures.
I have cannabalized a sweater for you, Dear
Readers. I'm just hoping I can get it back the
way it was afterwards. Or maybe I should let
myself be inspired by the Fix-a-thon sweeping
the knitting blogosphere and turn it into a
V-neck? Turtlenecks, I've realized, don't suit
me.
Picking up stitches along
a neckline is a bit of a mixed bag. You'll be
picking up stitches from the top of the stitch,
along a slant, and perhaps even just knitting
on some stitches that were being held on a holder.
This is definitely something that's easier to
do if you're a bit relaxed about the process.
If the final product fits and looks the way
you want it to, then an extra stitch here or
a little fudging there aren't the end of the
world.
Here's few random thoughts
before we begin with the details.
Your pattern is likely to
tell you to pick up a certain number of stitches
for the entire neck or for each section of the
neck. To make your life much easier, place markers
around the neckline every 2-3 inches...
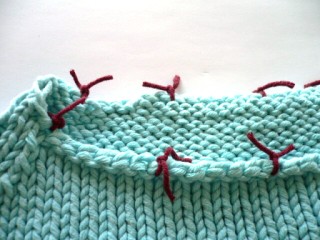
... and then count the number
of spaces between markers. Divide the total
number of stitches to be picked up by the number
of spaces and you'll know how many stitches
you'll need to pick up for each space. I tend
to get caught up in doing the actual picking
up and before I realize it I've picked up the
total number of stitches before getting halfway
round the neck. With only a couple of inches
you can more easily keep your focus.
If you do finish and then realize
you've got an extra stitch or two, don't worry --
just decrease them on the following row. In fact,
it may be a good idea to pick up a stitch or two --
especially in the corners where holes sometimes appear
-- then knit two stitches together on the following
row to tighten things up. Another way to tighten things
up is to knit all the stitches through the back loop
on the following row.
Be sure to bind off quite loosely,
either by using a larger needles while binding off
or by using a particularly flexible method (try doing
a google search for "invisible
bind off" for instructions). There's nothing
worse than having the triumph you feel at completing
a garment turn to despair upon having it refuse to
go over your head. And a too-tight edge will
wear out quickly from the stress of putting on and
taking off; then you're in for a real mess because
you likely won't notice the broken yarn until it's
unravelled itself back down the neck and taken several
of its neighbors with it. Do I speak from experience
on both these subjects? Yes. Yes, I do.
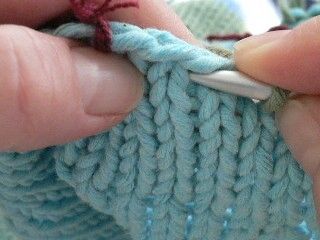
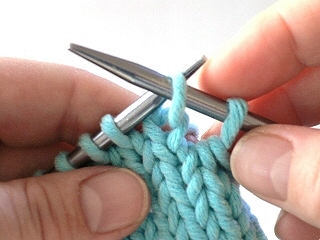
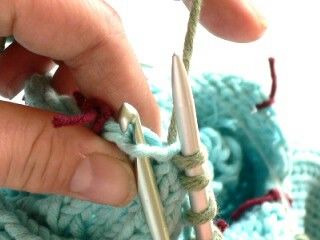
Most necklines have a straight edge
with bound-off stitches on the back and the front.
To pick up stitches just below the bound-off edge,
insert the needle into the center of the stitch below...
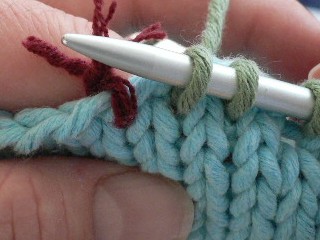
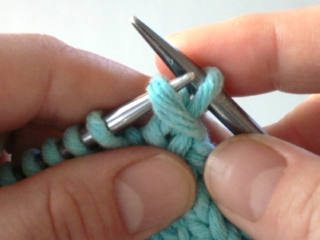
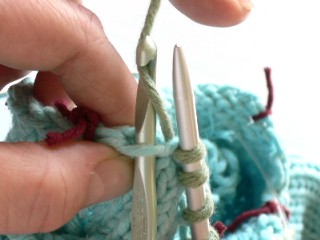
...wrap and pull through.
The results should look like this...
...and once you've picked up all
the stitches, you will continue the knitting upwards
as normal. By the way, if you want to pick up stitches
from a cast-on edge and knit it downwards, pick up
the stitches from in between two stitches rather
than in the center of one.
Before we move on to picking up
stitches along the sloped edge, let me mention something
here that I've found incredibly useful.
Many, if not most, neck shapings
(as well as shoulder shapings) have you binding off
one or more stitches on every other row several times.
Simply binding off those stitches in the usual way
leads inevitably to a distinctive stair-step edge.
This technique (which I first read about in Vogue
Knitting) prevents this problem beautifully.
On the row just before
the bind-off row, knit to 1 stitch before the
end :
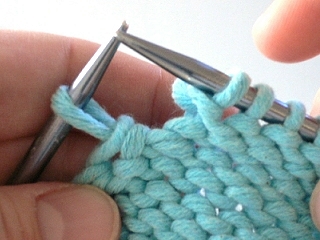
Do not work that last stitch.
Instead, turn the work (being careful not to
drop that single stitch off the needle). Ignoring
the unworked stitch on the right hand needle
for a moment, slip the next stitch on the left
hand needle as if to purl.
You now have two stitches
on the right hand needle. Pass the first stitch
(the one that was unworked from the previous
row) over the second (the one that you just
slipped).
This equals 1 stitch bound
off. If the pattern says to bind off several
stitches, just continue to bind off the remaining
stitches in the normal binding-off manner. It's
amazing how neat and tidy a slope this makes.
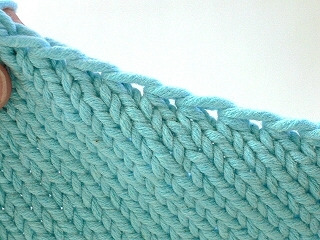
See?
Now. To pick up a stich from
a sloping edge, insert the needle into the front
half of the edge stitch...
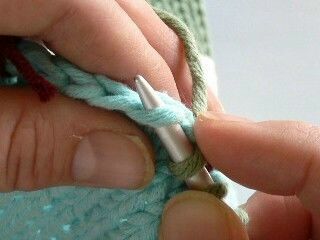
then wrap...

and pull through.
If you find this difficult,
then a crochet hook is always a helpful tool
when picking up stitches.
Insert the hook through the
front half of the stitch...
Grab the yarn with the hook...
and pull through.
Now you're ready to knit your
neck band however you see fit. Just makes sure
it's one that suits you!
|