Picking up stitches, picking
up stitches...seems like no matter where you
turn, you're being asked to pick up stitches.
Sock heels, button bands, neck edgings, ear
flaps, glove fingers, hat bands... knitting
patterns are full of places where you want
to add more stitches to an existing piece
of knitting in order to knit in another direction
or finish it off somehow.
I get the impression that
there's a bit of head scratching going on
when knitters come across these instructions
for the first time. And to make the matters
even more confusing, some instructions say
to "pick up sts" while other instructions
say to "pick up and knit sts". What's
the difference?
I've seen knitting patterns
use the expression "pick up" a certain
amount of stitches that were being held on
a stitch holder or spare piece of yarn --
that's simply referring to returning them
to your needles. And I really hadn't
given any thought to the difference between
"pick up" and "pick up and
knit" until I was helping to translate
an American toe-up sock pattern for an extraordinarily
talented Norwegian knitter. She (quick as
a flash and without using any extra yarn)
slipped her needle under each of the stitches
along the heel edge, gathered them up on one
needle and looked at me for the next line
of instructions. And it suddenly occurred
to me why the "and knit" is added
-- not everyone thinks the same way.
There are, as always, several
ways to pick up stitches depending on the
area of knitting you're working on. Of course
if it were straightforward, I wouldn't be
writing about it, would I? In this issue,
we'll focus on picking up stitches along a
vertical straight edge, as for a sock gusset
or button band. Stitches are picked up along
these edges in order to start knitting again
at a right angle to the direction of the main
body of knitting.
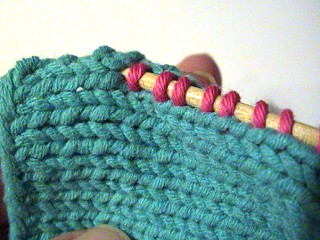
Let's talk first about picking
up stitches along a slipped-stitch edge, which
is very common when knitting heel flaps for
socks. To make a slipped-stitch edging in
the first place: on the knit rows, hold the
yarn in the back of the work and slip the
first stitch of the row as if to knit. On
purl rows, hold the yarn in front and slip
the first stitch as if to purl. By doing so
you're only working the edge stitch every
other row. This makes an edge stitch which
looks like an elongated V, resembling a large
knit stitch, as you see in the picture below.
And it also means that as you pick up stitches
through these edge stitches, you'l be picking
up 1 stitch for every 2 rows of knitting.
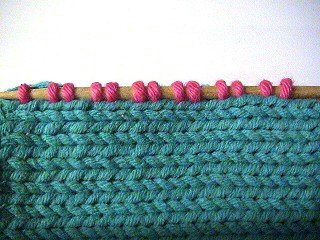
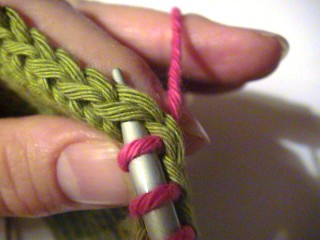
To "pick up and knit"
along a slipped-stitch edge, insert the working
needle under both sides (or one side if it
suits you or the directions specify) of the
V-shaped elongated edge stitch...
Then wrap the yarn around
the tip of the needle...
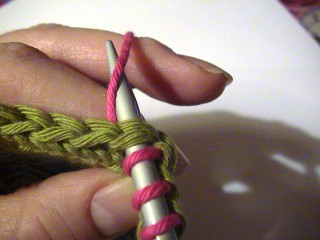
and pull the yarn back through
the loops and onto your needle.
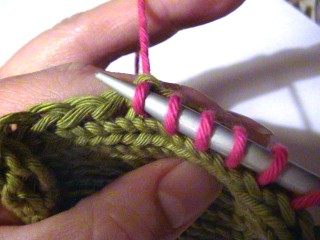
Repeat until all the stitches
you need to pick up and knit are picked up
and knitted. If you're having trouble performing
this little trick (and trust me, you aren't
alone) it may be a good idea to use a crochet
hook to pull the yarn through the loops. Work
stitch by stitch, slipping each newly created
stitch onto the knitting needle before moving
on to the next. Trying to pick up several
stitches at a time on the crochet hook isn't
a terribly good idea since when you try to
return the stitches back to the knitting needle
they inevitably wind up being a bit looser
than is ideal. Another way to correct looseness
is to knit the picked up stitches through
the back loop on the following row.
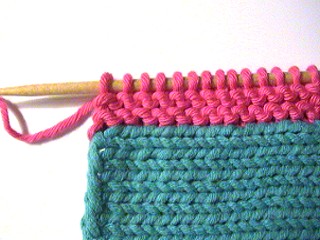
Now let's move on to picking
up stitches for a button band on a cardigan.
A slipped-stitch edge in this particular situation
is neither necessary nor advisable because
you'll want to pick up more stitches than
just one every two rows. If you're working
from a pattern, the number of stitches to
be picked up will likely be specified. However,
that number is entirely dependent on the fronts
being exactly the length that the designer
intended. If you pick up too many stitches,
the band will flare or ripple. If you pick
up too few, the rest of the cardigan will
hang from the button band in a very unflattering
way.
Since the length of button
band is so crucial to a professional-looking
result, you'll want to be sure all your finishing
work -- sewing up and blocking -- is properly
done first so the measurements you take are
correct. Lay the finished garment out flat
on a large work surface and measure the front
edges where the button band is to be picked
up. Check and see if the front edges are the
same length as the designer indicates in the
pattern. If it is, you'll soon be ready to
start.
If it's not exactly the
same but you can live with the length, don't
panic! Try reading the rest of the pattern
and see if your actual length is the same
as one of the other sizes given in the pattern
and work with the number of stitches to be
picked up for a front that is of that
length.
If that doesn't help, try
working out the math. Imagine the pattern
indicates the front is to be 16 inches long
and says you're to pick up 100 stitches along
those 16 inches. You block and measure and
discover your front is, in fact, 18 1/4; inches
long. Maybe you even tweaked the pattern for
it to be that length. Now you can use the
following formula to work out the number of
stitches you'll need to pick up:


 Using
our example, I'll multiply 18 1/4 (or 18.25)
inches by 100 stitches which equals 1825.
1825 divided by 16 inches equals 114.0625
stitches that you'll need to pick up for your
button band. Make sure the number makes
sense ... and in this case it does since you
would be picking up more stitches for a longer
front ... and round it up or down to the nearest
stitch -- in our case, 114 stitches. Then
sit back and be proud that you made it work
Using
our example, I'll multiply 18 1/4 (or 18.25)
inches by 100 stitches which equals 1825.
1825 divided by 16 inches equals 114.0625
stitches that you'll need to pick up for your
button band. Make sure the number makes
sense ... and in this case it does since you
would be picking up more stitches for a longer
front ... and round it up or down to the nearest
stitch -- in our case, 114 stitches. Then
sit back and be proud that you made it work